SURBURBAN BRAKE AND STEERING UPGRADES WITH CLASSIC PERFORMANCE PRODUCTS
JEREMY RICE . August 16, 2019 . C10 Builders Guide
Share Link
Save ArticleLogin to save it
BRAKE AND STEERING UPGRADES WITH CLASSIC PERFORMANCE PRODUCTS
WHEN IT COMES TO CLASSIC STREET TRUCK PARTS, CLASSIC PERFORMANCE PRODUCTS IS A NAME THAT IS VERY WELL KNOWN TO THE INDUSTRY. CPP has been around for 41 years and carries parts for a wide variety of vehicles. When it comes to the popular C10 trucks, the company has just about anything you could need, from LS engine swap parts, suspension parts and steering to brake parts. So, when we needed some parts for our Suburban project, we knew where to turn to for help.
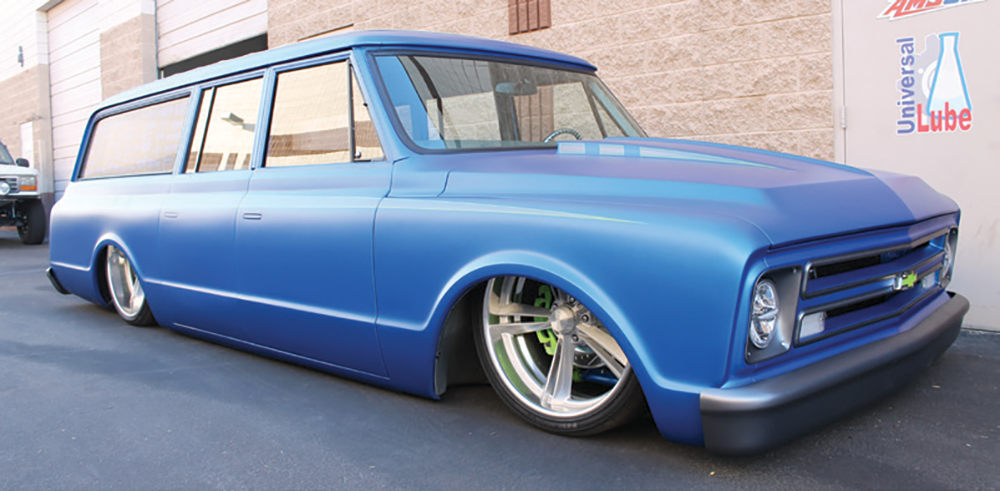
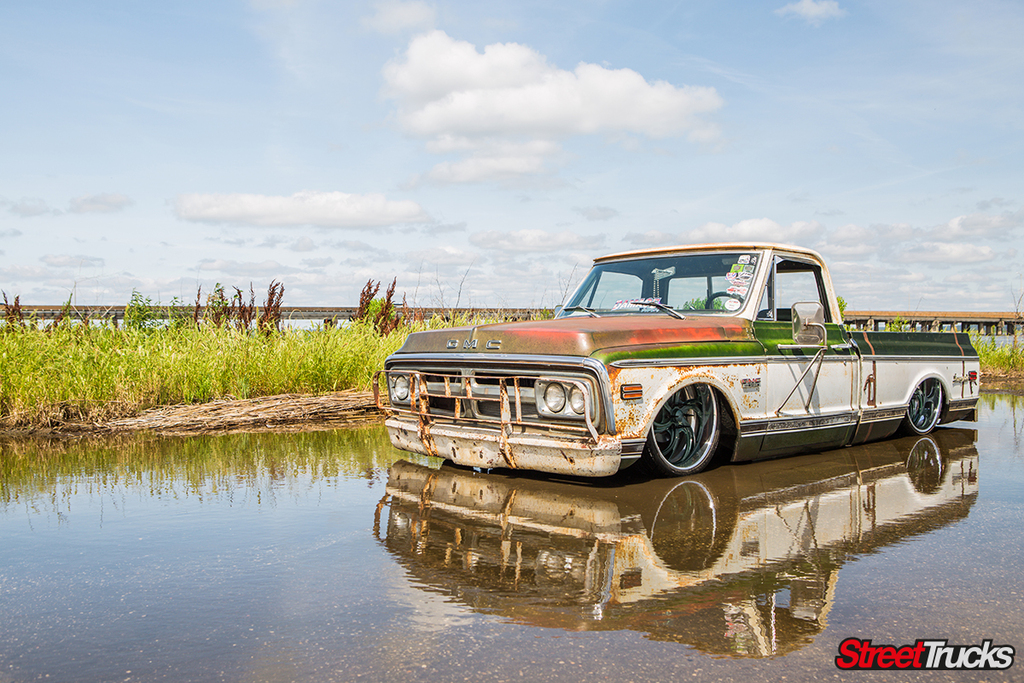
Currently, we are doing a full build on a 1970 Chevrolet Suburban. There are big plans for this truck, and it will definitely be a head-turner when it is completed. The plan is to lay the ‘burban out on big wheels with a bright blue paint job. The project has been dubbed the “Blues Traveler” because the truck will be driven almost everywhere it goes. Powering the truck will be a 525hp LS3 engine, so we knew we were going to need a good set of brakes on all four corners to bring this big ol’ truck to a stop. That’s where CPP comes into play.
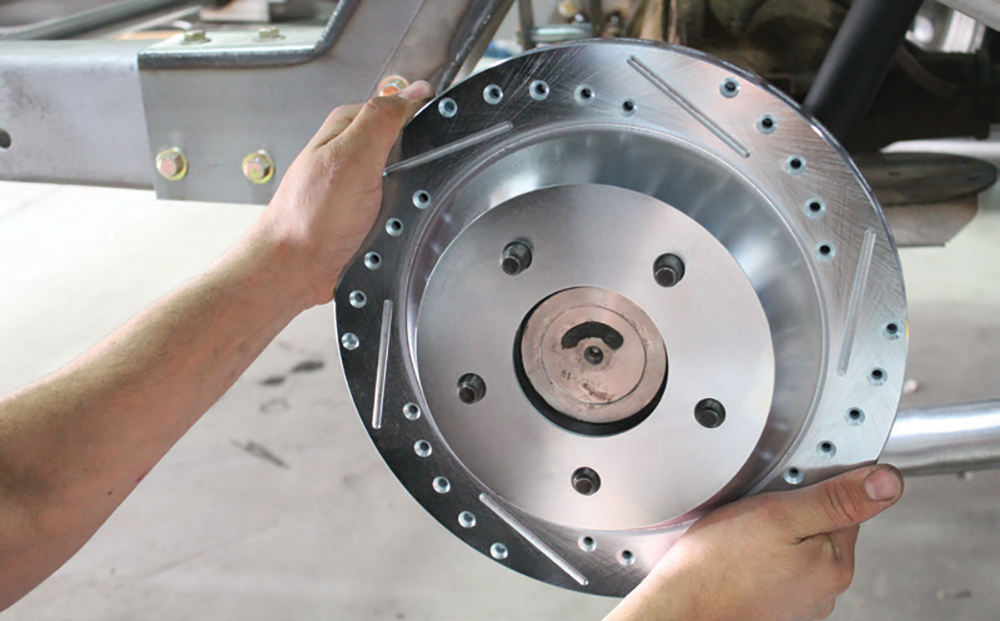
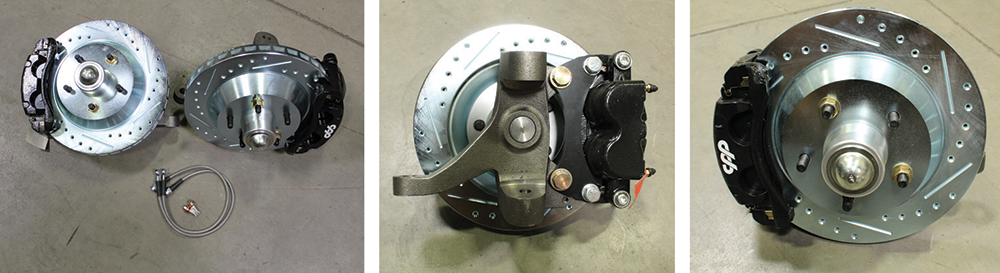
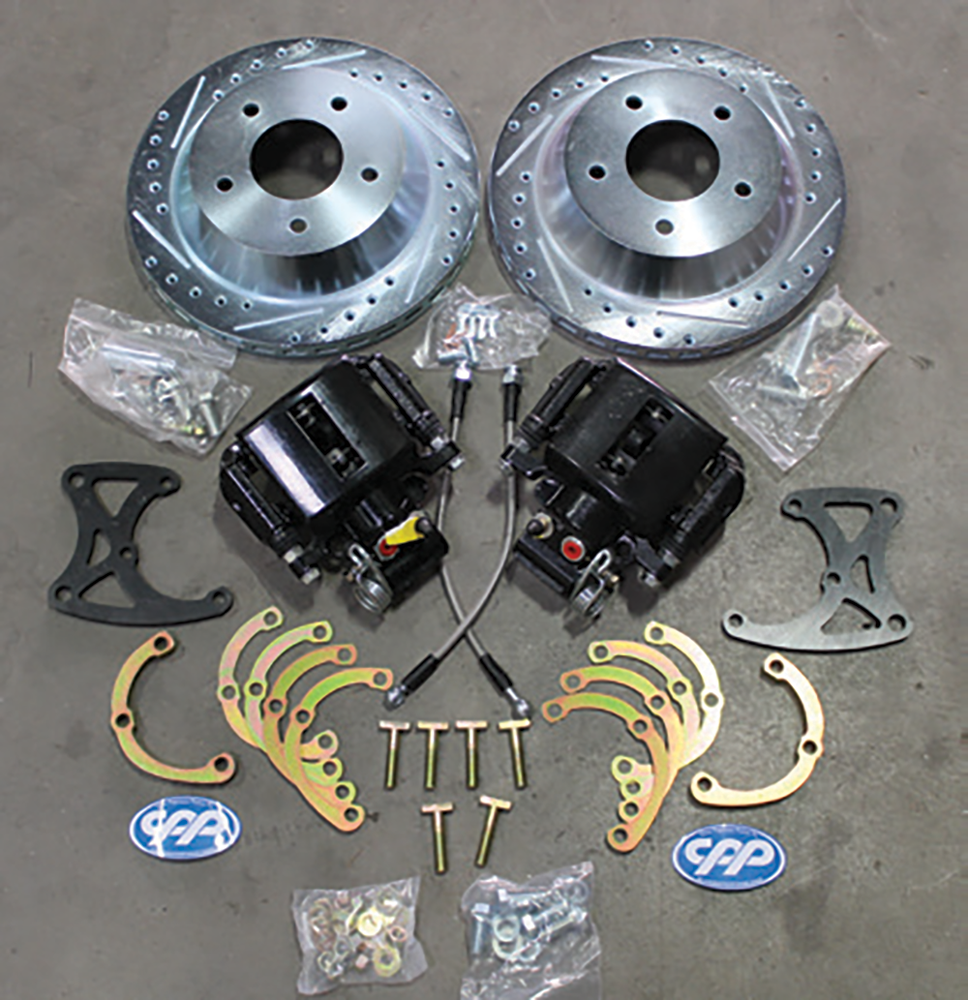
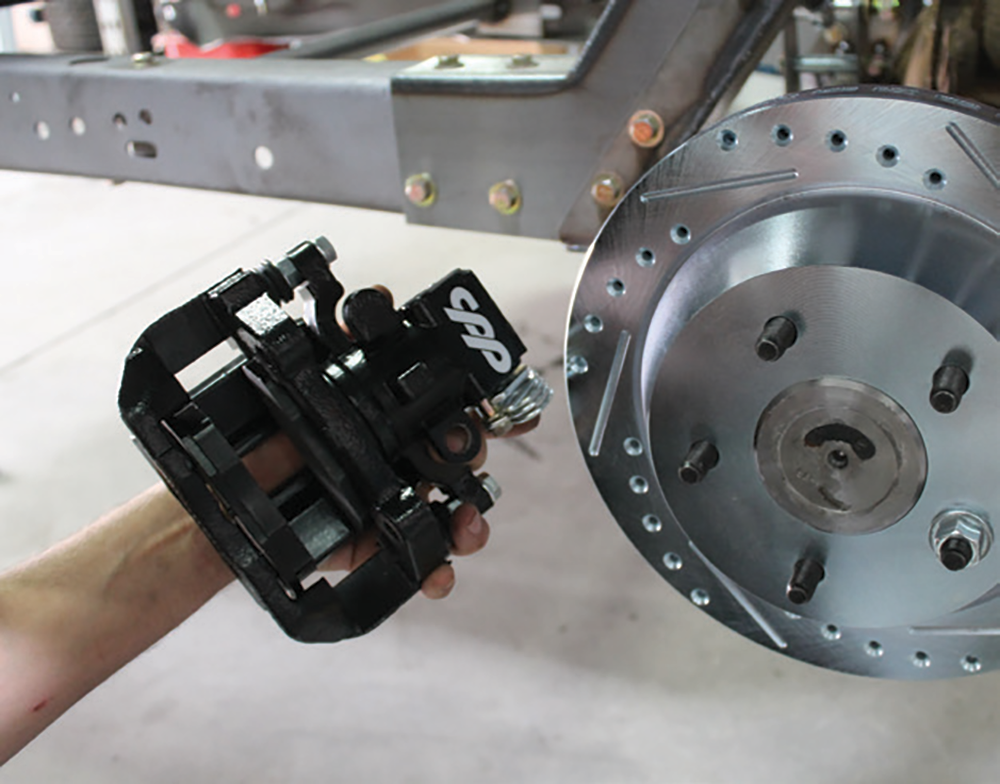
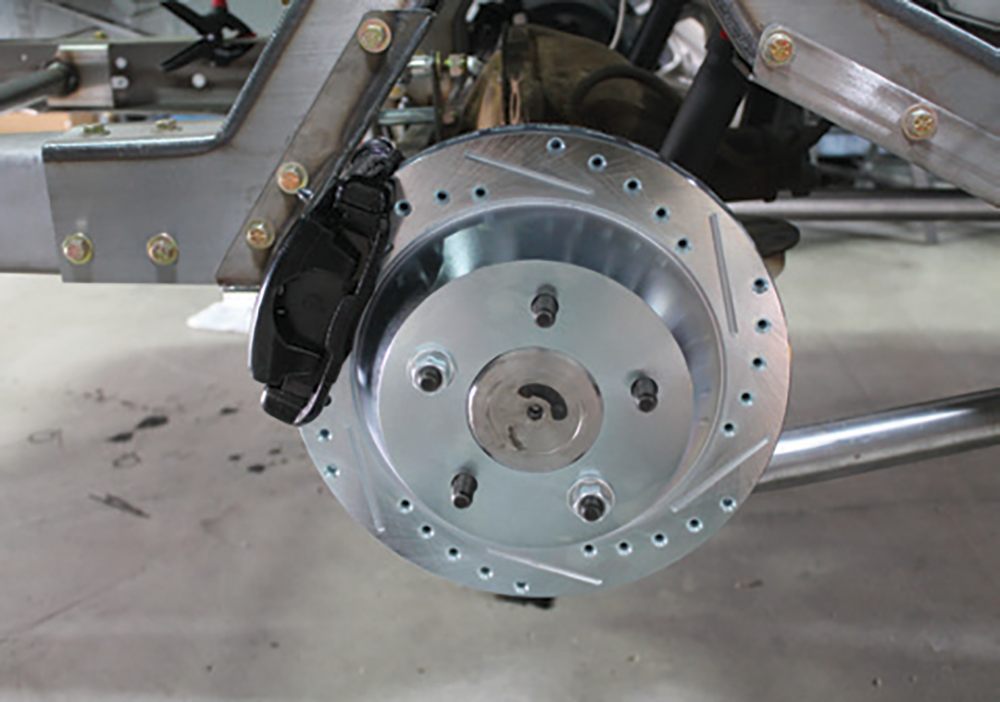
After talking with the folks over at Classic Performance Products, we decided to go with the complete big disc brake setup for the front and rear of the truck. The complete kit addresses the lack of stopping power of the factory brakes by increasing the front rotor size to 13 inches. The new front rotor is also cross-drilled and slotted. The new front caliper is bigger in size when compared to the stock caliper and is a dual-piston design for more clamping force. Outback, the drum brakes will be swapped out and replaced with a 12-inch cross-drilled and slotted rotor with a single-piston caliper.
When doing a complete brake swap like this, it’s also necessary to change out the master cylinder and booster. CPP had us covered there, with a brand new “show stopper” hydraulic brake assist master cylinder and booster kit. One last thing we ordered from CPP was one of its direct replacement steering columns for the ’67-72 Chevy trucks, and its universal column mount that we will install on the firewall of the truck.
Since this project is a complete build, we documented the initial mock-up stages; however, we wanted to show you the finished product, so we waited until the truck was completed to finish this article. Check out the process of installing all these parts from Classic Performance Products—and the awesome end result.
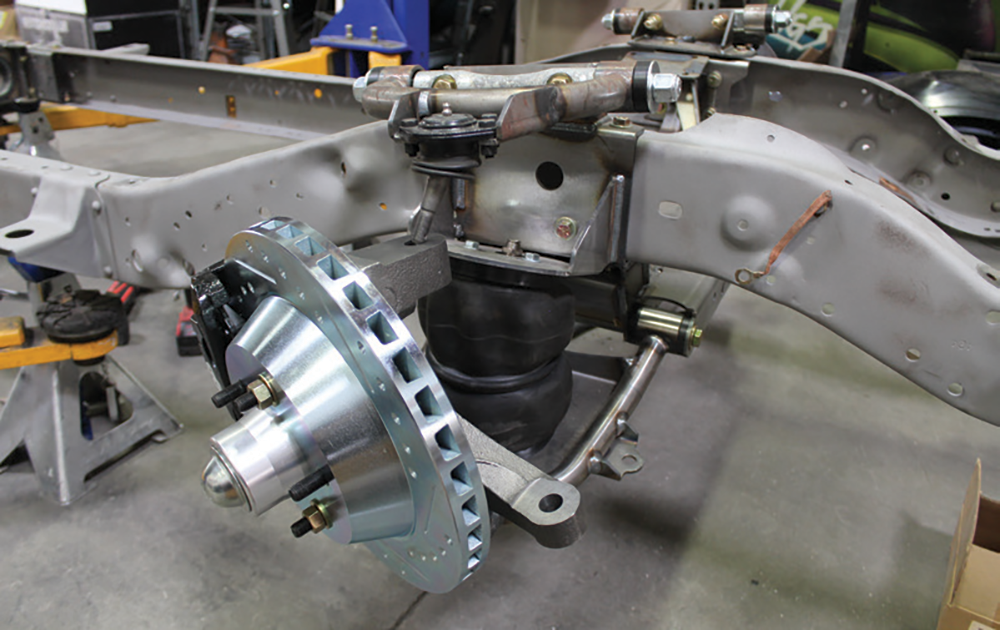
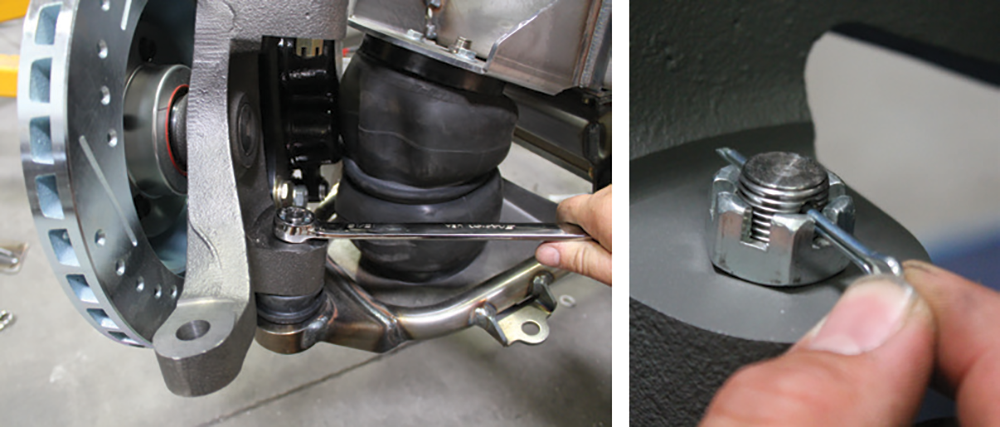
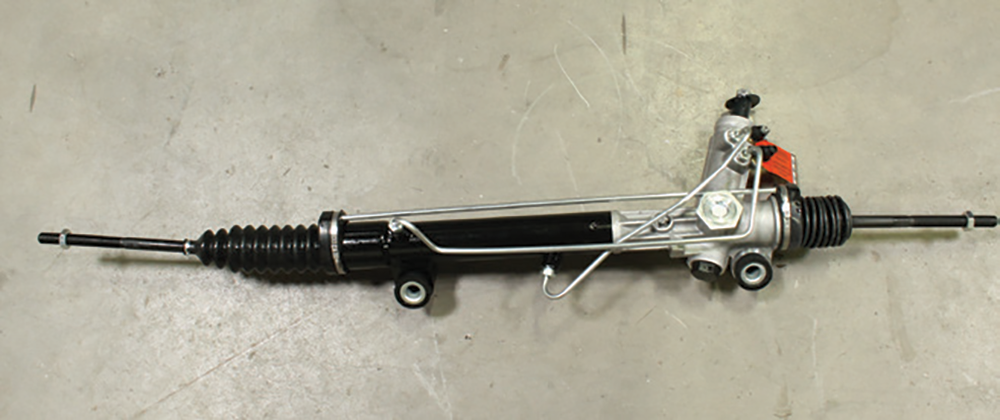
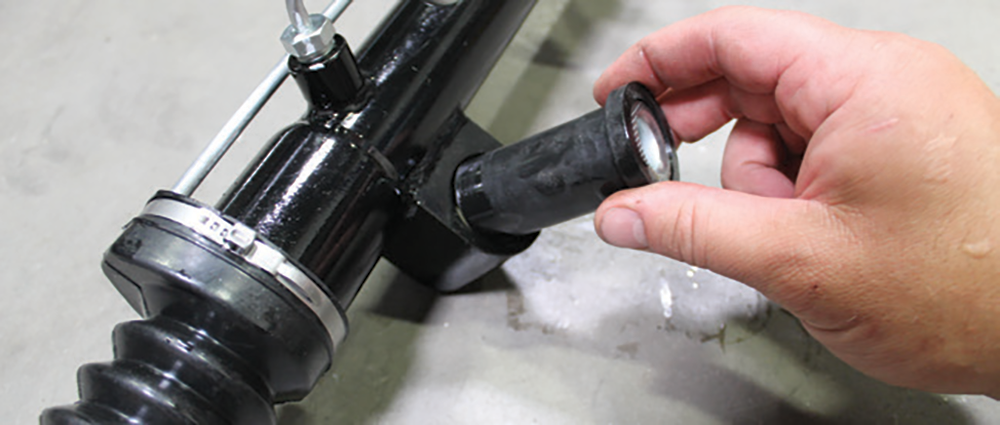
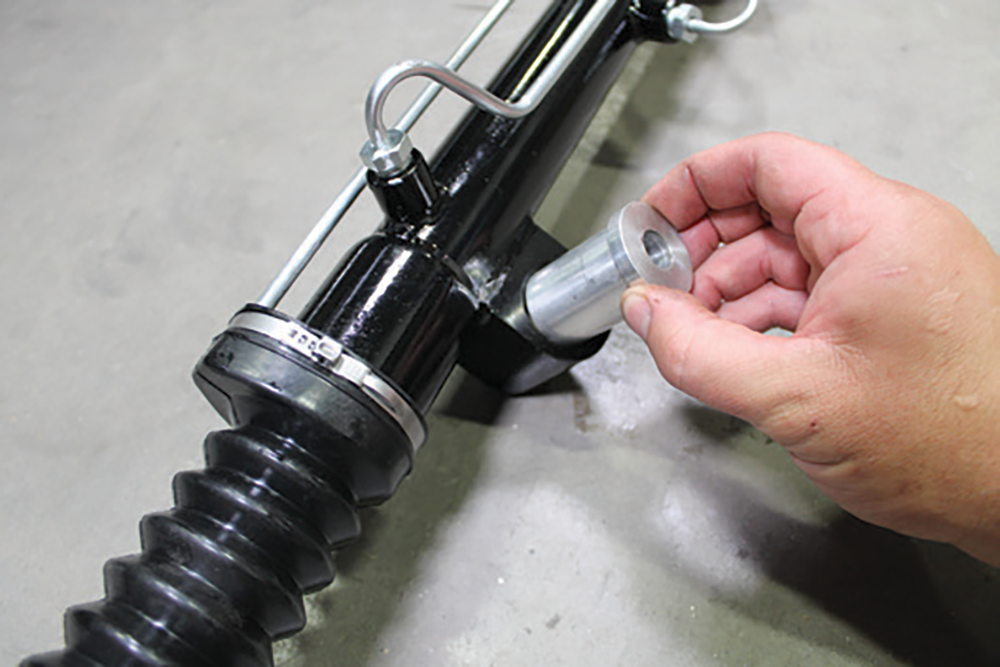
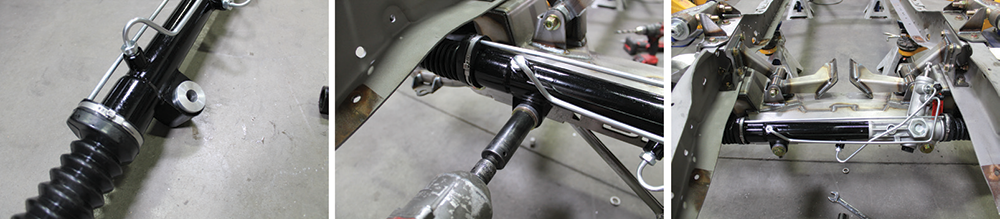
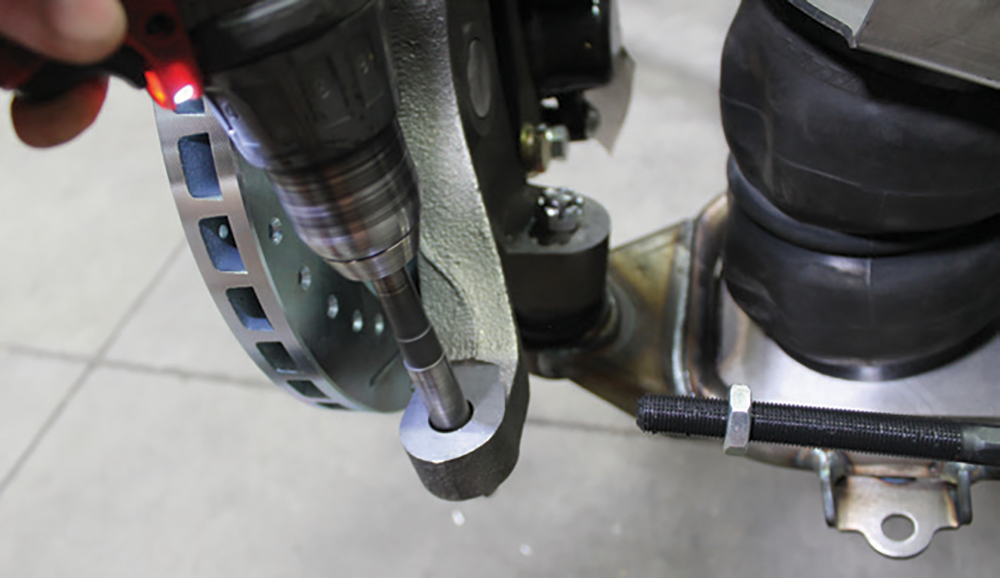
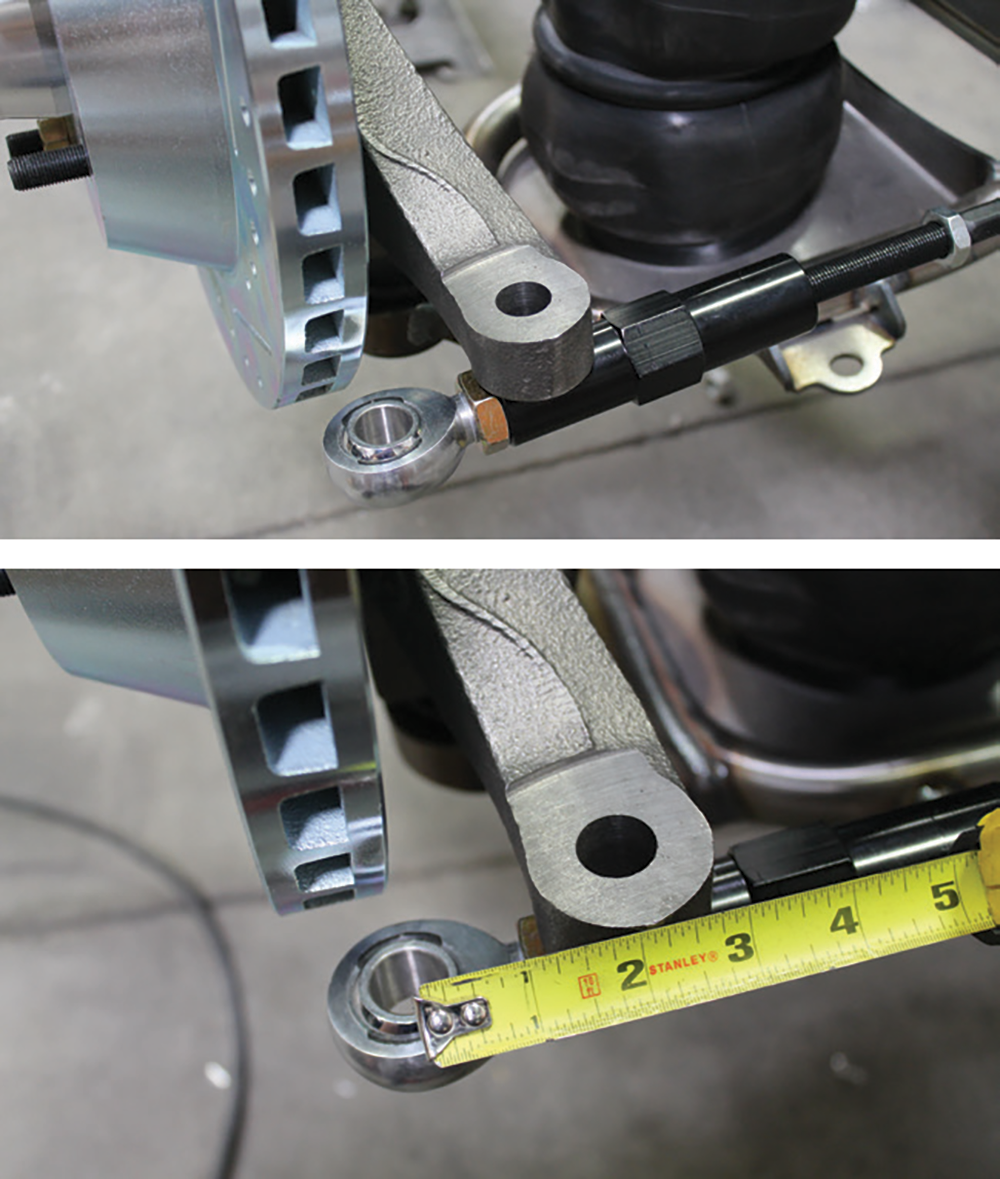
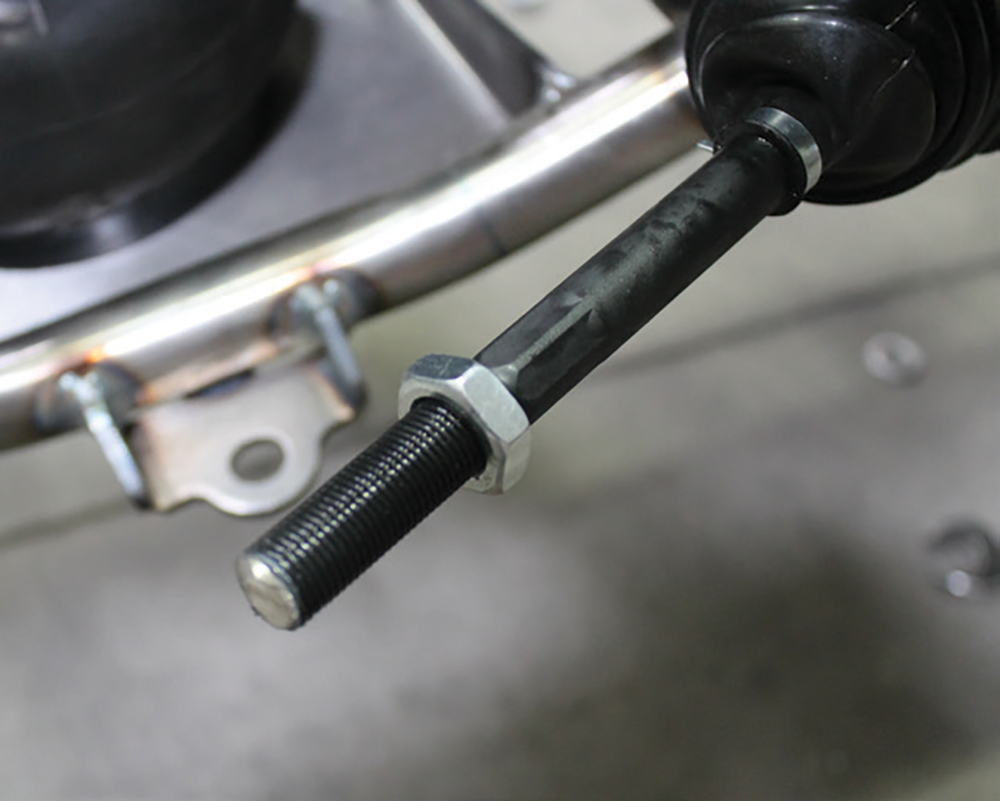
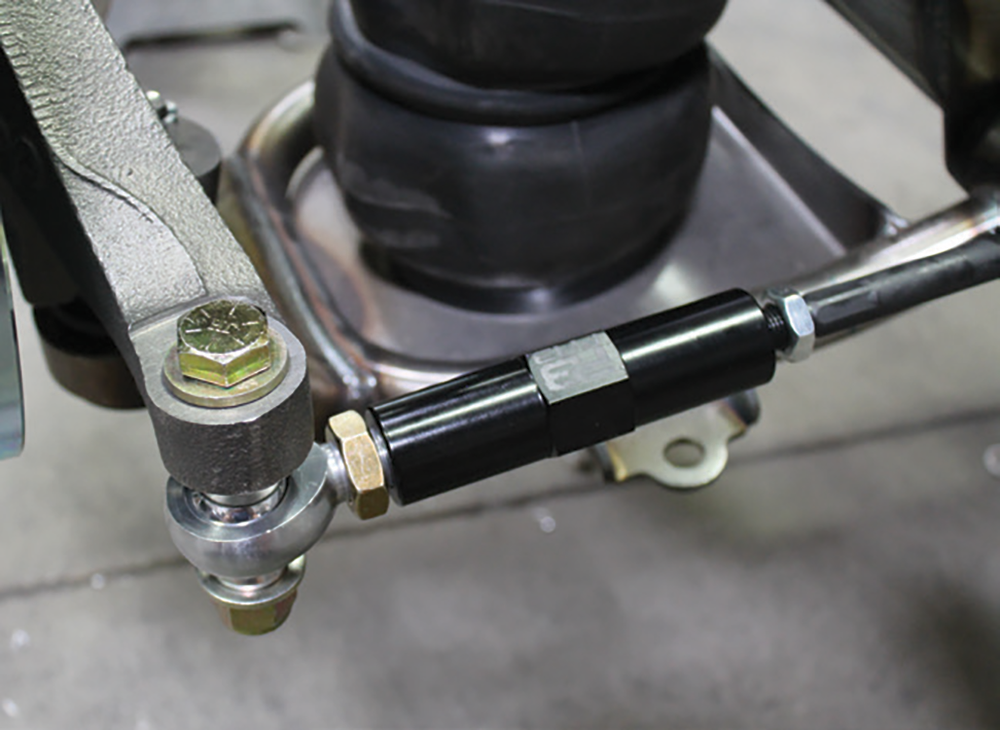
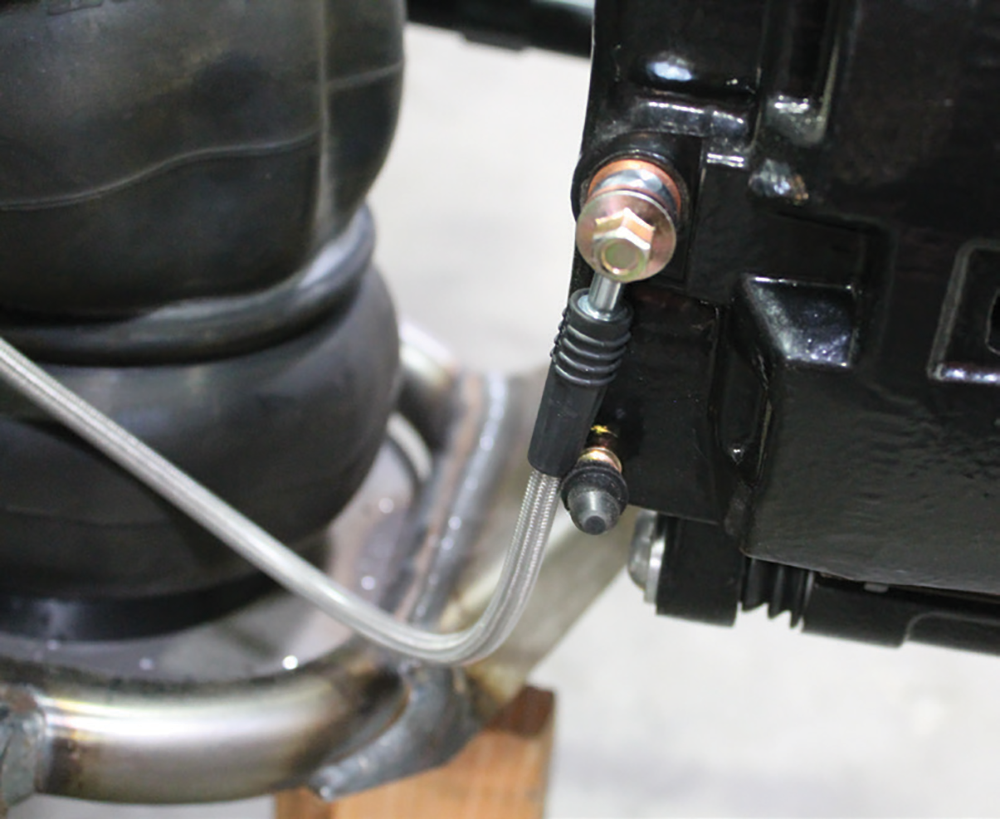
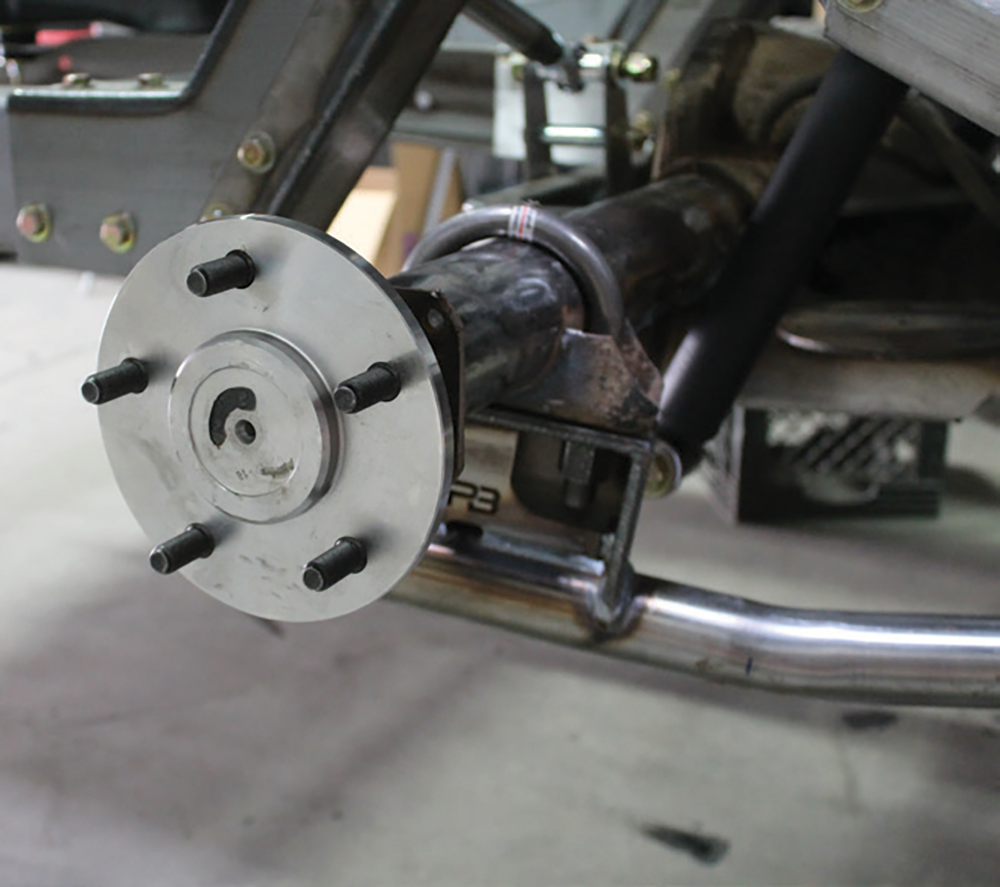
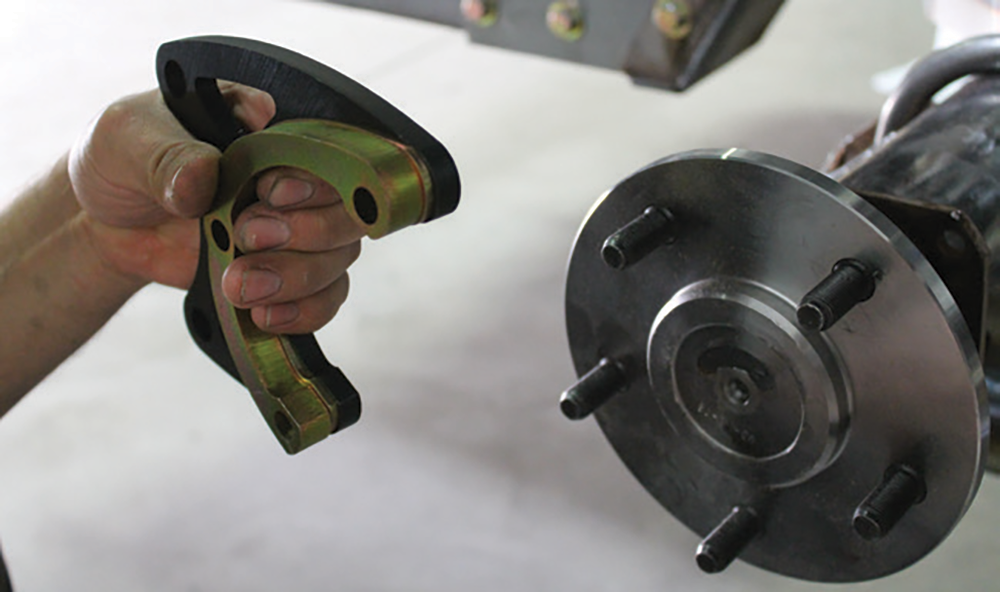
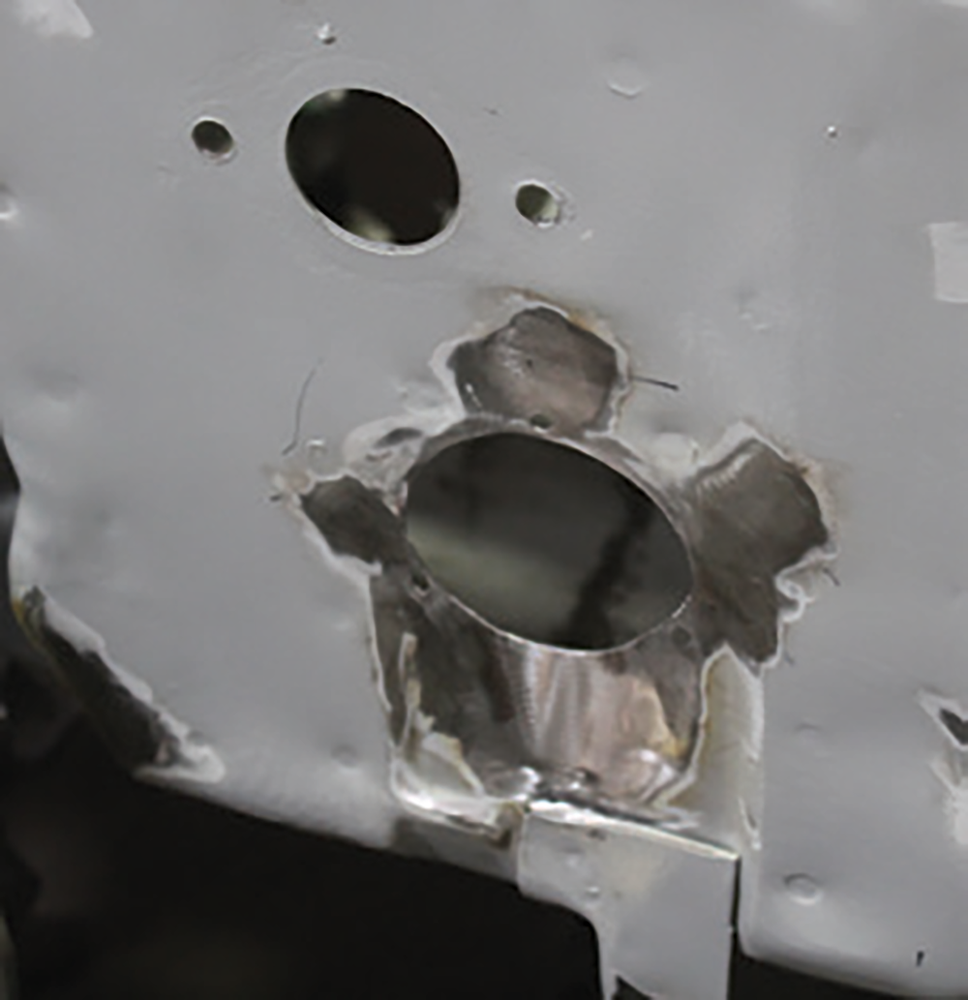
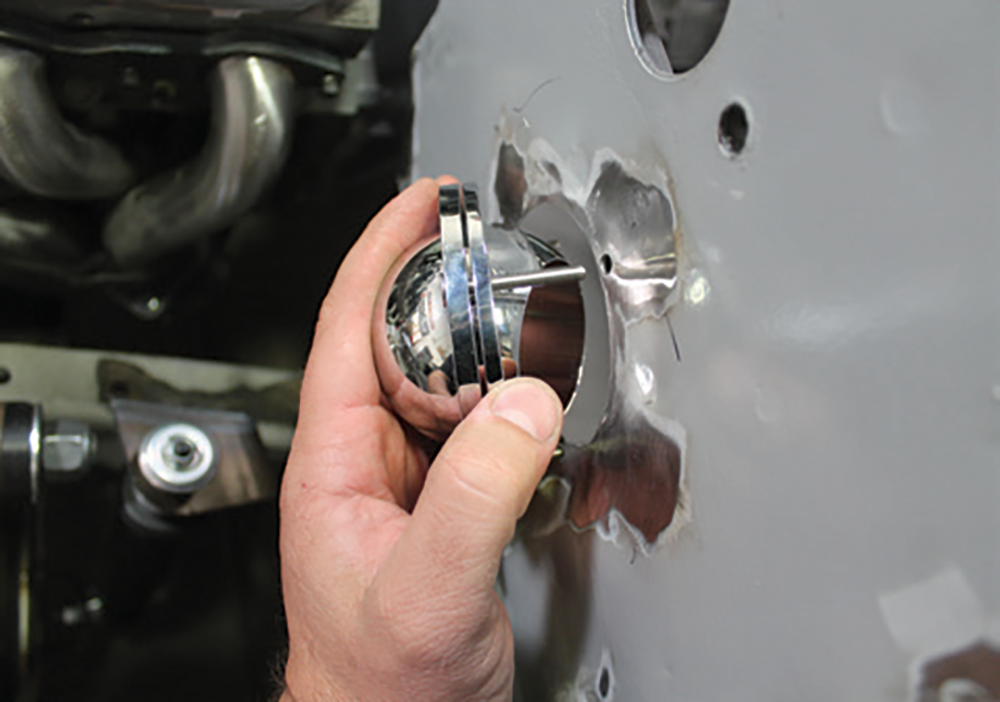
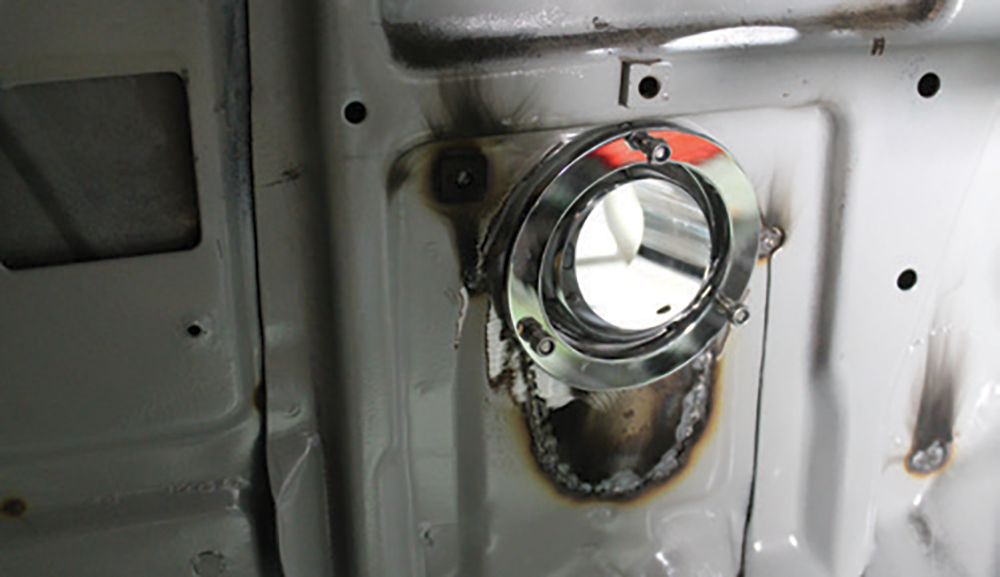
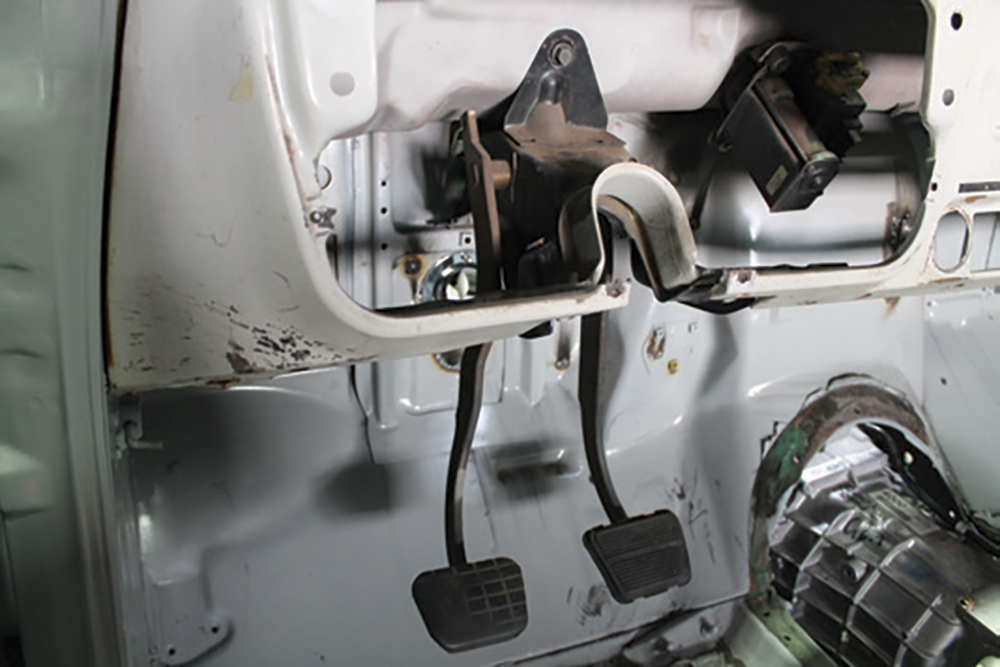
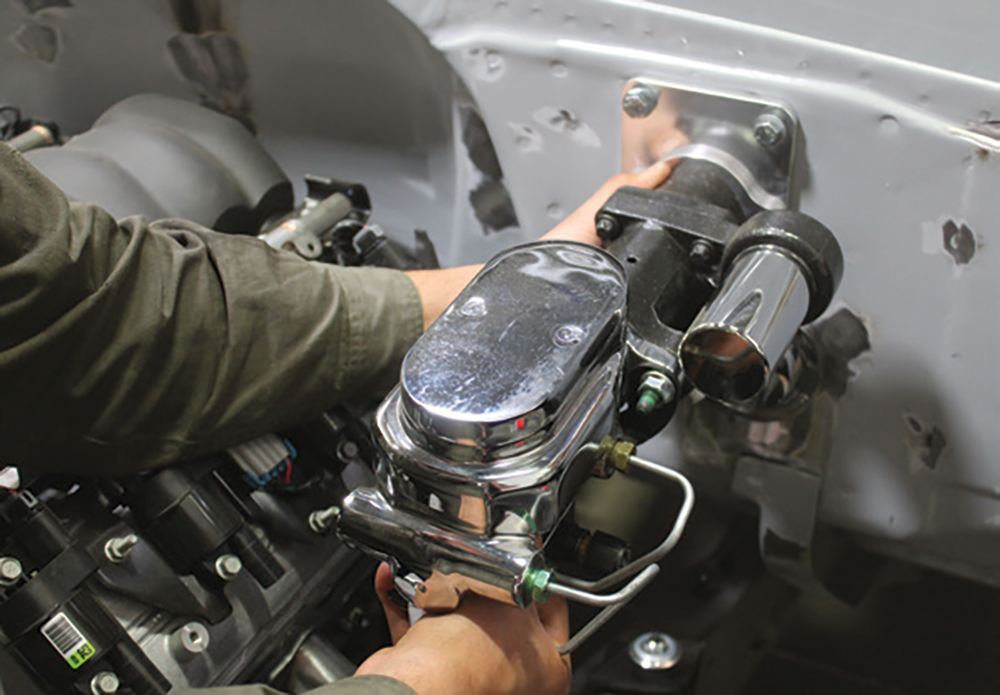
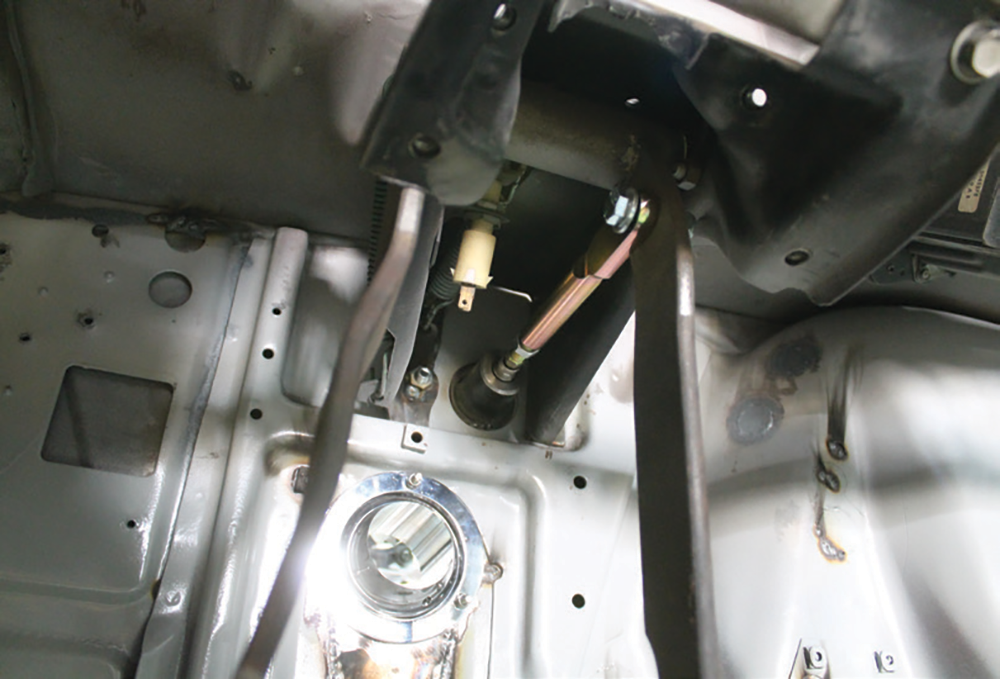
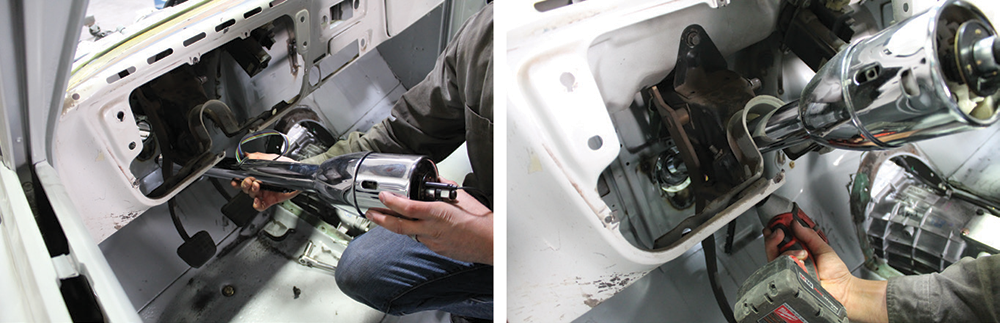
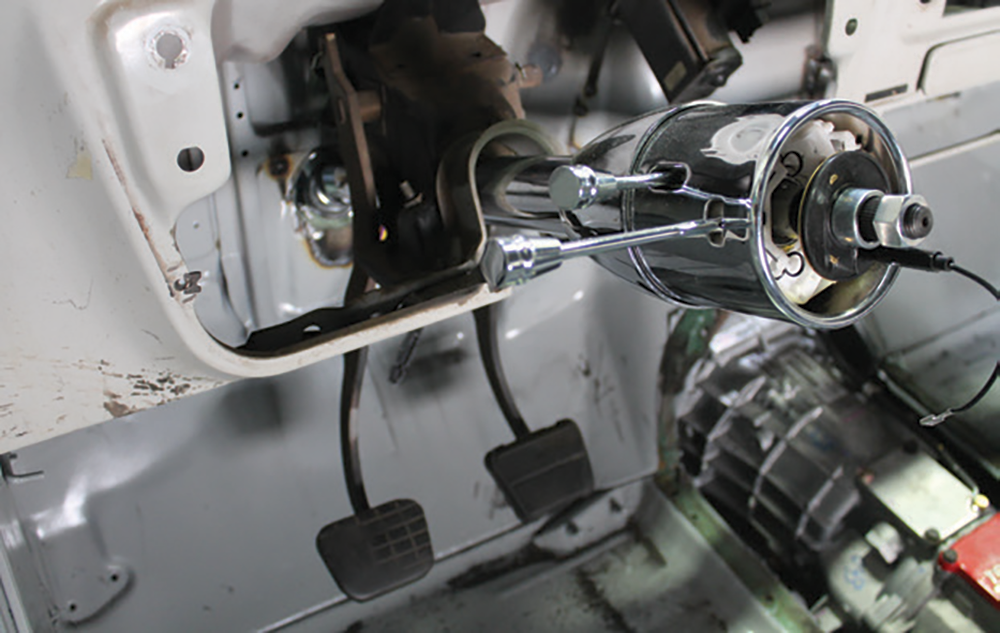
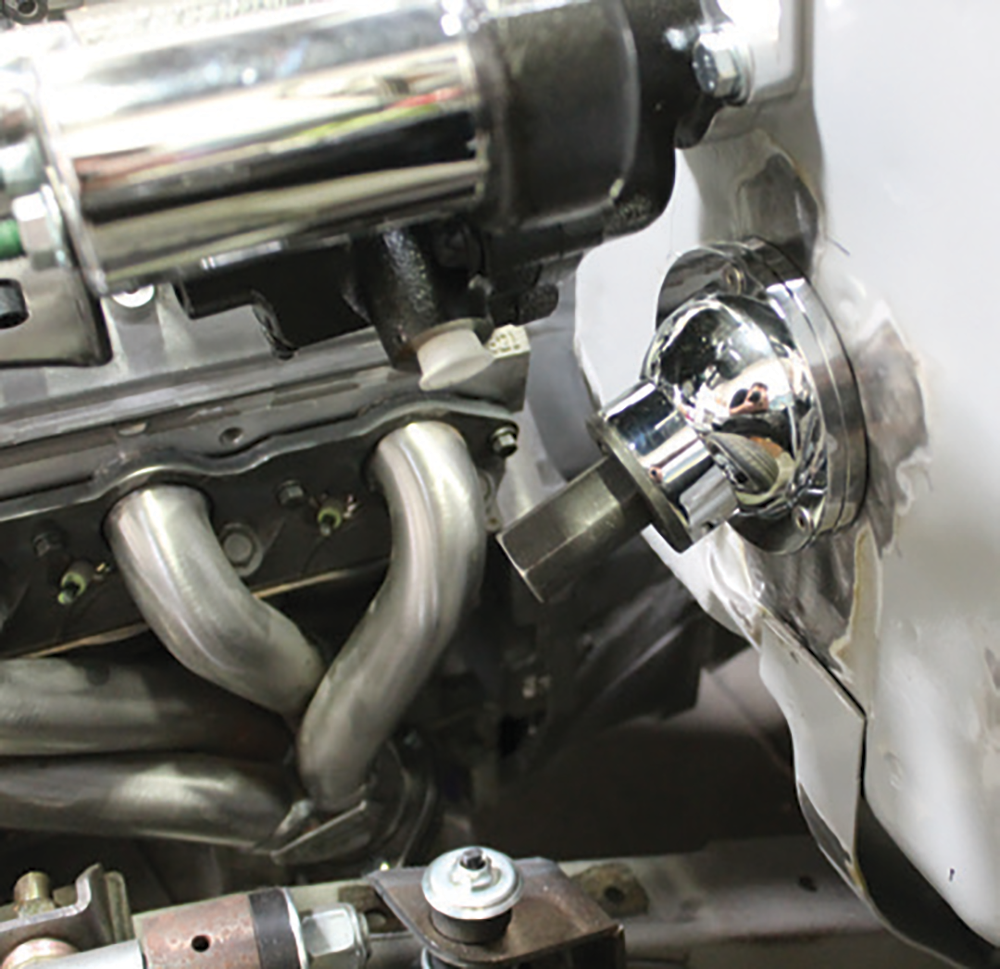
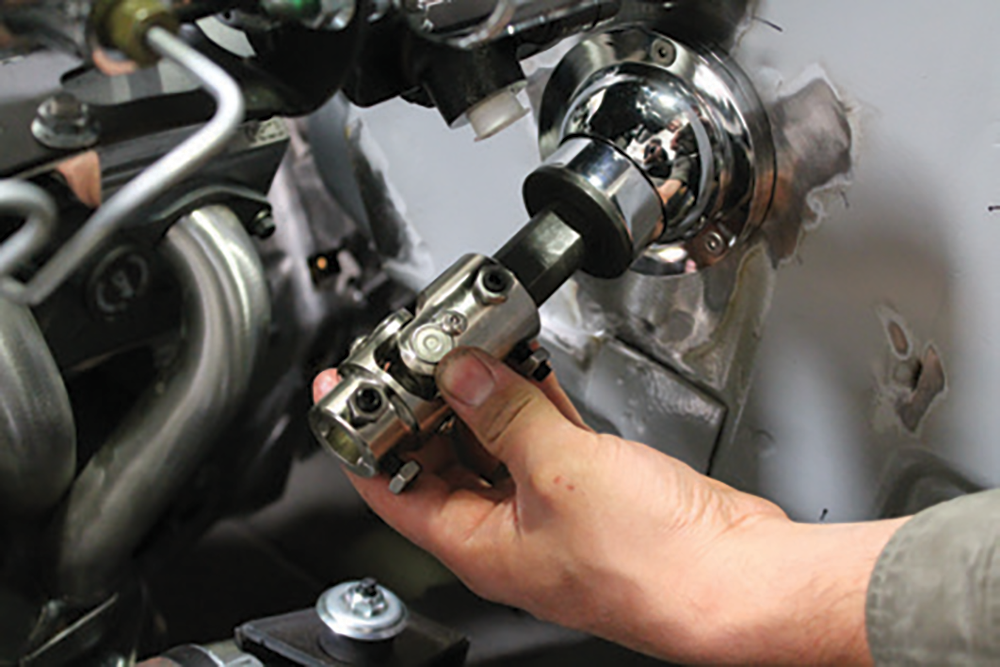
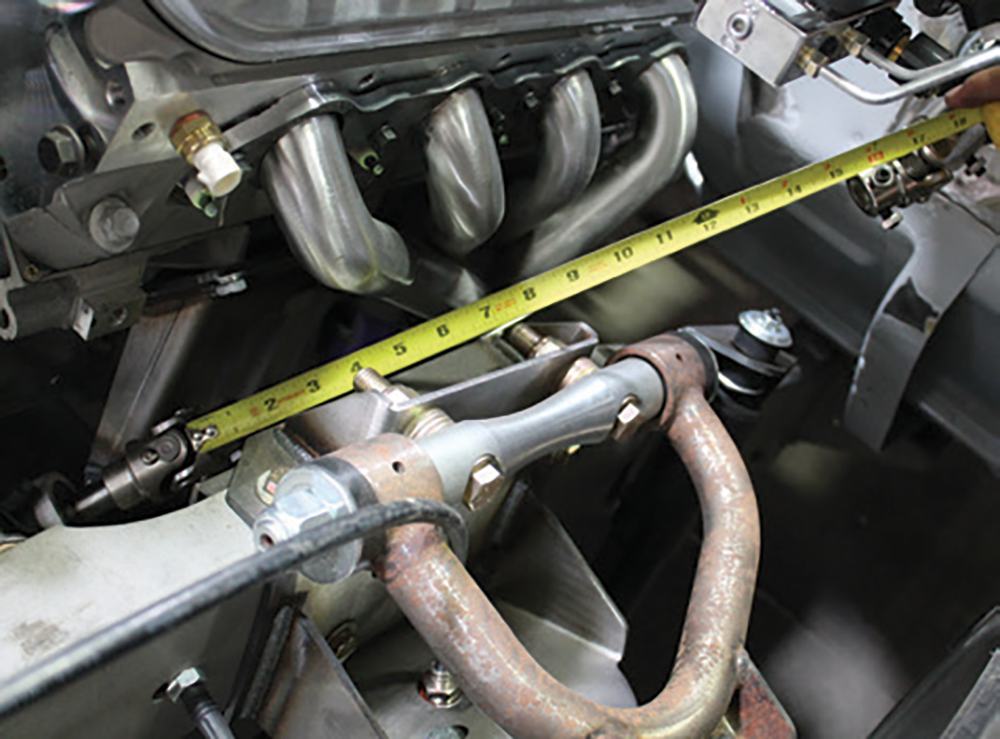
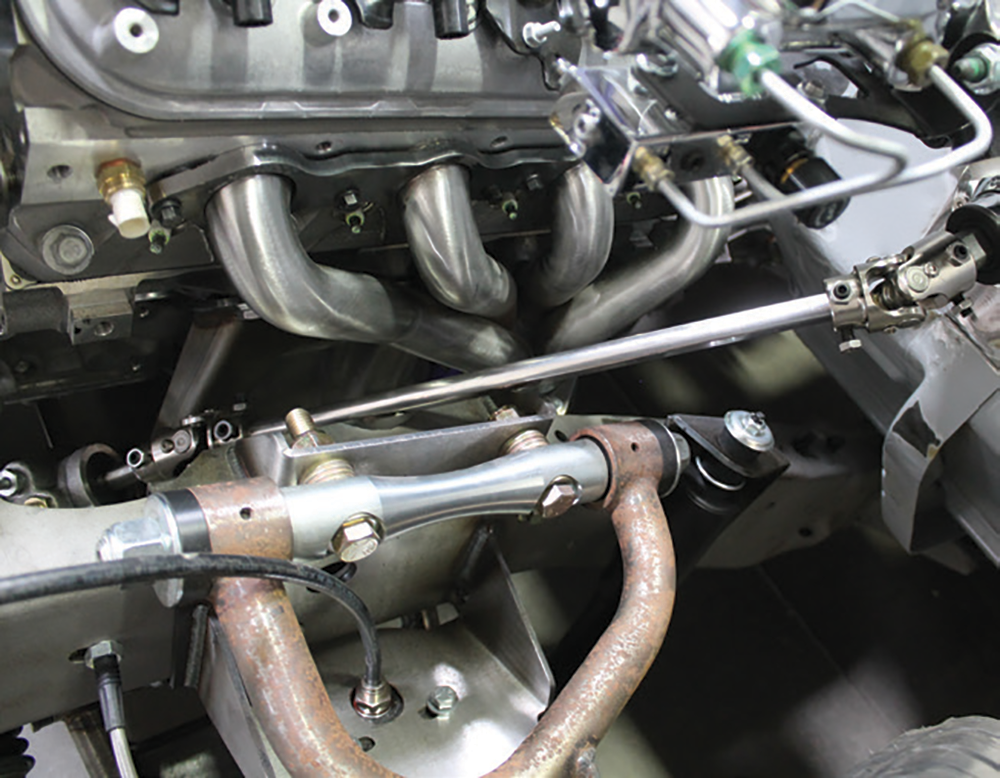
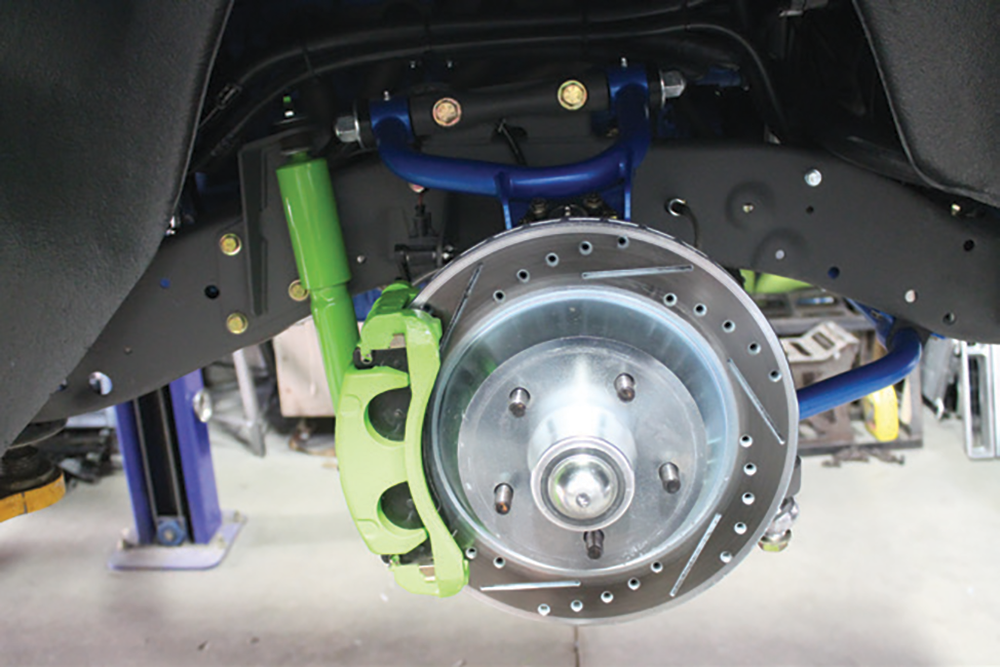
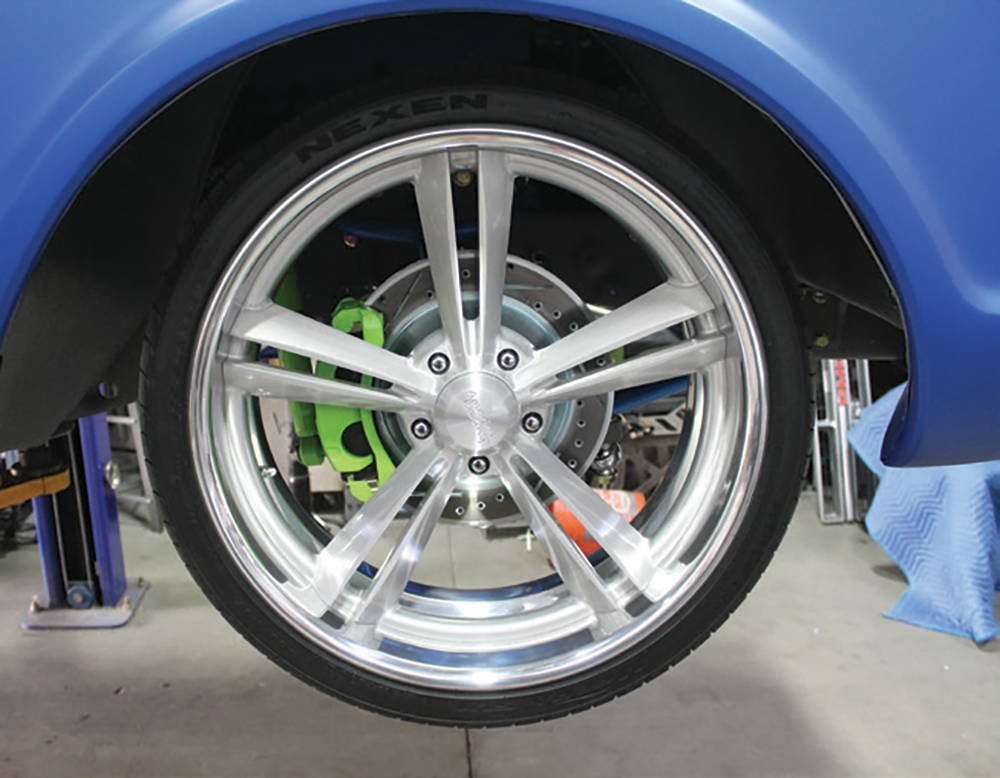
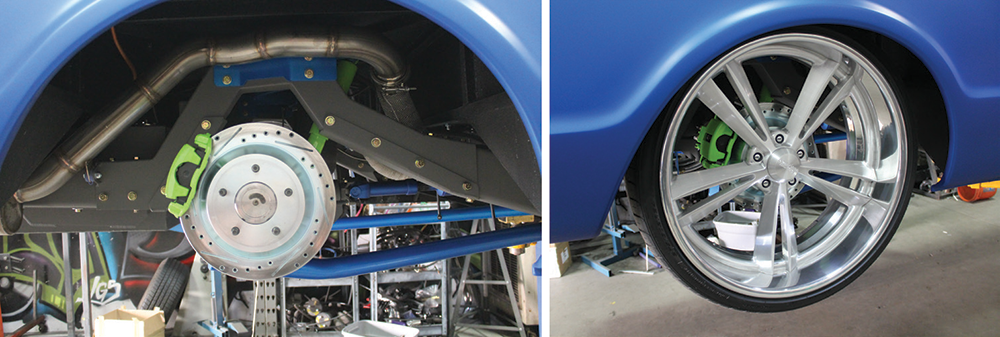
Since we are doing a Porterbuilt front “drop member” suspension, we were able to order the new brake kit to fit the ’73-87 C10 trucks. We also made sure to order the Porterbuilt kit the same way. The reason for this is the ’63-72 trucks came with smaller ball joints and changing out to the larger ’73-87 ball joints is as simple as just ordering the correct parts from each company. The front brake system was shipped to us completely assembled with CPP’s famous modular drop spindle. Also included with the front kit (part #7387SWBK-55213) was the upgraded stainless-steel braided brake lines.This project is a full rebuild, so before assembling anything we completely stripped the chassis of all the stock components and sent it off to get media blasted. We also installed the Porterbuilt suspension parts before finally turning our attention to the front brake kit. Since CPP ships the parts as a complete unit, the assembly is simply set on the lower ball joint and then the upper ball joint is brought down and slid in the upper taper on the spindle.New castle nuts are used to hold the spindle in place, and new pins keep the nuts from backing off.The Porterbuilt drop member suspension requires the installation of a Mustang II-style steering rack-and-pinion. CPP also carries this unit, so we ordered one to install on this project.Some slight modifications are needed for the rack-and-pinion to bolt up to the new drop member. The rubber bushings that come with the rack-and-pinion need to be removed.Porterbuilt supplies new aluminum bushings that replace the factory installed rubber ones.With the new bushings installed, the CPP steering unit can be installed into the Porterbuilt lower cross member using the hardware provided with the Porterbuilt kit.A couple more modifications are needed to bolt the steering rack to the new CPP spindle. Since the tie rods will be converted to a Heim joint end, the spindle needs to be slightly opened up to accommodate the 5/8-inch bolt.The length of the threads on the steering rack are also a bit long and need to be cut down to fit. The easiest way to do this is to install the steering kit from Porterbuilt and take a measurement from the center of the Heim to the center of the hole on the spindle. Of course, we made sure the steering rack was centered in its travel first.The excess threads are then removed with a 4.5-inch cut off wheel on an angle grinder. The cut was cleaned and tapered to make threading the adjuster on easy.Once both sides are cut, and the adjusters are centered the complete tie rod assembly can be bolted to the CPP spindle.Finishing the installation of the front brake kit and spindle is the new brake line. CPP provided all the necessary hardware to secure the line to the caliper and to the frame rail.Moving our attention to the rear brake kit, here’s everything that CPP includes with its rear kit (part #6772RWBK- 5-P12). This kit fits 12 bolt truck axles from 1967-1972 and includes 12-inch cross-drilled and slotted rotors, e-brake equipped calipers, and all the necessary hardware and brackets to complete the installation.Again, since we have stripped the truck down and already installed the suspension, we will begin at this stage for these photos. The axle has already been disassembled, all the factory brakes removed, and narrowed to fit our bigger wheel and tire package.The brackets that hold the caliper are the first pieces to get installed. In the kit are several spacers that will adjust how far inward the caliper sits. It is important to center the caliper on the rotor, but it’s hard to do that until the rotor is installed. We started with the one thick spacer and one thin spacer to get us in the ballpark. We can adjust these once we get the rotor on, if necessary.T bolts are provided with the kit and are used to secure the caliper brackets to the axle flange.After securing the caliper brackets, the new rotor is slid over the new wheel studs on the narrowed axle shafts and a temporary ½-inch fine thread nut is used to hold the rotor flush with the axle mounting surface.Finally, the new caliper can be installed on its bracket and checked for alignment.Here’s a look at the completed rear kit. We got lucky and hit the mark on our first try with the spacing. Since this truck will sit right on the ground when aired out, we opted to not install the e-brake cables.Now that both the front and rear brake kits are installed, we can tackle some of the other CPP parts we ordered, starting with the steering column mount (part #2401500040). The factory hole in the firewall is teardrop shaped and the new column mount is round, so we had to weld in some new sheet metal to close off the teardrop. We also filled in the factory column mounting bracket holes around the new round opening.Using the new mount as a template, we drilled the three new mounting holes and installed the outer part of the column mount.Inside the truck the remaining hardware is installed, and our new column mount is left loosely in place to make installing the actual steering column easier. If we were to tighten the mount now, the ball that swivels inside the mount would be locked in and not allowed to pivot. We’ll tighten everything up on the mount after the column is slid through and secured.Inside the truck, the steering column is going to mount up just like a factory column would. Since the factory column bolts up to the brake pedal assembly, we need to reinstall that first. We held the assembly in place with the single bolt right behind where the gauges will eventually sit.The remaining hardware used to secure the pedal assembly actually attaches the brake booster as well. So we grabbed the new “show stopper” hydraulic brake assist unit that we ordered from CPP (part #6772HBK-SS). This complete unit comes with a billet aluminum firewall mounting bracket, chrome master cylinder with chrome adjustable prop valve distribution block, chrome accumulator cover, stainless pressure hoses, return hoses and all necessary fittings and hardware for installation. Since we are just in the mock up phase of this build, we are just going to set the unit in place for now and we’ll tackle all the lines at a later date. Our goal for right now is to get the steering column in the truck.Before installing the column, we did want to attach the rod from the booster to the pedal arm. CPP provides a couple different types in the kit and we were able to simply thread the adapter on and adjust it to the correct position. It was necessary to do this before the column goes in because it won’t be accessible with the column installed.With the column mount and brake pedal assembly in place, we could get the new CPP polished aluminum column (part #TC-32-FC) installed. We opted for the 32-inch chrome column, and since this truck will be a manual six-speed transmission, we ordered the column without the shifter. Also, the key will be on the dash in this truck, so we ordered the column without the ignition switch.The column mounts to the pedal assembly with the factory bracket and the 32-inch column sits just far enough away from where the gauges will be, giving a bit more room between the steering wheel and the seat.Another benefit to the shorter column is that it protrudes less through the firewall, making the steering shaft angles less severe.Speaking of steering shaft, that was our next step. Using some universal joints that we ordered from CPP, we started connecting our new column to the rack-and-pinion. We began by installing the U-joint at the column (part #CPP-UJ7), which is a 1-inch DD to ¾-inch DD unit.Next we installed the U-joint at the rack-andpinion (part #CPP-UJ5), which is a ¾-inch x 36 spline to ¾-inch DD unit. Then we measured for the length of DD shaft (part #CPP1850-36SS) we’d need to connect the two U-joints.Here’s a look at the straight shot of steering setup. Everything worked out perfectly on this setup and we were able to get away with just the two U-joints.Now, let’s flash forward a bit and check out the finished photos. After several more months of work on the project, everything is painted, powdercoated and fully assembled. Here’s a look at the front suspension and CPP big brake kit.The 22-inch American Racing Wheels VF506 is a wide open five-spoke design that really shows off the undercarriage of the truck, including the new CPP big brake kit.34Out back, the brakes and suspension received the paint and powdercoat treatment. The brakes look a bit smaller in the rear, but the reason for them looking that way, even though the rotor is only 1 inch smaller out back, is that the American Racing Wheels are upped to a 24-inch-tall wheels.Here’s a look at the completed 1970 Chevy Suburban laid flat out on the asphalt. With the calipers being bright green, it definitely draws your eyes to them, even though they are tucked into the wheel wells of the classic truck.
We use cookies to enhance your browsing experience, serve personalized ads or content, and analyze our traffic. By clicking "Accept All", you consent to our use of cookies. Visit our Cookie Policy for more info.
 JEREMY RICE
.
August 16, 2019
.
C10 Builders Guide
JEREMY RICE
.
August 16, 2019
.
C10 Builders Guide


Share Link