In the entertainment world, a “triple threat” is someone who can sing, dance and act. It’s serious competition when you’re toe-to-toe with a triple threat at an audition. In our world, a triple threat would be a truck that goes like hell, is comfortable to drive, and with a killer stance and looks!
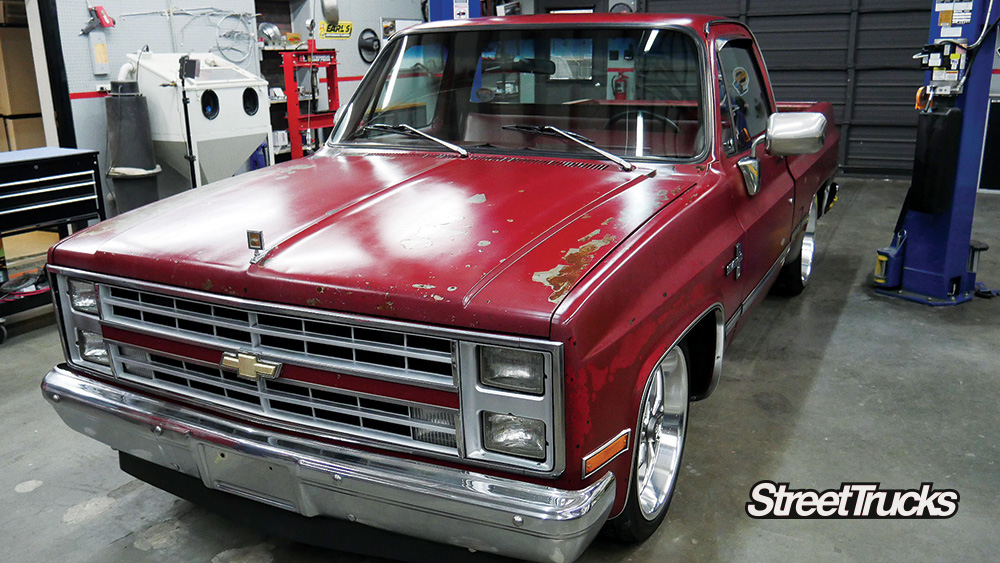
Gary Faust has this goal with his 1983 C10 truck, which up until now has had two out of three boxes ticked off on a good day. Gary wants it all, which is entirely possible with today’s aftermarket products and platforms as versatile as a C10, but some strategy is involved. GM made the small block Chevy engine from 1954 through 2003, and it revolutionized the automobile industry with the potential for performance upgrades. The introduction of the LS series of engines in 1997 showed great evolution in engine technology and expanded the performance aftermarket, so much so that the LS swap is very common, and for good reason. Gary Faust had a sweetheart of a Squarebody that his family fell in love with, and it was something he could spend time fixing up and enjoying.
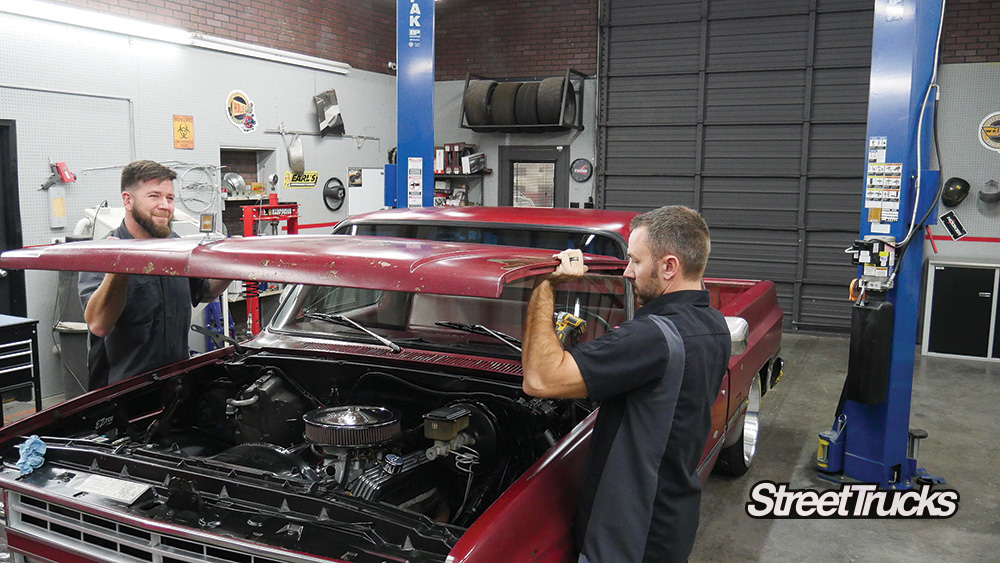
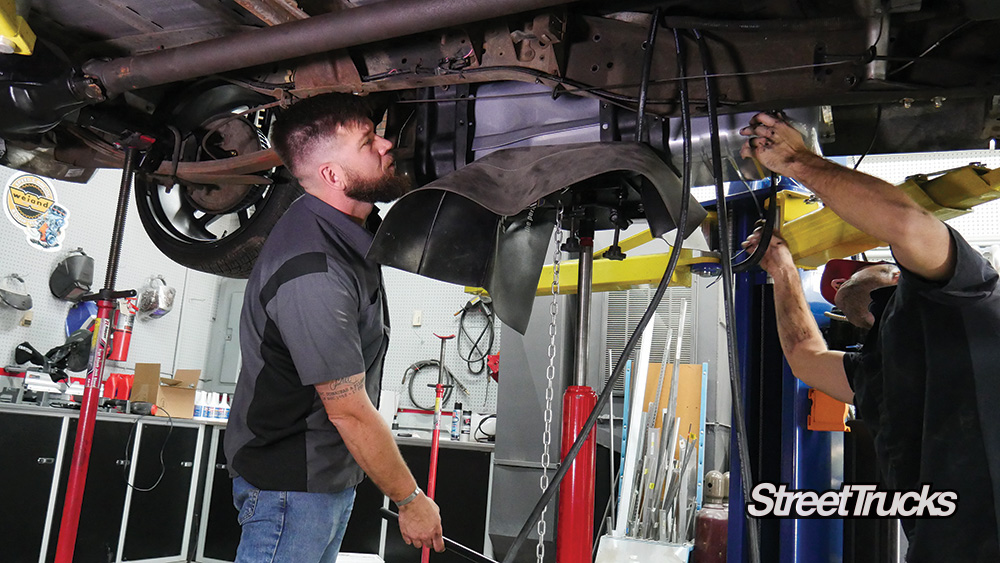
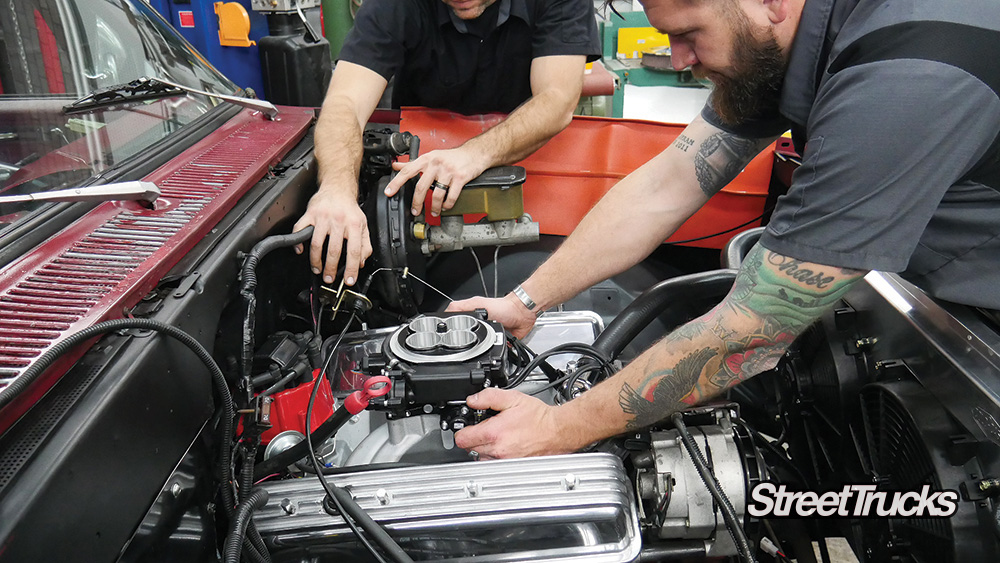
Removing the hood lets a lot more light into the engine bay and allows different angles of attack on multiple projects. Corey Schuette works alongside Gary and is a diagnostic electronics support expert. Cory knows his way around all things automotive and helped us make good time on all of these projects.
He bought it with the ’87 grille installed and the ZZ3 crate engine already broken in. As typically happens, Gary got used to the power levels, needed more, and went down the road of researching a typical LS swap. Gary’s a handy guy, and after serving as a combat medic in the Army, he traveled down a respectable automotive career path as a mechanic and is currently an electronic diagnostic technician repairing vehicle guidance systems. His love of high horsepower has produced several projects, including an OBS project, a badass Jeep JK and a G8GT that he built to well over 500 hp at the wheels with a string of upgrades including a centrifugal supercharger that was a blast to drive!
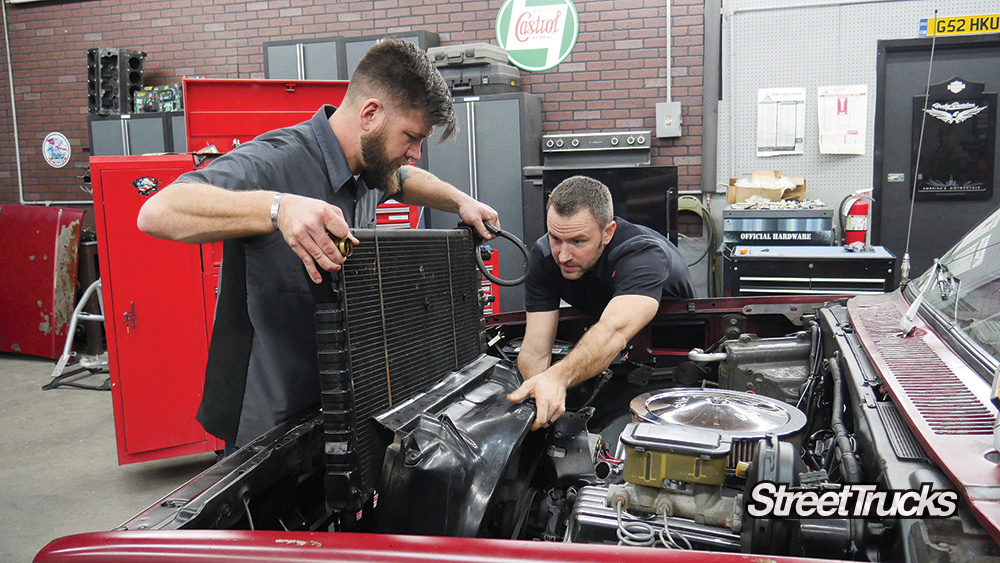
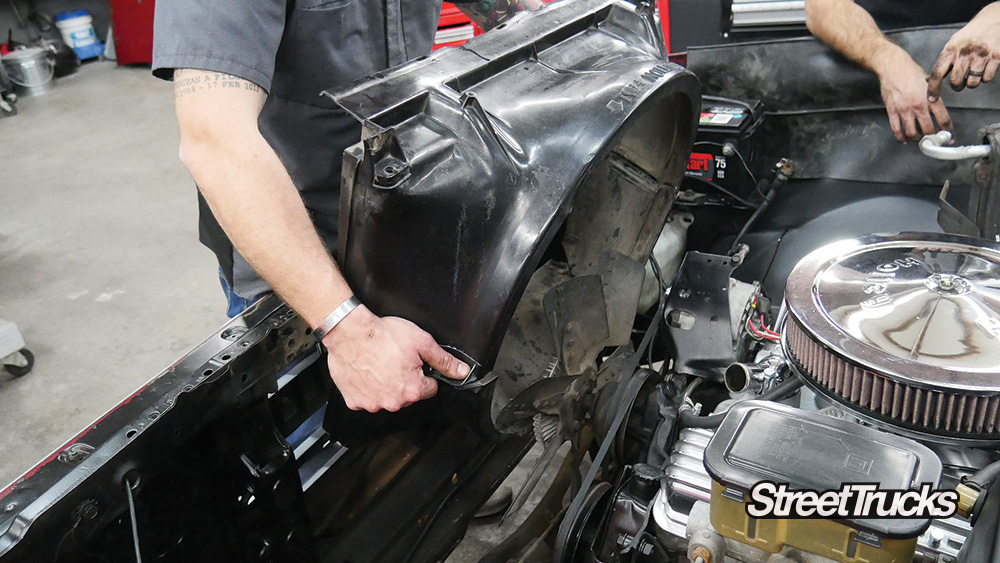
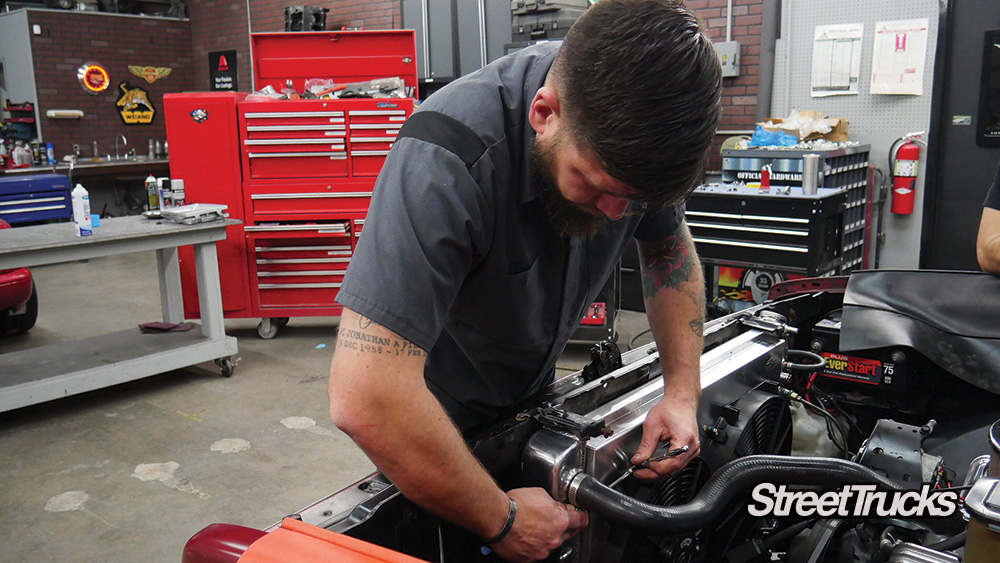
We drained the coolant, disconnected the battery, and pulled the tired stock rad from behind the shroud and fan, which saves having to reach in blindly and awkwardly wrenching off the fan.
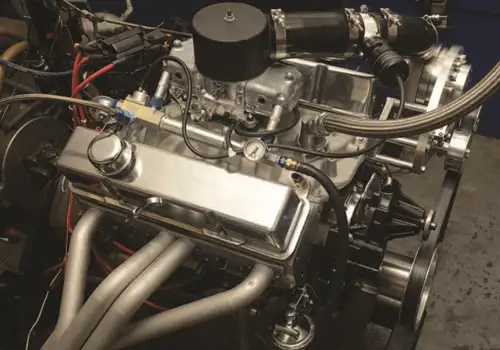
Gary’s holdback on LS swapping this truck was the ridiculously low (less than 5,000) mileage on the ZZ3 crate engine with forged bottom and bulletproof internals, in front of a beefed up 4L60E transmission feeding a new LSD and 3:42 gears in a 10 bolt 8.5-inch rear diff. A decent foundation for sure! Gary, being no stranger to forced induction, decided a blower was a “must-have” and started his research. TorqStorm Billet Superchargers has a fast-growing reputation for making great performing and reliable hardware with several different applications, including traditional small-block engines. After a few phone calls and some web-surfing, Gary settled on the TorqStorm SBC centrifugal blower system designed for 40-50% power gains, which (on paper) should net him about 500 to the tires—with air conditioning to boot! Yes, please!!
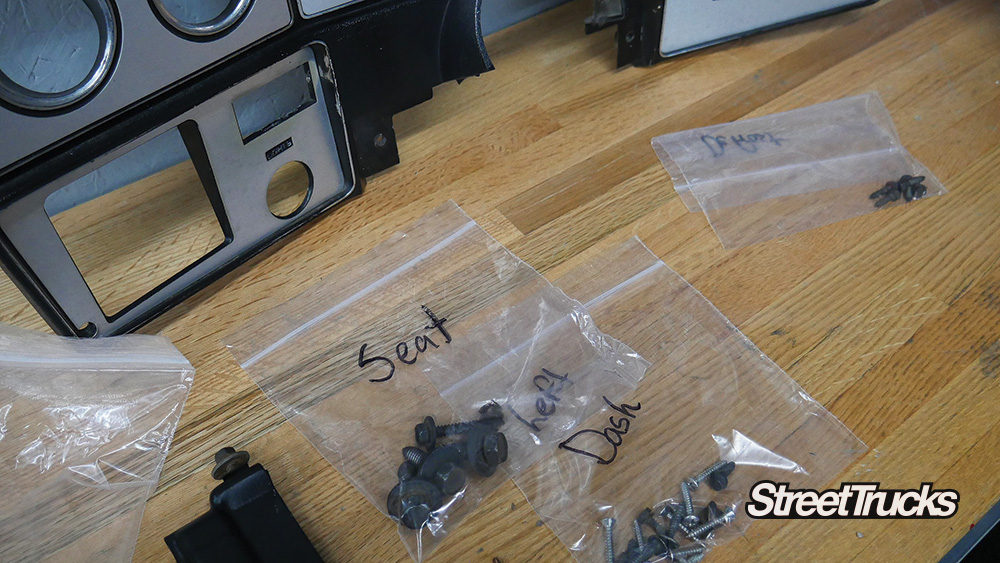
Teardown is fun, but reassembly can be a pain if you’re not organized. Gary’s military training kicks in with bagged and labeled parts!
Randomly throwing a ton of air and fuel and an unprepared engine may be fun on a bonsai-web-car show, but Gary wanted to do things in the right order and the right way, thinking and planning his way through the process of creating a powerful and comfortable classic truck that will give years of reliable performance with room for improvements! We’re going to follow the process of solidifying the foundation of this truck, making it robust enough to withstand the demands of forced induction and reliable enough for his family and the occasional cruise to a cars-n-coffee or even an occasional jaunt down the 1350.
The OE fan shroud won’t be needed and needs to be removed to clear the TorqStorm blower setup.
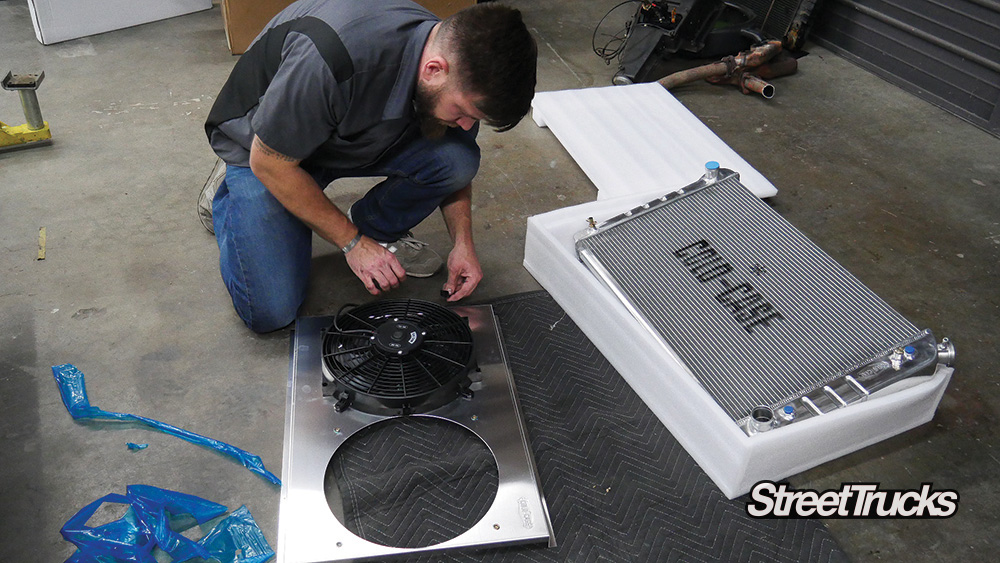
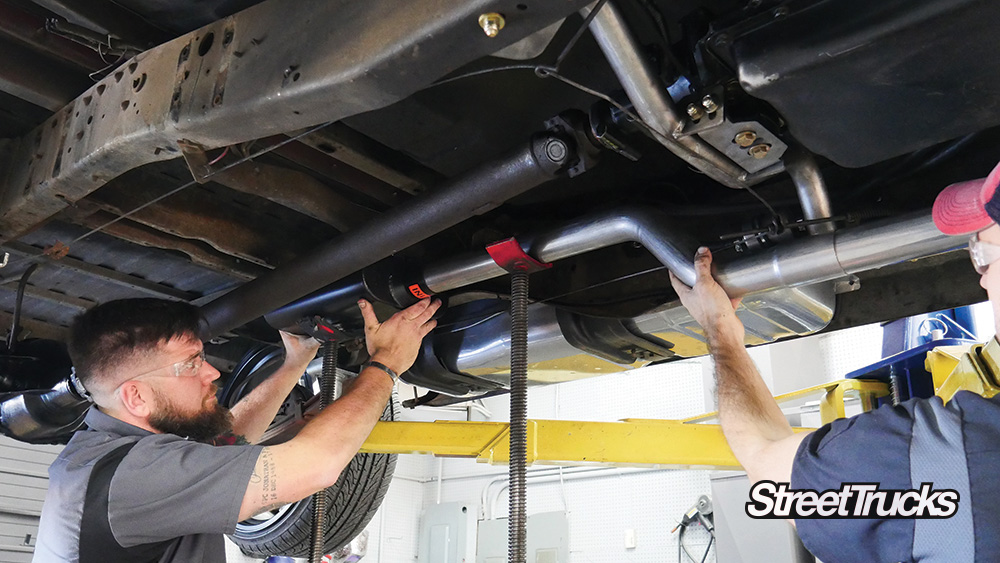
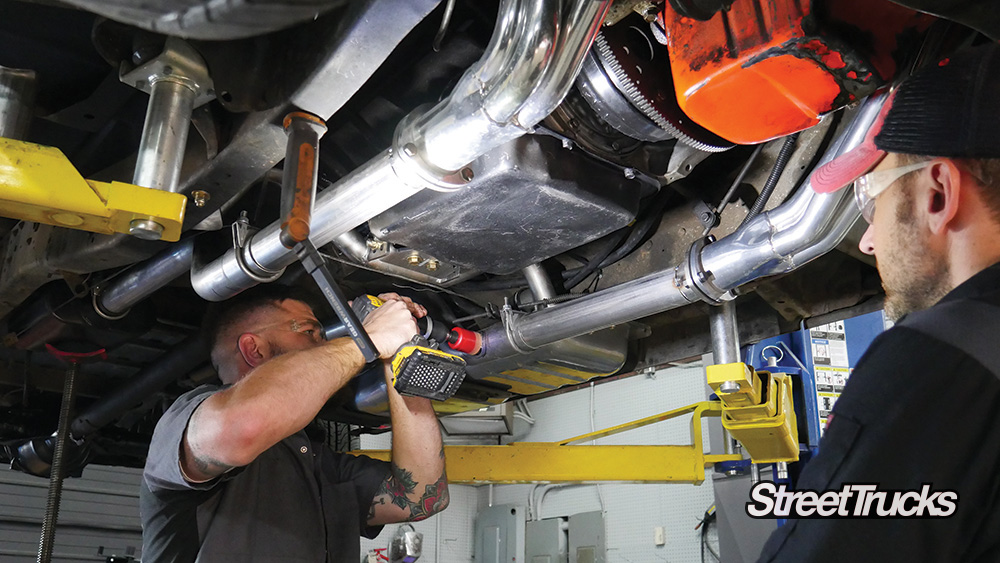
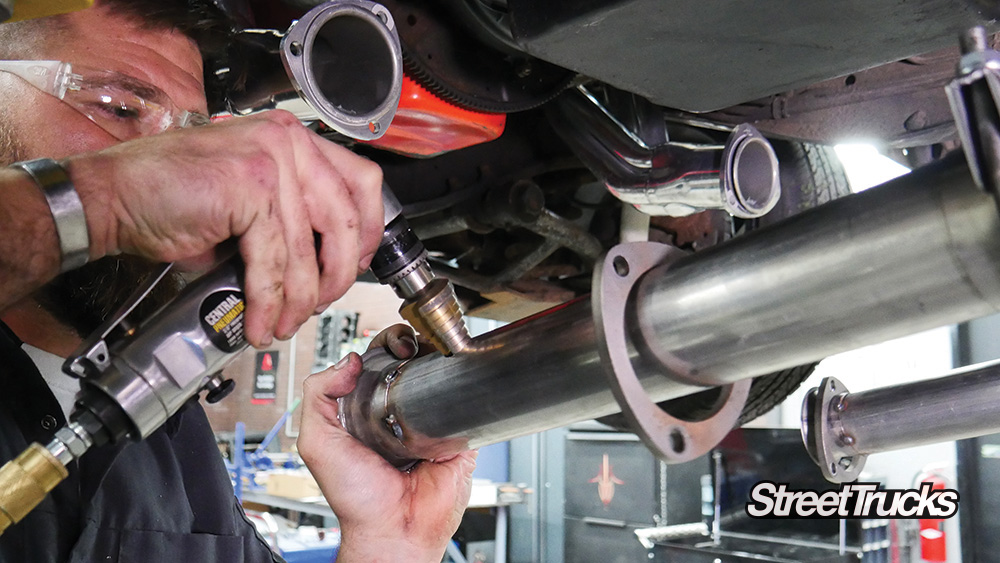
Addressing all the vehicle systems began with Gary knowing the limitations of the existing drivetrain and improving components one by one until the pyramid was right side up. This starts with a cooling system upgrade from Cold Case Radiators, a new Vintage Air HVAC package that we’ll show you in part 2 of this series, new fuel delivery and Sniper TB/EFI from Holley Performance to accommodate blow-through requirements, and a free-flowing exhaust system from Flowmaster and Flowtech to get rid of the spent gasses and sound great to boot.
We’re using Cold Case Radiators’ 21-inch C10 radiator (Part #GMT556A21) with dual electric fan setup as well as its fan controller kit. This system will offer excellent engine cooling with an oversized two-row system, which is much more efficient than a traditional four-row.
An added bonus that has nothing to do with power is a TMI dash pad replacing the cracked and poorly repaired stock dash, which is typical in these trucks. (Hey, we all want it to look good too!) Then we’ll shake down and baseline the N/A package before we install the TorqStorm blower to get a before and after comparison, as well as realize the true potential of the combination of all the upgraded components.
No, the world doesn’t need another LS swap… Yes, Gary is absolutely correct in building up the cool factor of an already proven platform of the venerable GM small block and making it current and a lot more potent!
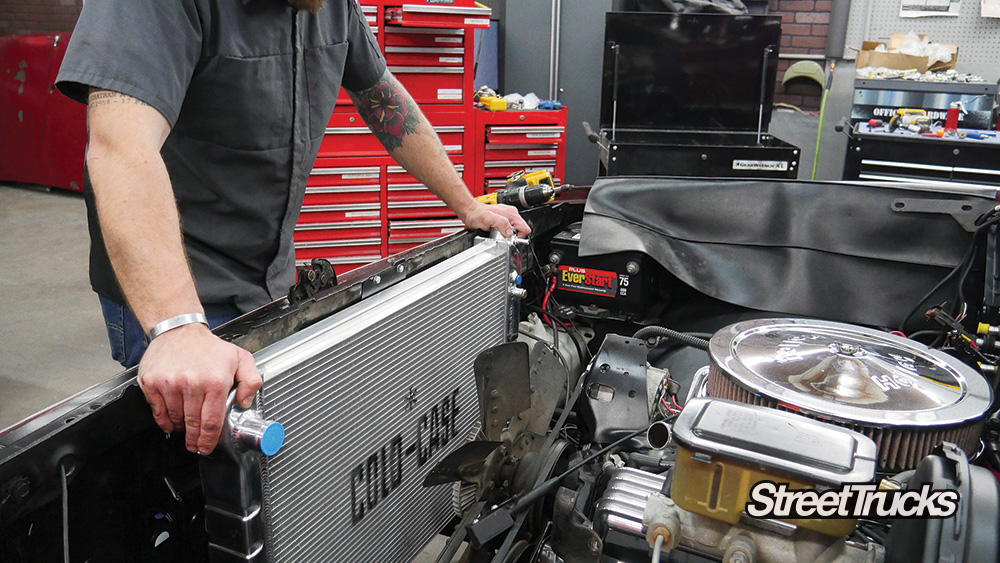
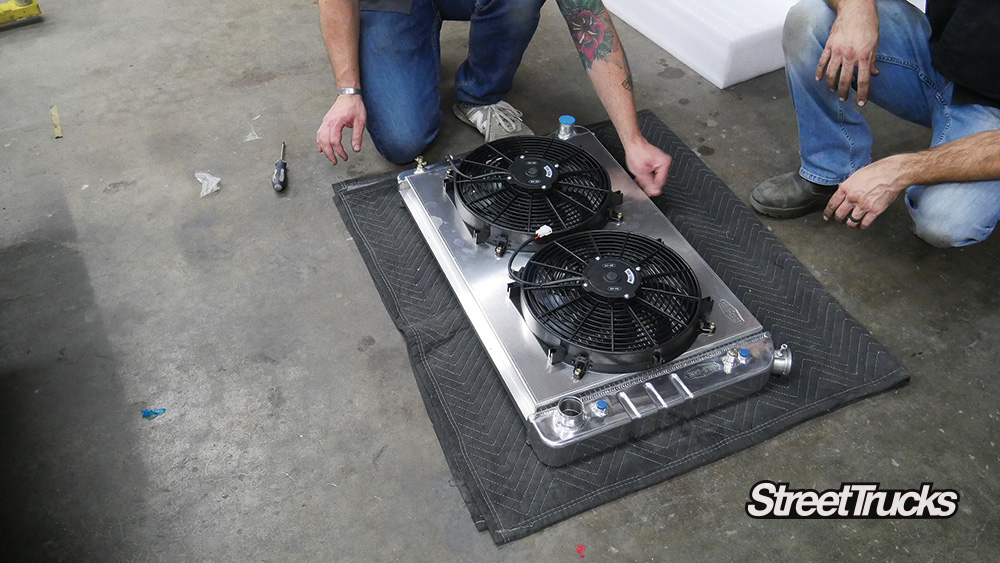
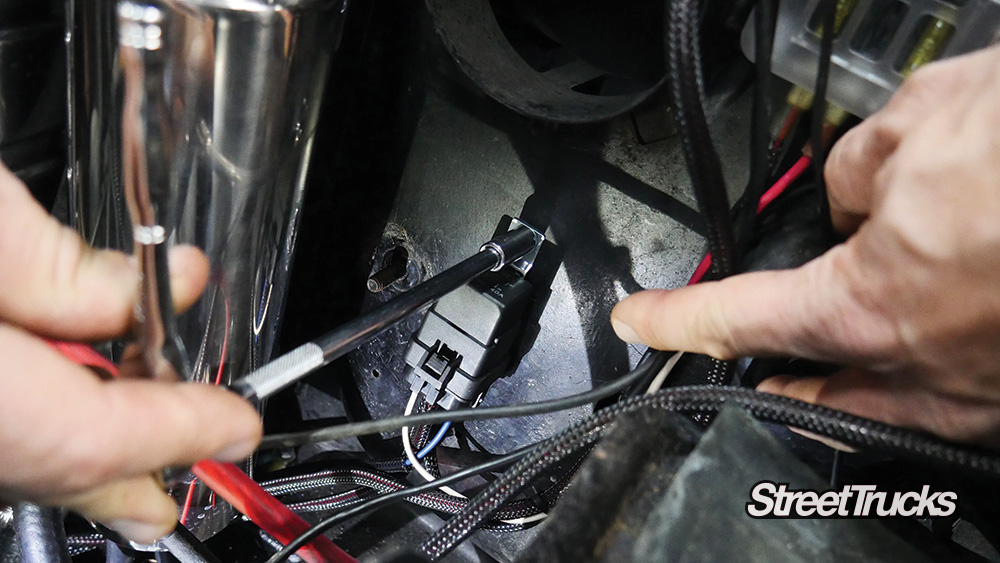
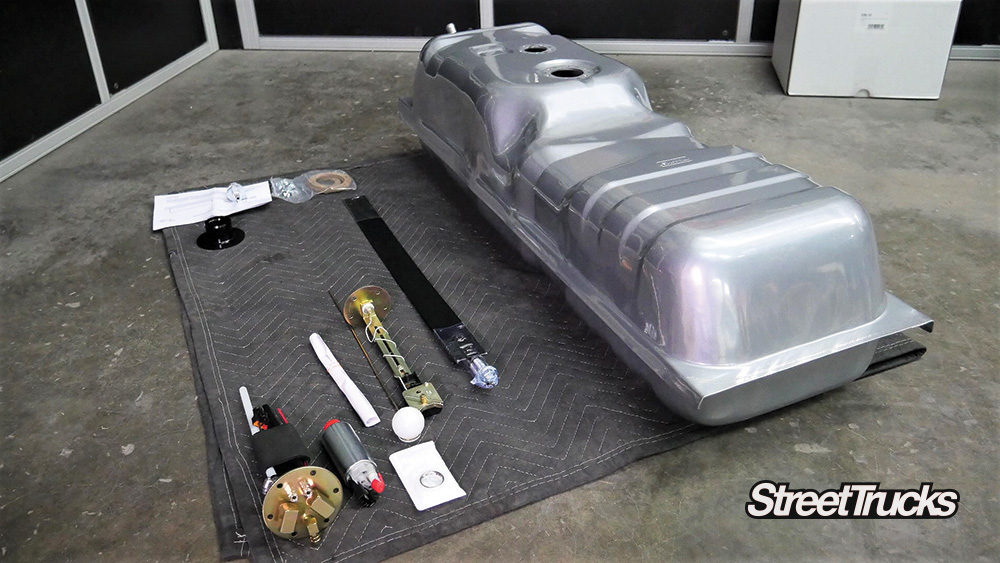
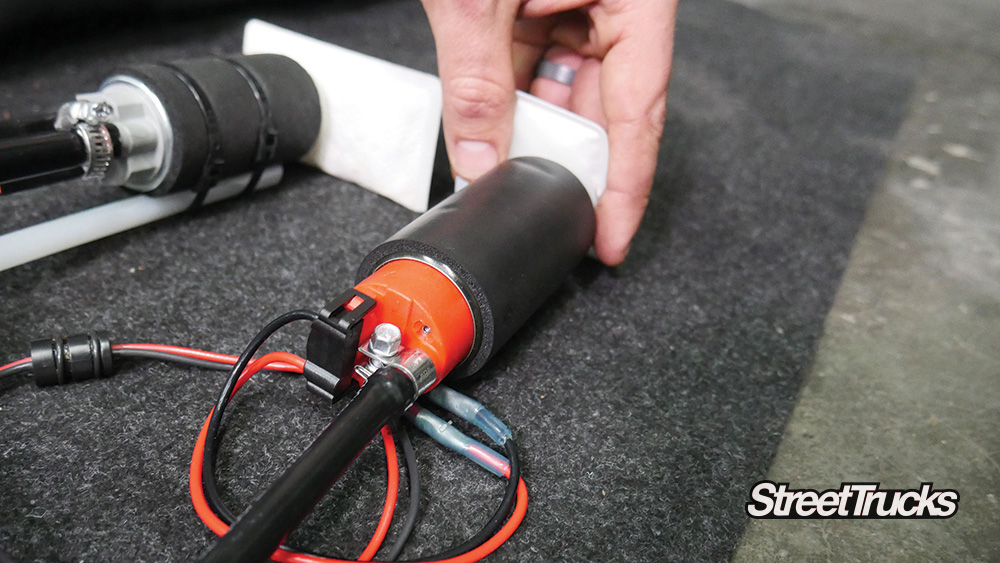
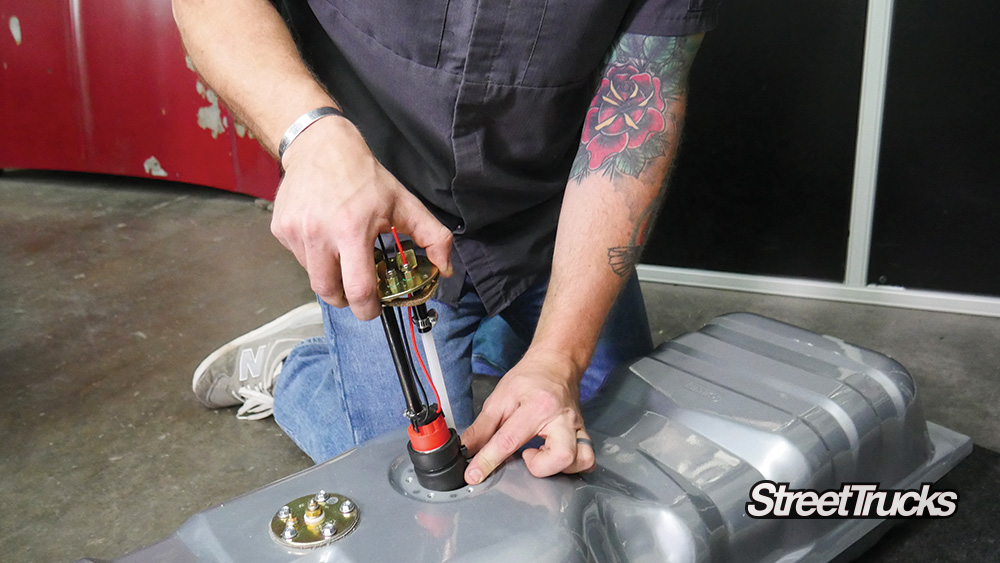
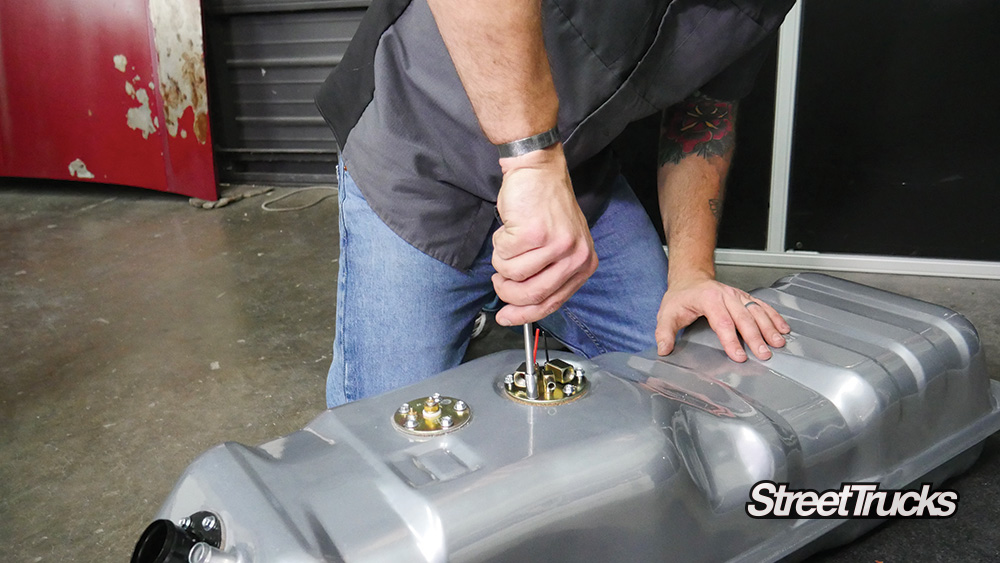
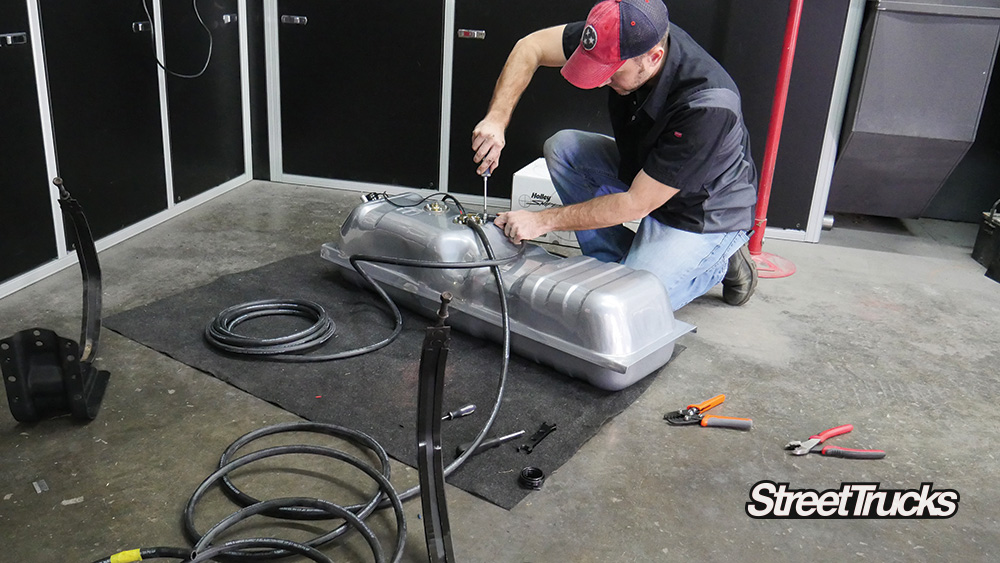
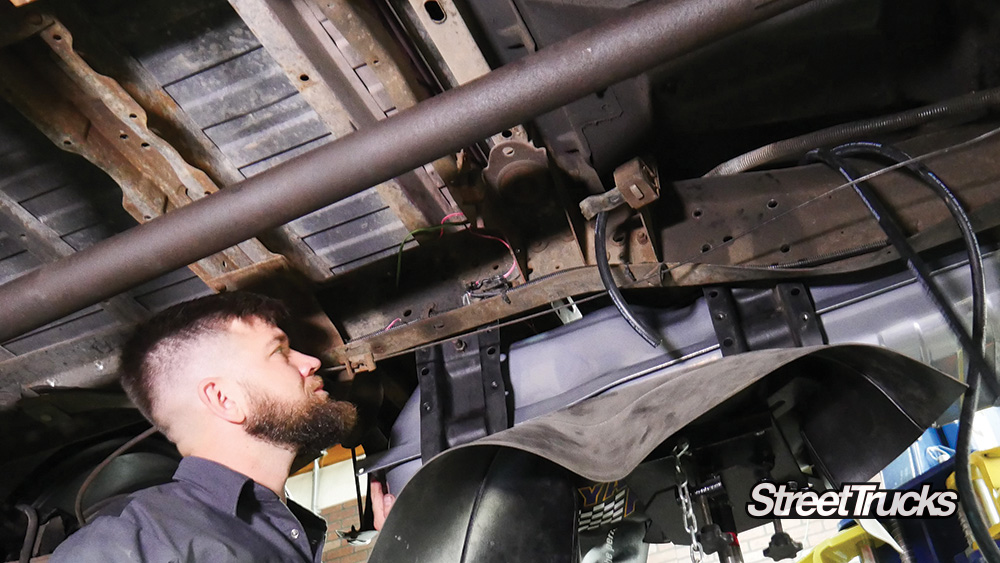
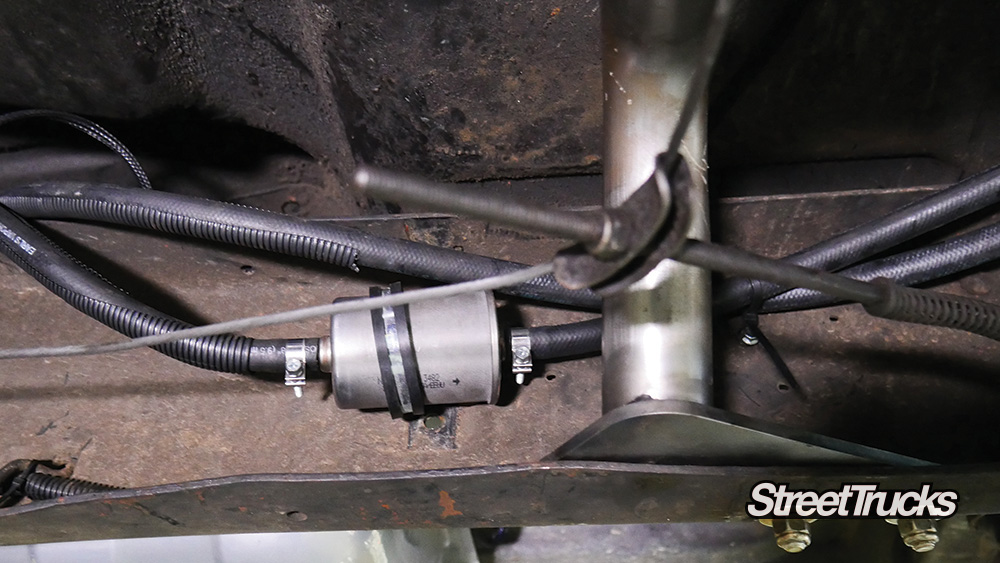
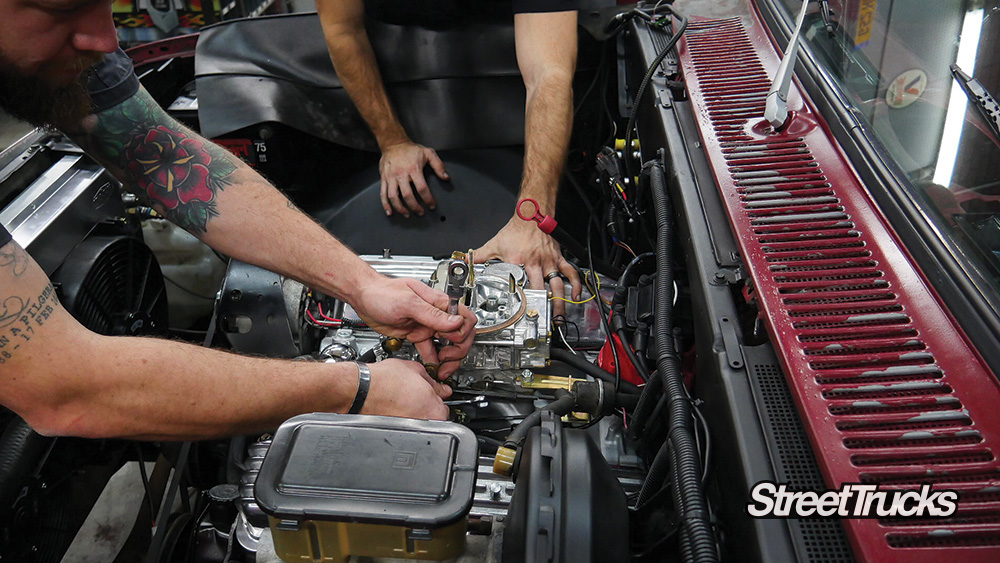
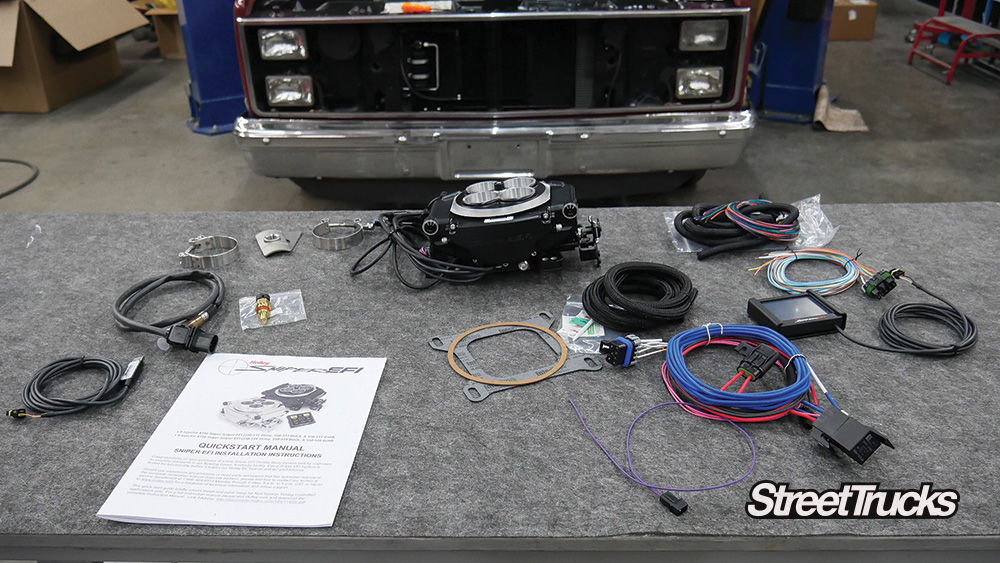
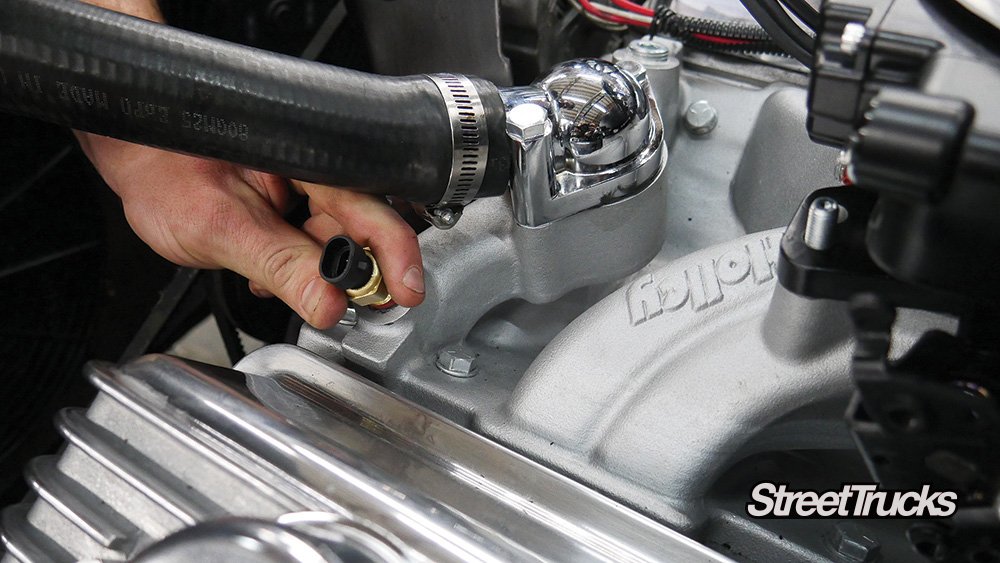
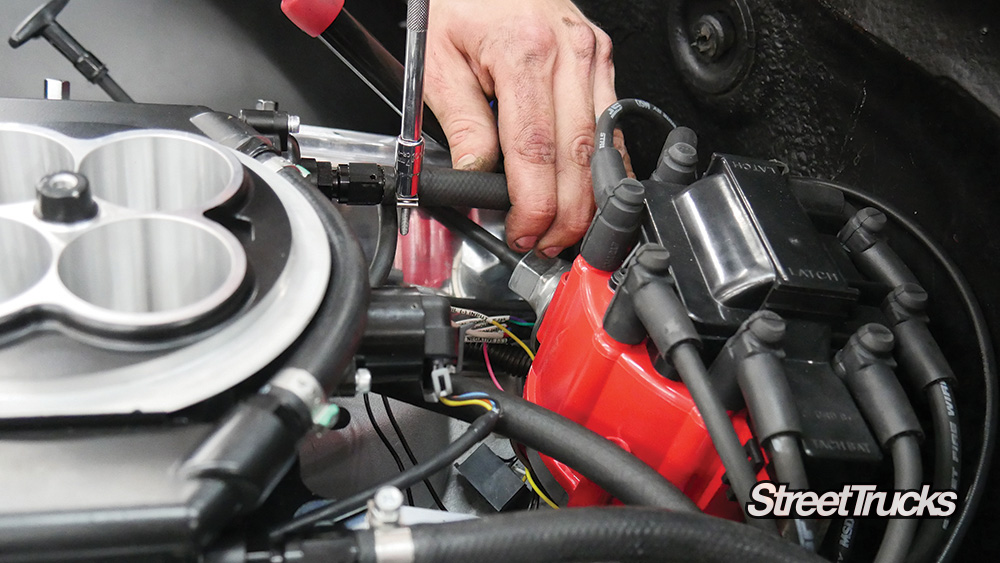
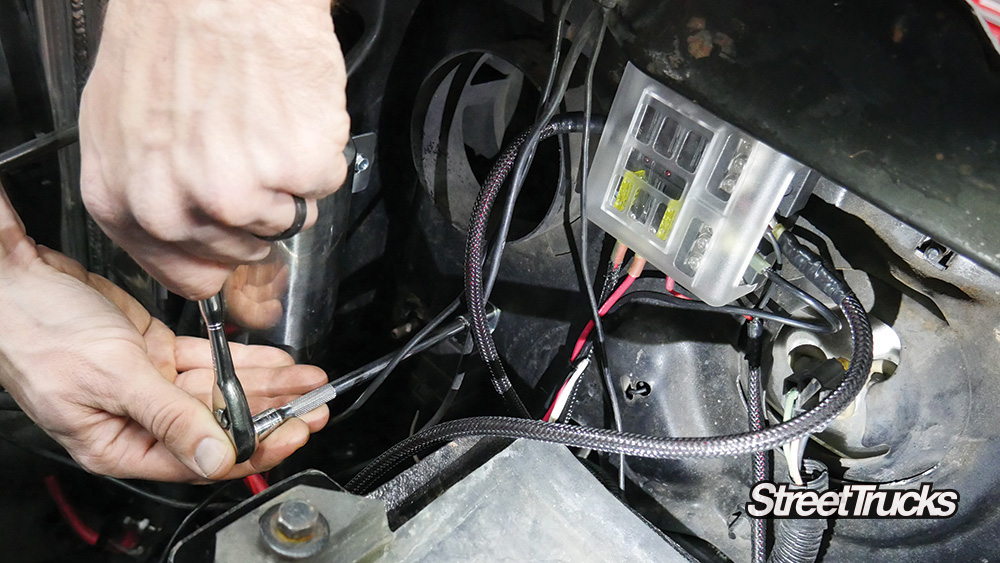
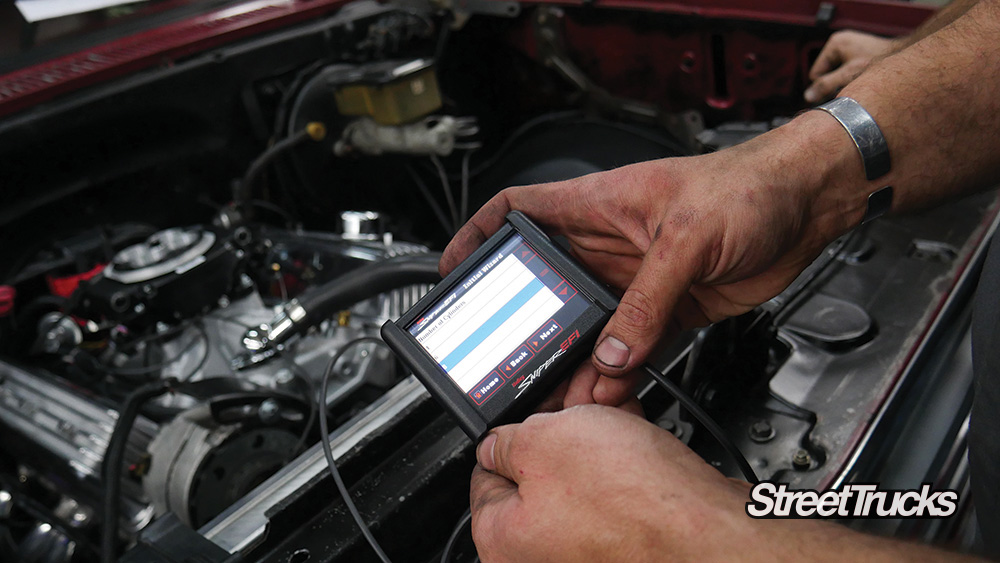
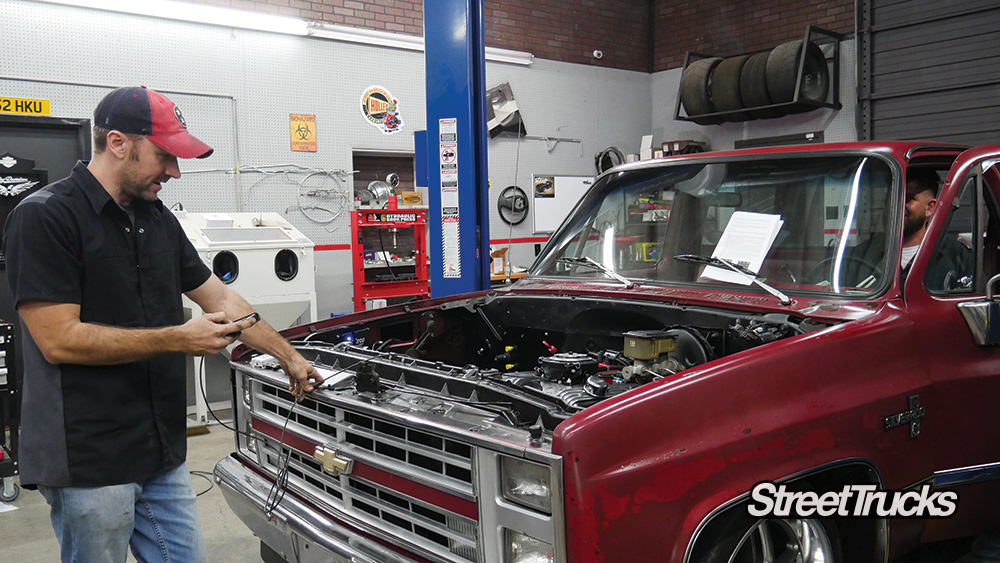
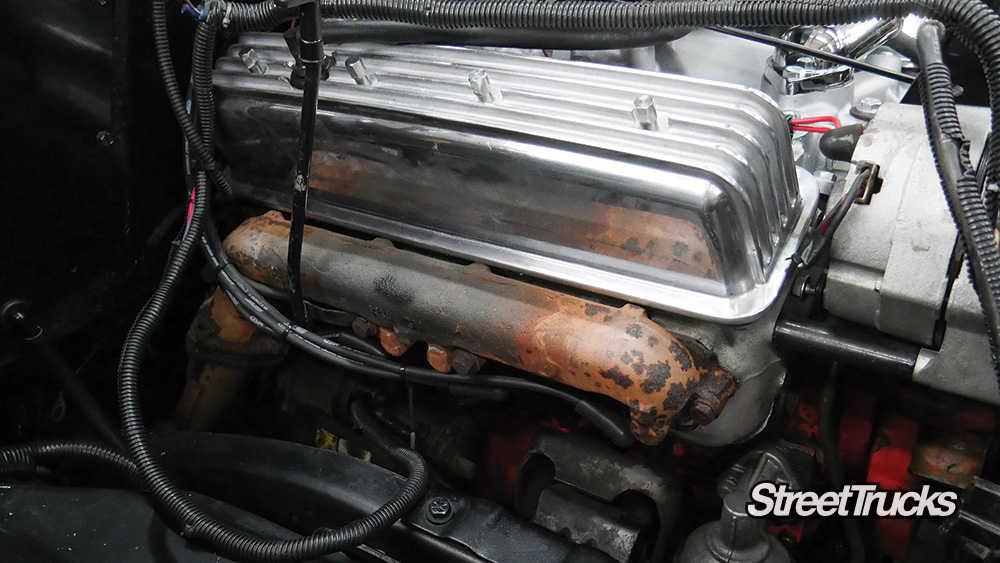
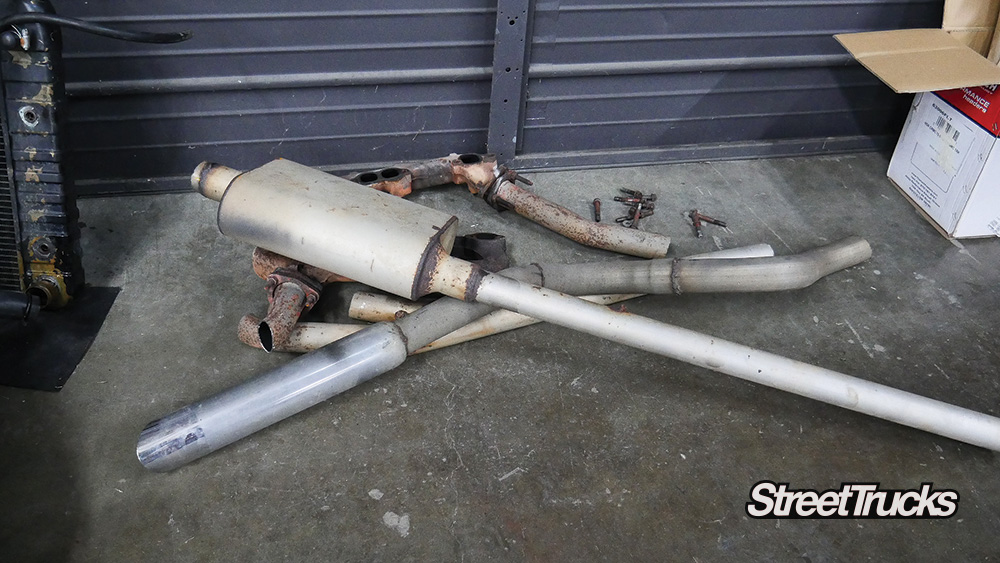
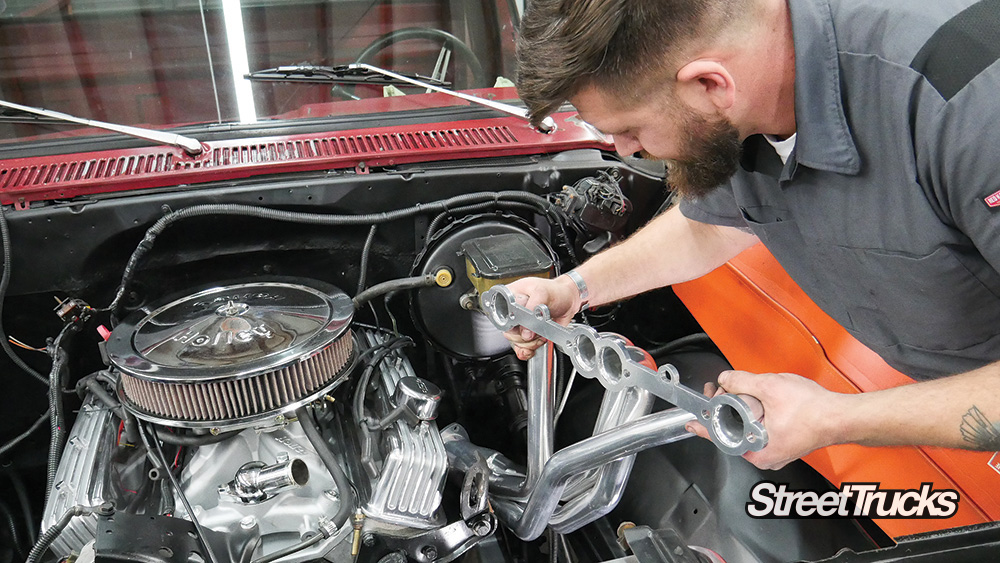
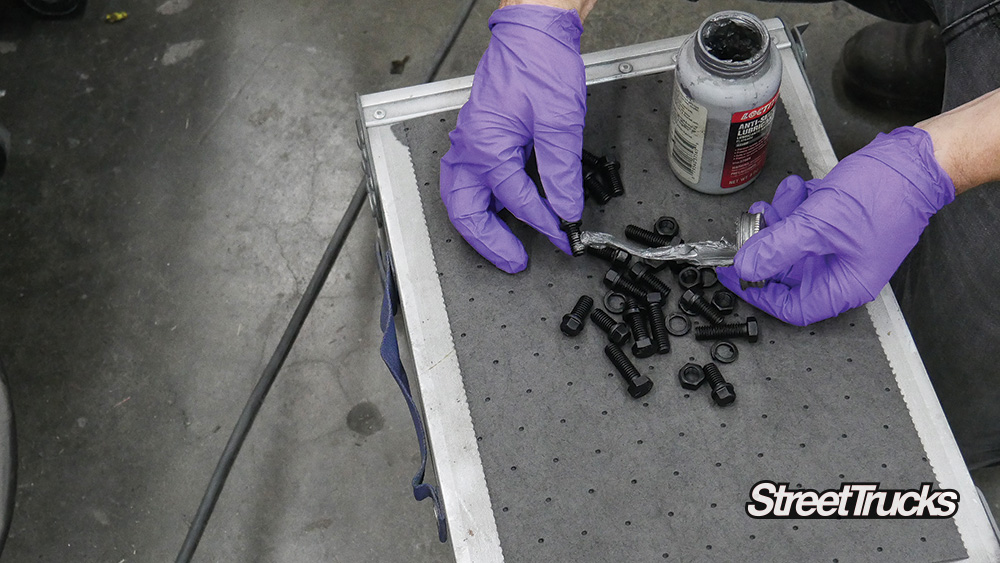
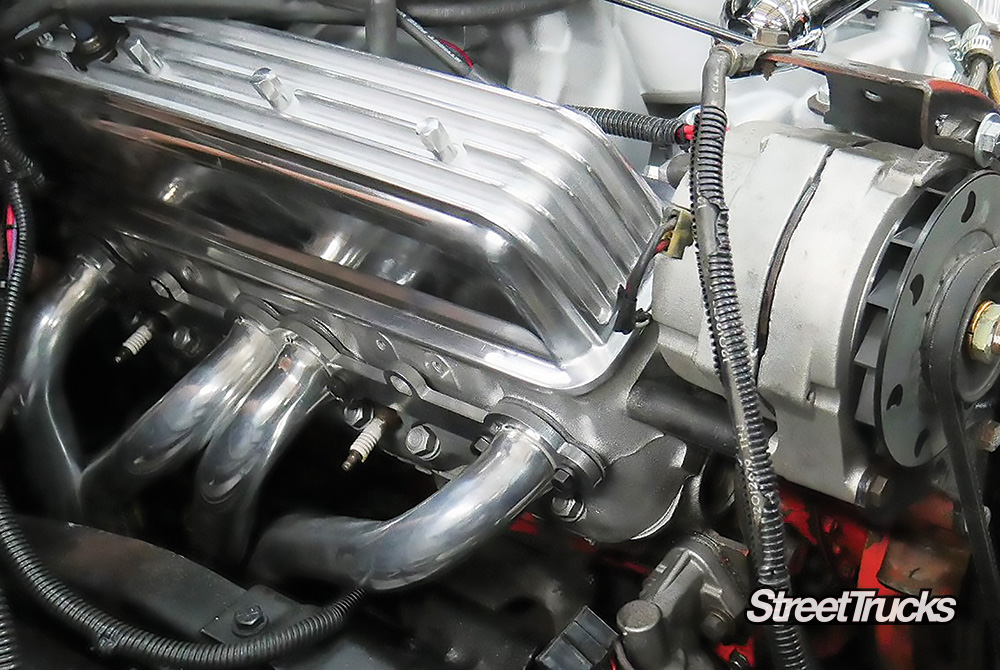
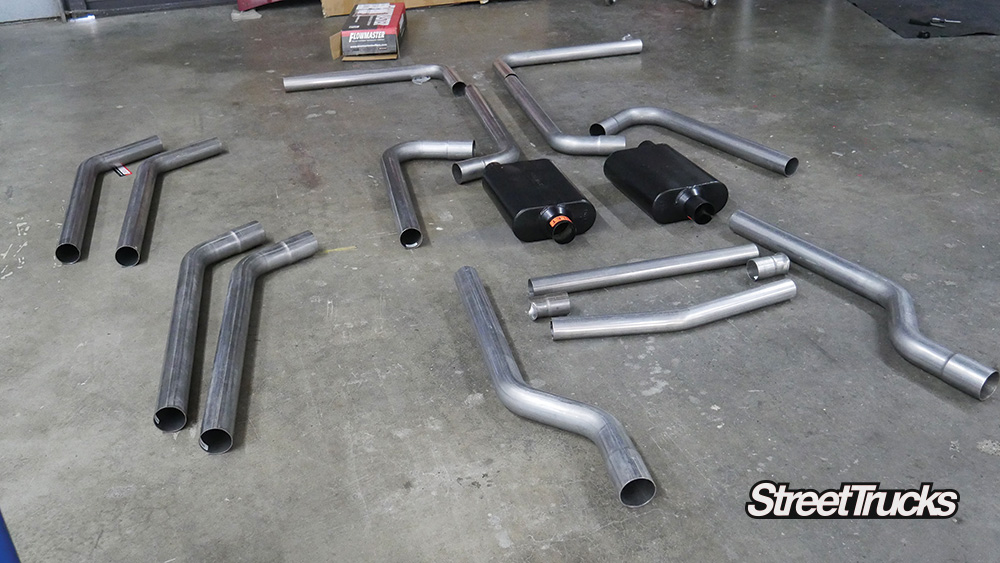
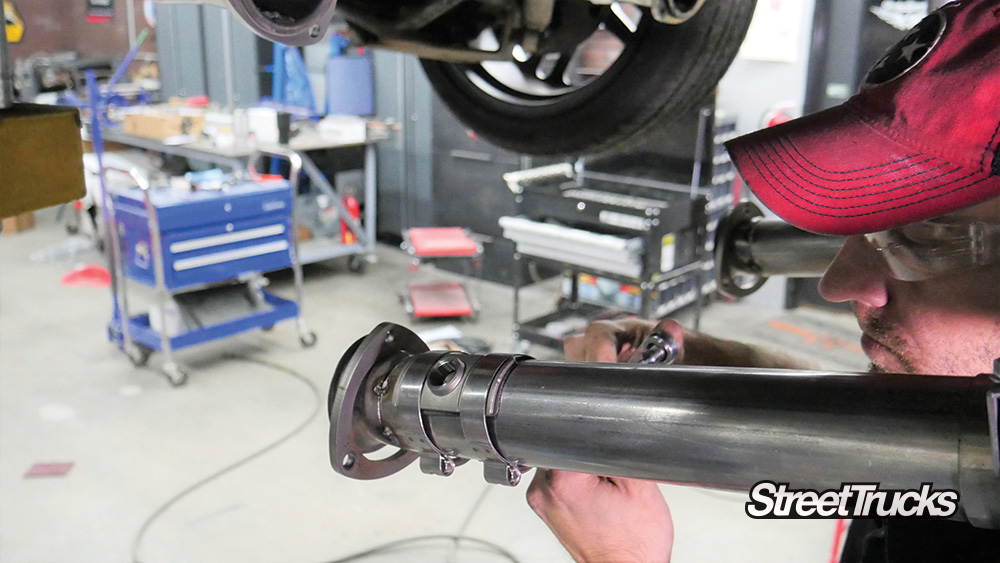
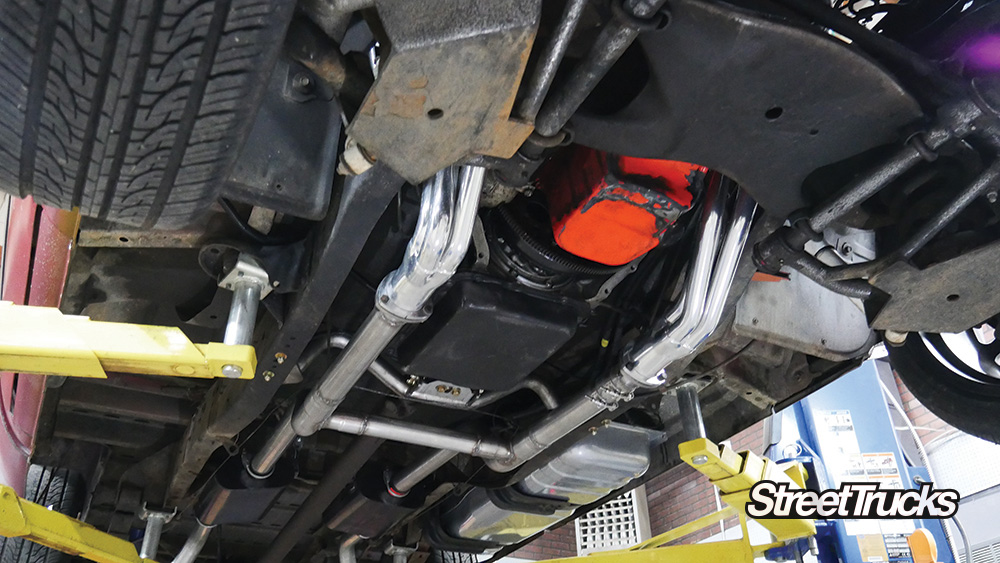
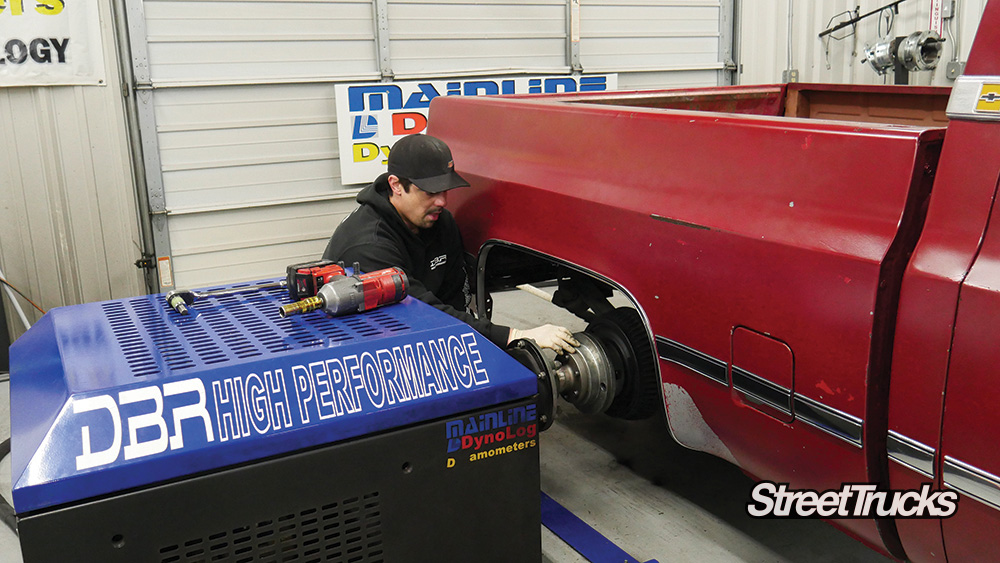
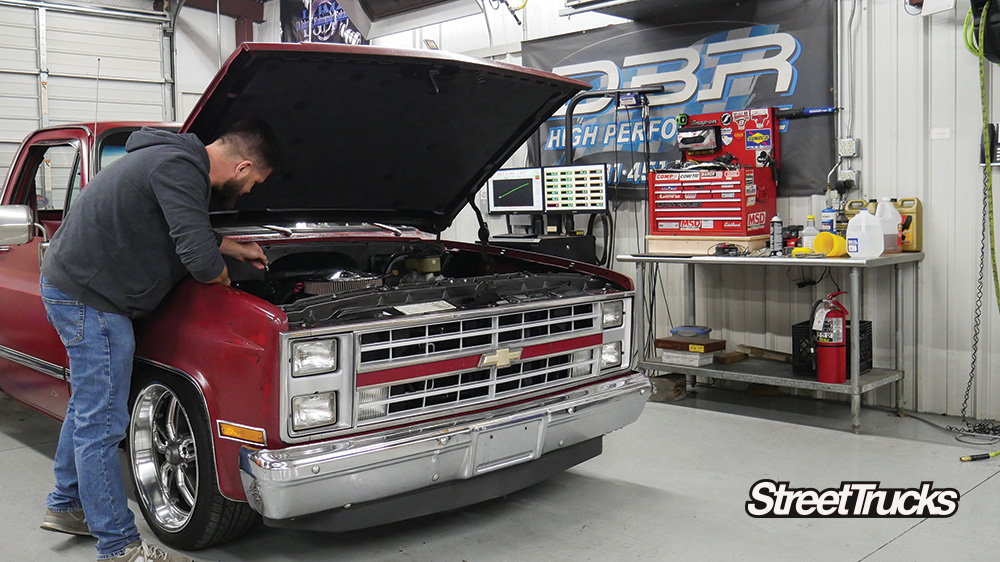
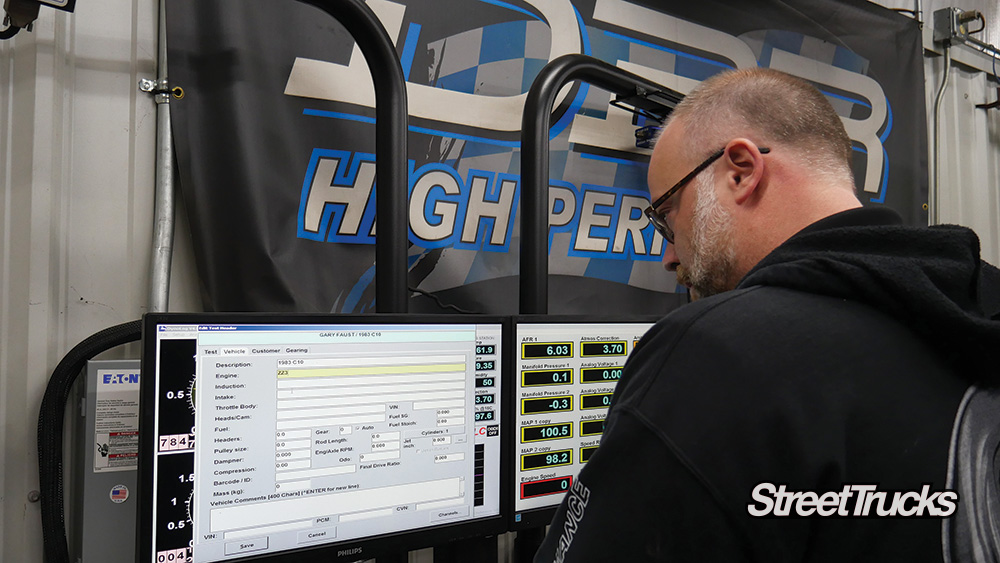
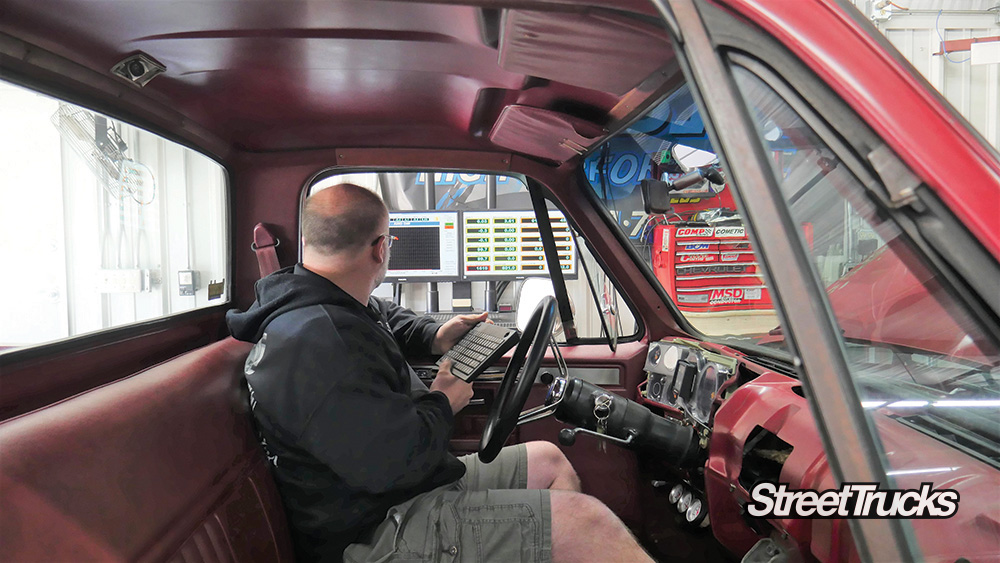
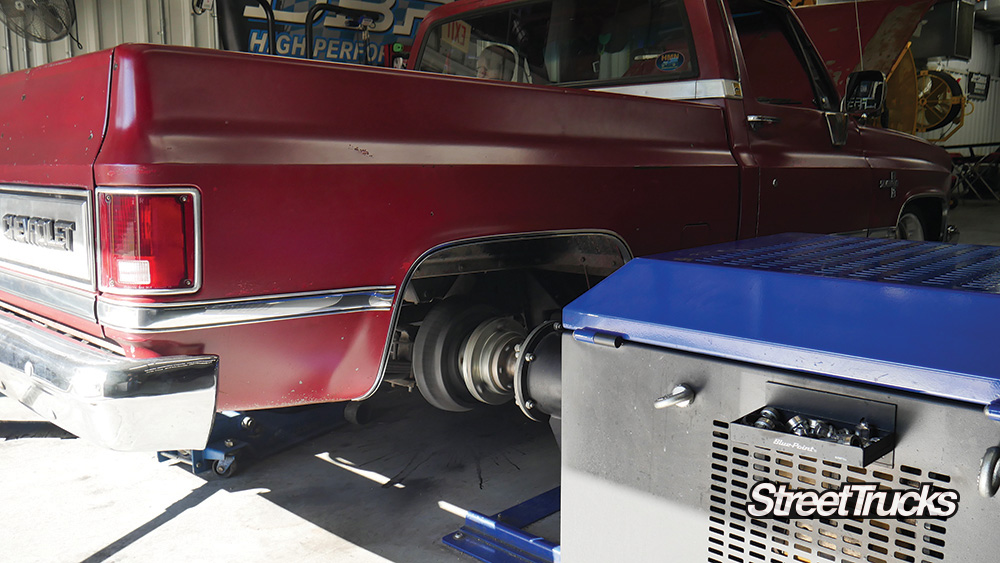
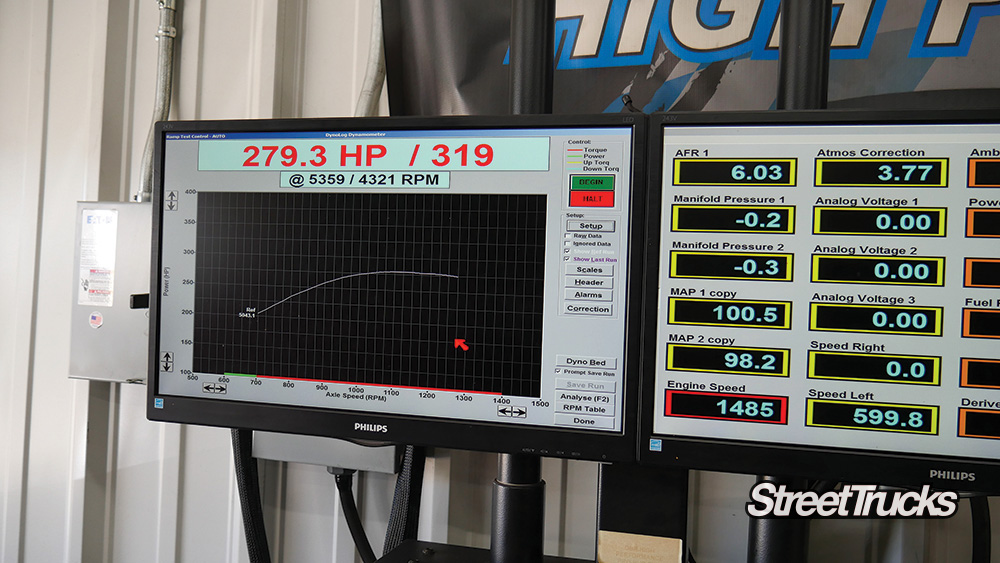
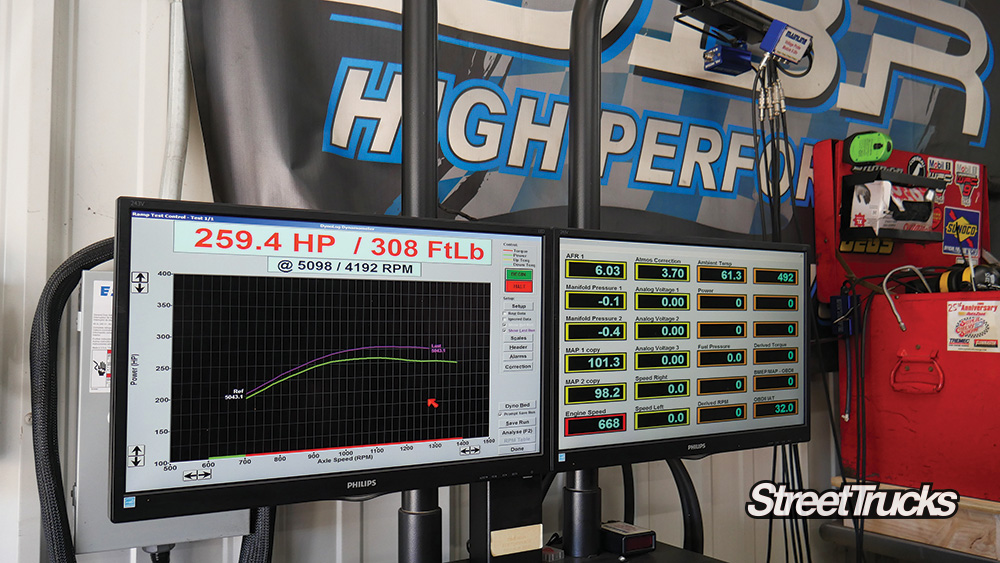
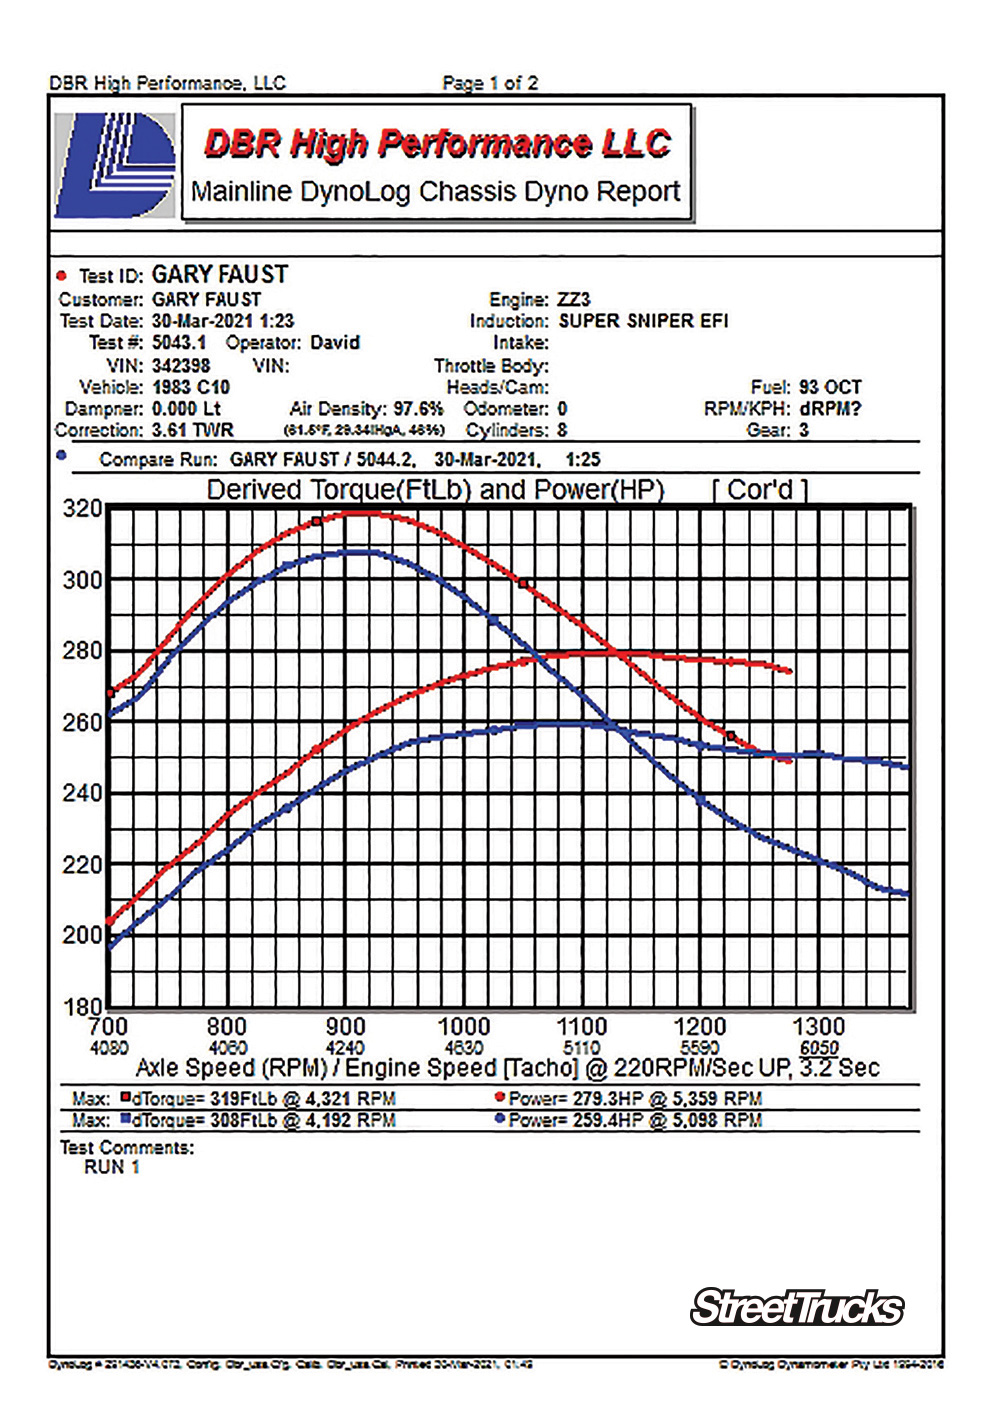
A quick test-fit of the new core tells us that the original rubber isolators will work, as will the upper holding clamps.The dual 12-inch fans can be mounted with provided self-drilling screws or by drilling for the provided rivets for a cleaner look. The total thickness of the radiator and fan will leave plenty of room for the new accessory drive.Gary replaces the stock clamps on the new radiator and clamps things in place behind the Vintage air condenser. (Part 2 of this series.)Cold Case provides part numbers for the larger (4×4) hose set to accommodate the extra airflow of the 1.75-inch ports and will be selling its own custom hoses by the time this article hits the stands.Cooling fan relays and circuit is provided by an auxiliary fuse box Gary has mounted on the passenger side of the core support.Holley, anticipating the popularity of these trucks and EFI and LS swaps, offers a complete replacement fuel system with a choice of either in-tank or external fuel delivery. Gary chose the Sniper EFI tank (Part #29-156). The tank itself is powdercoated for durability and comes with a 255 LPH internal pump, sender, straps, gaskets and clamps to install in an ’82-’87 C10 truck. If Gary was staying N/A, this pump serves up to 550 hp and would offer plenty of fuel. However, with the upcoming TorqStorm blower, numbers will be closer to 650 flywheel, so Gary called Ethan at Holley Tech Support, who recommended a 340 LPH pump upgrade (Part #19-342) that will support 700 hp.The original tank is unbolted and discarded, but the mounting straps will be cleaned up and reused.The larger capacity 340 LPH pump is the same physical size and replaces the 255 LPH pump that comes in the Sniper kit.Gary carefully measured, installed and clamped the new pump in place (complete with dirt sock) before installing into the new tank body.Provided hardware secures both the pump hat and the fuel level sending unit.Cory installs and clamps the new vapor guard hose to the tank before installation.A transmission jack comes in handy to install the new tank assembly, and it gets a fender cover for padding on the bottom side to keep the tank pretty.Send and return lines are routed inside the frame rail, away from anything that moves or gets hot.The provided feed-line filter gets installed on the frame rail with an oversized Adel clamp, paying attention to flow direction.Removing the Holley 600 CFM carb is simple. Reselling it in horse-trades, swap meets or internet auctions will help buy back some of the parts costs.The TorqStorm charger needs a blow-through setup for induction. Gary had a choice to make: either purchase a blow-through carb or convert to a TBI setup that can adapt to forced induction. There’s quite a difference in cost between the two, but the TBI setup will yield much better driveability, has self-learning capabilities and can be converted back to N/A status easily. Besides, the ability to tune air and fuel precisely at boost can make the difference between along engine life and broken parts. Research led us to the Holley Super-Sniper 550-519 4 injector kit, which comes complete with the throttle body unit, ECU, wiring, sensors and handheld controller. Gary had the option of shiny, black or gold colors; he opted for black. The Sniper EFI comes with everything needed to install, including a manual. Online tech support is fantastic with Holley Performance with dozens of videos, tech support phone lines and a forum at Holley.com.Installation is straightforward, and configuring cables and connections is by the numbers using the manual.The throttle and TV/trans cable are installed with a Holley bracket (Part #1953) made for a DEMON carb that fits nicely on the mounting flange of the TB.Sniper comes with all necessary sensors, including coolant temp and “no-weld” 02 exhaust sensor and bung.Delivery and return fuel lines are routed up the rear of the bellhousing and to the Sniper EFI body. For N/A application, the Sniper is internally regulated. We’ll add an external regulator for the boosted application in Part 2 of this series.Gary pulled 12v key-on power from the pink ignition wire for the Sniper and connected the main power and ground directly to the battery. Trans and fan controllers go to an auxiliary fuse box.We used Redline 50/50 with water wetter in the new Cold Case radiator to make sure we keep cool on the initial startup.Once plumbed and connected, we can fire the truck, which lit immediately. The setup menu is straightforward and walks you through all the setup prompts.The Sniper doesn’t start “learning” until it hits 160 degrees, so some idle time is necessary to reach operating temps. Once it’s warmed up and in a closed loop mode, Gary will put a few hundred miles on it, check for leaks and make sure everything is happy.The restrictive factory manifolds were destined for the heap, regardless of the plan, but certainly need to be replaced with a forced induction upgrade.The OE 1 ¾ pipe and ancient Flowmaster mufflers get cut out and reclaimed by nature.Ceramic-coated Flowtech long tube 1 5/8 headers with thick flanges will ridiculously outflow the OE manifolds and are budget friendly, relatively speaking.With aluminum heads, all header bolts get anti-seize! Any dissimilar metal fastener, regardless of the component, should get anti-seize lubricant.Installation is drama-free and looks great! No adjustments needed and all fasteners and gaskets went in with fingertip pressure.Flowmaster offers many options for many vehicles. We opted for its Universal 2.5-inch stainless and mandrel-bent exhaust, with some Flowmaster Super 44s thrown in. There’s plenty of choices for routing, as well as straight and V-shaped crossover tubes.After installing a tubular transmission mount that will allow for symmetrical exhaust pipes, Gary and Cory built the exhaust from the collectors back, tacking sections together as they went.The crossover tube was mounted under the transmission mount, which is a good transition point where exhaust pulses are starting to lose some velocity. A 1.25-inch hole saw makes a clean opening on each side.The Sniper ECU only needs one 02 sensor. Ours is going in the driver side just behind the collector using a step drill is used to create the location. It’s important not to place your sensor at the bottom where moisture or fuel could potentially accumulate.Holley provides a gasket and clamp-on bung for installation, or you could opt to weld in a bung.The completed system turns down just ahead of the rear axle, looks great, and will be an awesome enhancement for both the N/A and forced induction versions of this truck.. On paper, this engine was advertised at 345 hp/387 tq. Not too shabby for a daily driven street truck, and a solid foundation for power adders. Subtract 20% for driveline losses, and it should make right around 275 RWHP. We can add back a little for the 1 5/8 LT headers and eliminate the mechanical fan, but that’s our target for the day. This initial session is not about tuning. It’s to establish a solid baseline for comparison moving forward. Whatever we get at the wheels, a dyno session is always a good idea to test limits and levels on a drivetrain rather than public roads, so we headed to DBR High Performance in Spring Hill, Tennessee. David Branson has more than proved himself over the years, tuning and assisting with many of my personal builds, countless TV projects and potent Drag Week with TM vehicles, trophy trucks and road race cars. Our Holley Sniper X is settled and happy with a few hundred miles of commuting on the new cooling and exhaust systems, so we picked a cool morning to get our baseline numbers before the TorqStorm power adder gets installed. DBR has a state-of-the-art eddy current hub-dyno, which ensures no slippage and complete accuracy. Chris connects both hubs and triple checks the installation.Gary connects his TCI controller to lock the converter and gear selection.David Branson fills in the info for the computer before an initial pull. Remember, we’re not tuning here. This is to establish a baseline only for comparison.Since Gary drove his truck to DBR, it’s warm and ready to make a pull—60-degree ambient air temperatures are not a bad thing!With the 4160 locked in at 3rd gear, wheel speed gets well over 120 mph. Driveline components are tested here! It’s better to break on the dyno than out on the street.The first tug nets almost 280 hp and 319 lb-ft.After a 2-minute cool-down, David does another pull and nets less HP and TQ but justifies it with higher IAT’s and general heat-soak effect.Averaged out, our truck made 269.35 hp and 313.5 lb-ft. Gary is very happy with those numbers, which are actually higher than advertised power from this engine. This can be attributed to a much better exhaust, less drag on the engine with an electric fan and the computer controlled EFI system maximizing efficiency. Gary says the truck never felt so good, and there’s an amazing before and after effect from these upgrades, but there’s more on the table! TorqStorm advertises a 50% gain with 8 pounds of boost on its single charger kit, but Gary’s hope is to see 500 hp to the tires, and no loss of driveability or comfort. Watch for Part 2 of this story to see if we meet that goal!!
We use cookies to enhance your browsing experience, serve personalized ads or content, and analyze our traffic. By clicking "Accept All", you consent to our use of cookies. Visit our Cookie Policy for more info.
 KEVIN TETZ
.
July 09, 2021
.
Department
.
KEVIN TETZ
.
July 09, 2021
.
Department
.


Share Link