COMPLETE INTERIOR RESTYLING BY TMI PRODUCT MANUFACTURING
WHEN SHOPPING FORa vintage truck there are always a few parts you can expect to be thrashed. The bench seat is likely at the top of that list. Think about it: For a truck that was used on a daily basis for even a third of its 50-plus years on and off the road, chances are the upholstery, foam and frame will be so far blasted, the only thing that could possibly serve as a quick fix would be a trusty, old Mexican blanket. OK, so maybe the blanket won’t really fix anything, but it will do a decent job of masking the true condition of the beat-down bench.
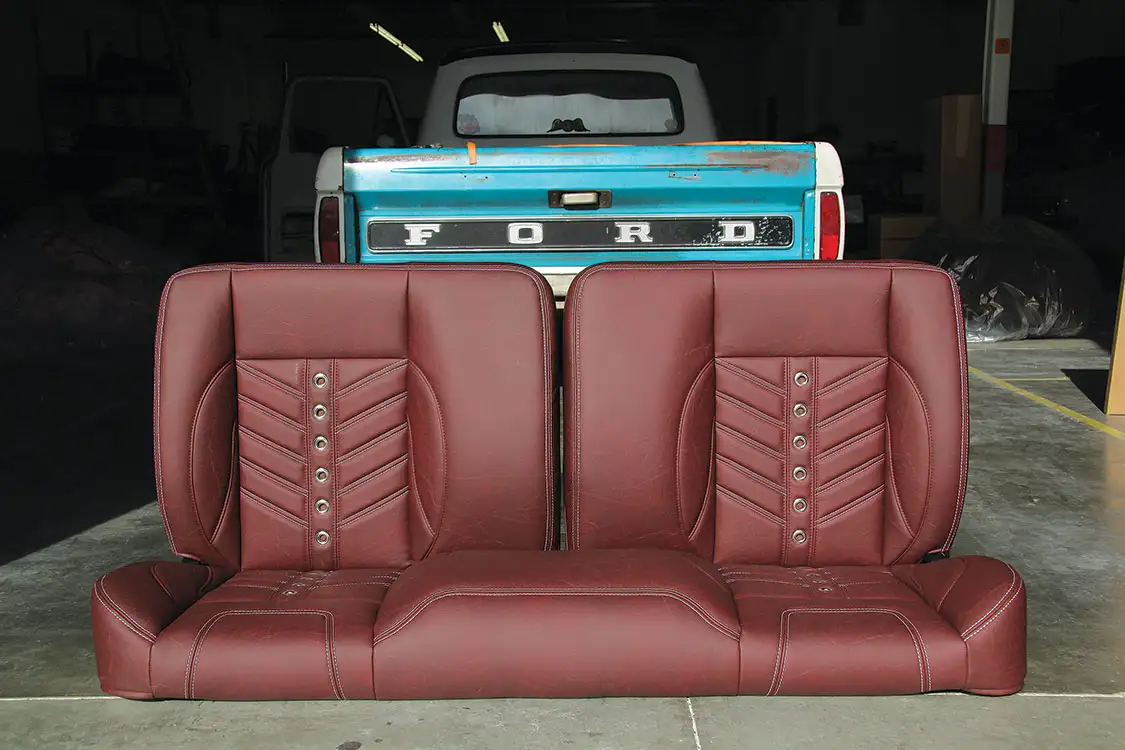
There is only so much masking one can be expected to endure when restoring an old truck, though, especially one that gets driven a lot. The ’65 Ford F-100 seen here is a native of California’s Central Valley (Fresno to be precise) and has been known to make 100-plus-mile runs with ease. But we aren’t focusing on the Ford’s prowess on the road at the moment. The conversation is still aimed at the bench seat and just how uncomfortable it must be on extended trips. The days of sitting at awkward angles, hoping to avoid a protruding rusty spring to the rear, are over.
TMI Product Manufacturing is the place to turn to for the ultimate in bench-seat replacement. There’s no need to attempt to save your truck’s old bench frame. TMI has many diff erent seat offerings, from buckets to benches, in package offerings from the very basic to more detailed, like the Sport-X series seen here. To sweeten the deal, TMI also off ers custom dash pads, panels for doors and full carpet kits to completely overhaul your old truck’s worn interior.
We were curious to see just how easy the transformation could be, so we planned a trip to TMI’s Southern California headquarters and met up with Carlos Marron of Los Rod Chop and his F-100. We watched as the guys at TMI completely gutted the truck’s cab space and turned it into a place where someone would actually want to spend a few hours. Follow along and see for yourself just how you too can upgrade your project with the ultimate in style, comfort and simplicity. ST
How’s this for a before photo? As you can see, the Ford’s old bench was living life in poor shape. Even though Mexican blankets have a charming look all their own, the time to switch things up for the better had finally arrived.
The crew removed the bench seat by unbolting it from the mounting points in the floor—Just like that, the old, uncomfortable bench seat was freed and escorted out of the building by these two fine gentlemen.Sometimes change is great, although there wasn’t any to be found underneath the old seat. No quarters or dimes were recovered, just a lot of dirt and dust, and a packet of mild (not even hot) sauce from Taco Bell.With freshly upholstered seating and accessories due to arrive shortly, the old seatbelts just weren’t up to snuff. They were unbolted and disposed of.
SEAT ASSEMBLY
With the cab floor cleared to make room for the new TMI bench, the guys began the assembly process first, starting with sizing up the new frame.To allow the bench to be adjusted while on the track, TMI includes a pair of sliders in the kit.
To install the sliders, the seat was turned upside down, and each piece was fastened to either side of the bench.An included wire rod was fed through a designated hole on each side of the sliders. This will allow the seat to slide forward and back evenly at both ends.Next, the frame was attached to the bottom of the seat, ready to be installed inside the cab. Although the seat was fully assembled, there was still much more to do to the Ford’s interior before inviting it in. For the time being, it sat on the sidelines and watched as the rest of the steps played out.
DRESSING THE DOORS
TMI’s matching door panels were next, but first the window crank and door handle had to be removed.
The included door panel template was eyeballed then taped to the door once it was aligned just right.
Next, the holes in the template were marked. Eventually the retaining clips on the back of the panel will be secured into the holes.Before that could happen, each and every hole had to be drilled out.To prepare the area for the lower panel to be installed, the retaining clips were pulled and removed.The existing clips in the door were taken off since the ones TMI uses to attach its panels are much more secure and easily slide into the back slots of the panels.
With both panels ready to install, the clips were simply aligned to the holes in the door and pushed firmly into position. No secret mounting tricks here—simple.
TIME TO DASH
Next, the guys wanted to focus on installing the new dash pad, which is relatively quick and easy to install. There are two brackets on the dash, one on each side. Two screws are the only things holding them in place.
The dash pad was inspected before it was brought into the cab. At first glance, we noticed that there are two top vents built right into the pad. The upholstery and stitch work on this piece are just as top-notch as the seat and panels.The dash side clips were reattached to lock the pad securely in place. TMI’s vinyl material has been specially developed to withstand exposure to direct light and the subsequent fading and cracking that can occur over time.
CLEAN FOUNDATION
TMI’s sound-deadening material and carpet kits can be custom-ordered for the F-100, as well as other specific makes and models of cars and trucks. The multi-piece designs make the job easier, and all that is usually required for a great fitment is just a little trimming as the kit is spread out and pieced together.This can right here proved to be absolutely necessary when applying the sounddeadening material. The almost instant bonding action makes the job a whole lot easier and effective.
A series of test fitting, adhesive spraying, trimming and taping was all it really took to successfully cover the cab floor in TMI’s sound-deadening, heat-deflecting material.
The lasting result of the hidden layer underneath the carpet will keep the cab quieter and cooler without even having to think twice about it.Next, sections of carpet were laid in piece by piece. The spray adhesive came in handy with this portion of the installation, too.The floor wasn’t the only surface getting carpeted. The back wall of the cab was covered by the carpet kit for a more complete look and feel.Notches in the carpet were cut to expose the seat frame mounting points. You wouldn’t believe how many times this step is overlooked during this kind of job.Fresh, colormatched seatbelts were sourced from Brothers Truck Parts, and they were the next items to find their way inside the Ford.Trimming is especially important around the pedals to ensure proper movement. The guys took their time around this area to make sure fitment was spot on, while still giving the pedal assembly enough room to function without impediment.
FINISHING IT OFF
Now, for the moment we were all waiting for: the installation of the Ford’s new bench seat. It waited around all morning and into the afternoon, but the cab was finally worthy of its company.The rest of the job was a cakewalk; it was just a matter of bolting down the bench. You can see how annoying this part potentially could have been if the guys hadn’t exposed the mounting points in the floor.
The rest of the job was a cakewalk; it was just a matter of bolting down the bench. You can see how annoying this part potentially could have been if the guys hadn’t exposed the mounting points in the floor.
We use cookies to enhance your browsing experience, serve personalized ads or content, and analyze our traffic. By clicking "Accept All", you consent to our use of cookies. Visit our Cookie Policy for more info.
 John Mata Jr.
.
October 04, 2018
.
How to
.
John Mata Jr.
.
October 04, 2018
.
How to
.


Share Link