So you just bought a brand-new, full-size GM truck and you can’t wait to hit the pavement. If you’ve seen other new trucks laid out, you know that the mod boasts a powerful shock factor. If that’s the look you’re gunning for, you probably want to know how to achieve it. We’ve got your solution.
Michigan Metal Works (MMW) has been building suspension parts for a long time, and the company is wellknown for its flat-plate-style control arms. We’ve worked with the company in the past on other projects, so we called them first this time around.
MMW rep Taylor told us that there are some small changes in the frame and front suspension design of the 2014-present Chevy and GMC trucks. Fortunately for us, MMW has a kit for the new body-style GM trucks and SUVs. Taylor also explained that there are a few extra options for kit construction. The standard kit comes with factory-style upper ball joints, but the company also offers a kit with the upgraded Jeebus Joints. We chose to go with the Jeebus Joints because they not only look more custom, they also allow for more articulation. Another option is tubular control arms. We decided to stay with the flat-platestyle since it’s proven to work well in every application.
There is one thing important thing to understand about these newer trucks, though. Although it’s a front suspension kit, it’s not a simple bolt-on job. It takes some serious fabrication to install these kits. That being said, MMW does include everything you’ll need to get the job done, minus the ’bags and shocks.
The complete kit showed up a few weeks after we placed our order, and we quickly unboxed it and inventoried all of the parts. Obviously, we ordered a control arm kit, so the new upper and lower control arms are the biggest pieces included. Since each kit is built to order by MMW, you can choose from a wide variety of powder-coat colors for the control arms when you place your order. In addition to the control arms, the kit also included new upper control arm pivot mounts, new ’bag mounts, new shock mounts and new steering parts. The control arms came preassembled with the upper arm Jeebus Joints, lower control arm pressin ball joints and all of the bushings ready for installation. The kit also comes with some piece of mind as well, because MMW includes a lifetime warranty against weld and product failure.
Though this installation focuses on the front-end kit, it will take some work on the rear to get it to sit just as low as the front. Tre 5 Customs custom-builds a triangulated 3-link system to do the trick, but there are many other options on the market as well. Read on to see what it takes to make one of these trucks rest its frame on the ground.
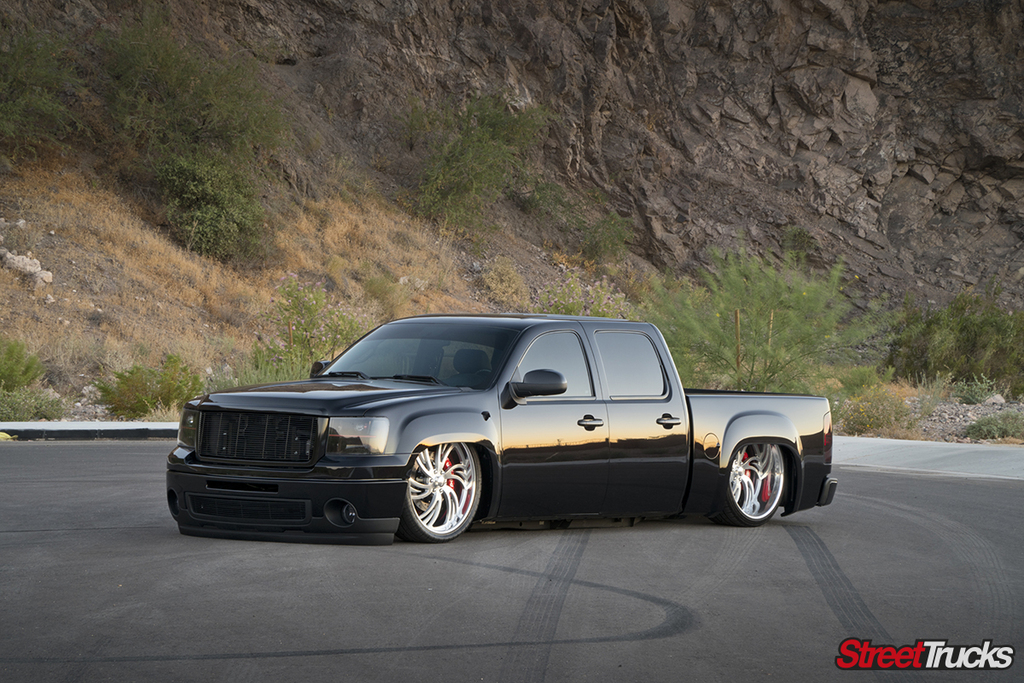
For reference, here’s a brand new ’16 GMC Sierra before it was laid out on a set of big billet wheels. These new trucks keep getting higher and higher from the factory, but you can cure this altitude sickness.The first order of business is to get the truck on the lift and pull off the factory wheels. You probably won’t want these anymore, but make sure to hang on to them for the wheel sensors.In order to gain more access and make the job a bit easier, the front fenders were removed and everything attached to them was moved out of the way.Once there was plenty of room to work, we got to work removing the front suspension, starting with the steering tie rods. Removing these first allows the spindle to be turned without having to turn the steering wheel.The ability to turn the spindle made it easier to gain access to some of the other hardware, like the caliper bolts. The two bolts go through the caliper and thread into the back of the spindle. Once they were removed, the caliper could be removed also. There are two Torx head screws securing the rotor to the hub. Once those were removed, the rotor came right off.There are three bolts securing the hub to the back of the spindle, those were removed to free the hub. After removing the bolts, the ABS sensor wire was unplugged and the hub was set aside.The next part removed was the spindle itself. The upper and lower ball joint nuts hold the spindle to the control arms.With both ball joint nuts removed, a heavy hammer was used to free the ball joints from the spindle tapers. Pay attention to where the spindle is being hit, you never want to strike the actual ball joint. Striking the spindle will jolt the ball joint out of the taper and free the spindle without damaging the threads on the ball joint bolt.On top of the strut mount there are three nuts securing the strut to the tower. These three bolts were removed to free the strut.Next, the two bolts securing the strut to the lower arm were removed, followed by the two bolts securing the lower control arm at the frame pivots. The lower control arm was removed and tossed aside.The last piece of the factory suspension to be removed was the upper control arm. The factory hardware for both the upper and lower control arm will be reused so be sure to hang on to it.
REMOVING THE FRONT MOUNTING TABS
Next, we prepared the new upper control arm pivot mounts. We measured the space from the front of the truck to the front control arm tab.There are several ways of attacking the factory mounts that must be removed. Tre 5 Customs used a plasma cutter to make quick work of the bulk of the material.Here’s what we’re left with after a few minutes of cutting. The plasma can get pretty close to the factory welds, but they still needed to be cleaned up. A 36- grit flap disc on a 4 ½-inch grinder was used to clean up the rest of the frame.Next, we transferred the measurement we took from the factory control arm tab onto the frame at the same location.
INSTALLING THE NEW ARMS
Here’s the first look at the complete MMW kit. The new upper and lower control arms have been custom powdercoated and all of the new plates are water-jet cut from ¼-inch steel.The upper control arm mounts key together via slots; they’ll hold the upper mounts in place for mock-up.With the new upper control arm mounts tacked together, the arm and mounts were located on the frame and tacked in place.The new lower control arm bolts right into the factory lower frame pivots and reuses the factory hardware.Before the spindle was installed, some modifications were needed. Since the new lower ball joint will actually go up through the spindle, rather than down, it needed to be re-reamed. Using a hand-held drill and a bench vise, the lower ball joint taper was modified to accept the new ball joint from underneath using a tapered reamer.The steering arm also needed some modification. We drilled it out to 5⁄8 inch to accept the new steering hardware.Once the spindle modifications were made, it bolted right up to the new control arms. Since the ball joints are tapered, they needed to be tightened completely for proper mock-up.The new tie rod and adjuster included in the kit were threaded directly onto the former factory tie rod location to make it easy to align the truck after the installation.The new heim joint tie rod was attached to the spindle. The factory brake rotor was also put back on to help with suspension cycling. Even though this is a proven kit, it’s always a good idea to check the suspension travel and make sure you’re not only getting the required amount of travel, but also sufficient things like toe and camber change.
AIRBAG IT
Once all of the suspension was moving well, the new airbag mount was addressed. The airbag plate and gussets were pre-welded on the bench and a 3-inchtall piece of tubing was used to imitate the collapsed ’bag height. One of the differences between the MMW kit and other kits out there is the ’bag mount. These ’bag mounts can be positioned at the correct height for your application, so that you can set it up for maximum lift depending on your wheel-and-tire combination.With the suspension and ’bag mount in place, the next order of business was the shock. A Ridetech shock was used in this application because they’ve been designed and tuned for optimum ride quality. The shock and shock mount were positioned and set up in the laid-out position. Again, everything was just tack welded in place in case any changes were necessary during suspension cycling.Next, everything was removed from the front end. The entire suspension had to be taken off in order to fully weld all of the mounts and apply a coat of paint to the bare metal. Then the hub, rotor and caliper were installed in the reverse order of removal. Finally, the Airlift D2600 ’bags and Ridetech RQ shocks were installed for the last time.The steering adjuster jam nuts were left loose until the truck could be set back on the ground and the alignment could be set close enough to drive it to the alignment shop.There are a few other steps to get the truck on the pavement that aren’t part of the kit but are definitely part of the job; things like creating clearance on the firewall and relocating all of the under-hood items with new inner wheel wells. Tre 5 Customs built new inner fenders, filled all of the holes on the inner part of the fenders, relocated the battery, fuse box and radiator overflow canister, and modified the factory intake tube. Once the inner fenders are painted, it will retain a mostly stock appearance.
LAYING OUT THE REAR
Since we showed you the front suspension, you should also see what must be done out back. These trucks are usually blown apart for a completely new rear suspension.Tre 5 Customs builds a triangulated 3-link system to hold the axle in place while its driven down the road.A new system of cross members and mounts was built behind the axle to hold the rear-facing lift bars and all of the air management components.
FINAL WORD
Fast forward a few weeks and here’s the finished product. For wheels, we decided to go with a 24×9 and 26×10 combination from Intro Wheels. The wheels are Intro’s Retro design and were custom-built for us. They were also custom-painted with black accents. For tires we chose 295/35R24 up front and 305/30R26 out back. All together, this made for a winning combo.
We use cookies to enhance your browsing experience, serve personalized ads or content, and analyze our traffic. By clicking "Accept All", you consent to our use of cookies. Visit our Cookie Policy for more info.
 JEREMY RICE
.
October 07, 2020
.
HEADLINE
.
JEREMY RICE
.
October 07, 2020
.
HEADLINE
.


Share Link