By now I’m sure you’ve heard of the Chevrolet LS engine. If not, I’m glad you’ve finally found a way to get out from under that rock. The LS-based engine platform has definitely taken over as the go-to engine swap in the last 5-10 years, and its popularity is still on the rise. Different variations of the engine can be found in everything from a bare-bones work truck all the way up to a factory-supercharged Corvette. Due to the different vehicle applications in which GM put these engines from the factory, obtaining an 6.0 LS engine for your swap is easy. Just skim your local classifieds, or make a trip to the salvage yard, and you’ll probably have a dozen or so to choose from on any given day. But what if you’re skeptical about buying a used engine?
Purchasing a used, or “pull out” engine, does come with some risks, and you should definitely consider them before purchasing. Since most of the odometers in newer vehicles are digital, you can’t simply glance into a vehicle to see how many miles are on it. Even if the seller knows the mileage, you still just have to trust his word. Compression tests can be done, and salvage yards will usually give you some kind of guarantee, but what if you want more piece of mind? Good news, there are options for brand-new LS-based engines.
When the opportunity to build a new LS engine presented itself to us, we knew right where to look for all of the parts we’d need. Summit Racing was our first and only phone call. Summit has been around since 1968 and is continuing to grow every year. In fact, it just completed the construction of its fourth distribution site located in Arlington, Texas. It also carries products from more than 1,500 manufacturers, so we were positive the company would be able to get us everything we needed to complete our engine build.
We discussed our options with a Summit rep and came up with a plan to build a strong and reliable engine that would also make great horsepower. Also, we decided to go with a short-block from BluePrint Engines. We also opted for a complete top-end engine kit from Trick Flow to complete most of the build. However, there are a lot of smaller parts we still needed to complete the engine assembly and get it ready to drop into our project. Follow along and we’ll tell you all about it.
Here’s how the new BluePrint Engines 6.0L, 364-ci short-block engine (P/N MLL-BPLS3640) showed up after we ordered it from Summit RacingOur first order of business was to get the engine unpacked and on an engine stand so we could inspect it and make sure all was well.Once we received the Trick Flow top-end kit (P/N TFS-K306-550-470), we laid it out on a table and took a quick inventory. The kit comes complete with new, assembled heads. The heads boast a ton of changes from the stock versions to provide extra strength and power. The kit also comes with a new camshaft featuring an advertised 291/295 duration, .595/.595 lift and 112 degrees of lobe separation. The camshaft is designed for use with the pushrods and roller rockers, which are also included with the kit. New head gaskets and head bolts round out the list of included parts.There are a lot of parts necessary to complete the engine build, and Summit helped us put together a list of everything we needed. Once everything arrived, we laid it out and took inventory. We picked up everything from new ignition coils to front and rear covers, matching valve covers and an intake manifold.
Once everything was accounted for, we began the assembly process with help from our friend, Jason. Starting with the new lifters from Trick Flow (P/N TFS-21400002-16), we forced some Royal Purple HPS oil into the lifters and let them soak for a while.While the lifters were taking a bath, we installed the camshaft. We applied some Royal Purple Max Tuff assembly lube to the camshaft and carefully slid it into place. It became more difficult to hang on to the camshaft once it got further into the engine, so we threaded a bolt into the end of it to help with the installation.With the camshaft fully inserted into the engine, the retaining plate (P/N NAL-12589016) and new bolts (P/N NAL-11561455) were installed and torqued to spec.Installing the timing set is a very critical procedure that must be done with precision. After setting the engine at Top Dead Center (TDC) with compression stroke at cylinder 1, we installed the crank sprocket and hub sprocket.Next, we installed the cam sprocket and chain. Notice the “0” on the crank sprocket is straight up, and the dot on the cam sprocket is straight down. These indicators need to be aimed directly at each other, just like in the photo, for the timing to be correct.Next, we installed the oil pump. Jason prefilled the pump with some more Royal Purple oil so that it wouldn’t be dry on initial start up.The oil pump (P/N NAL-12612289) was installed over the crank/hub sprocket.With everything on the front of the engine torqued to spec, the front cover/timing cover (P/N NAL-12561243) was installed to finish the front part of the engine assembly.Once the lifters had soaked up all of the oil they could, it was their turn to be installed. The lifters are installed four at a time into the four lifter guides (P/N NAL-12595365), and then they’re dropped into the engine.New hardware from Summit was used to secure the lifter trays to the engine. The lifter guide retaining bolts (P/N NAL-12551163) were installed and the lifters were put in place.Next, the new Trick Flow heads were added, but first Jason gave the mating surface a good cleaning in order to ensure a perfect seal with the new head gaskets.Since the engine assembly from BluePrint didn’t come with dowel pins, we made sure to order some. The new cylinder head pins (P/N NAL-12570326) were tapped into place with a brass hammer and will position the heads correctly.Then Jason installed the new head gaskets provided with the top-end kit.With the short-block fully cleaned and prepped, the new Trick Flow cylinder heads were set in place. The cylinder heads were located on the engine block with the previously installed positioning pins.
Tightening the cylinder heads is a five-step process, using the supplied torque-to-yield bolts. The first step is to install all of the M11 bolts and torque to 22 ft-lbs. Second, those 10 bolts all need to be turned 90 degrees. Third, all of the same bolts, with the exception of the two outer bolts within the cylinder head, are turned an additional 90 degrees. Fourth, the two unaddressed M11 bolts are turned an additional 50 degrees. Lastly, the M8 bolts supplied are tightened to 22 ft-lbs.A simple way to determine how much the bolts have been turned is by marking the bolt heads with a Sharpie. Trick Flow provides a very detailed set of instructions that also lay out the order in which the head bolts should be tightened.After installing the heads, the new valley cover (P/N NAL-12568002) was installed. The new cover comes just like you see it, with the gasket and hardware already in place.The new cover is set in place and the hardware is torqued down.Several sensors are needed throughout the engine for it to run correctly. We installed the new knock sensors (P/N ADO-213-3521) first. These threaded into the top of the engine block, after the valley cover was installed.
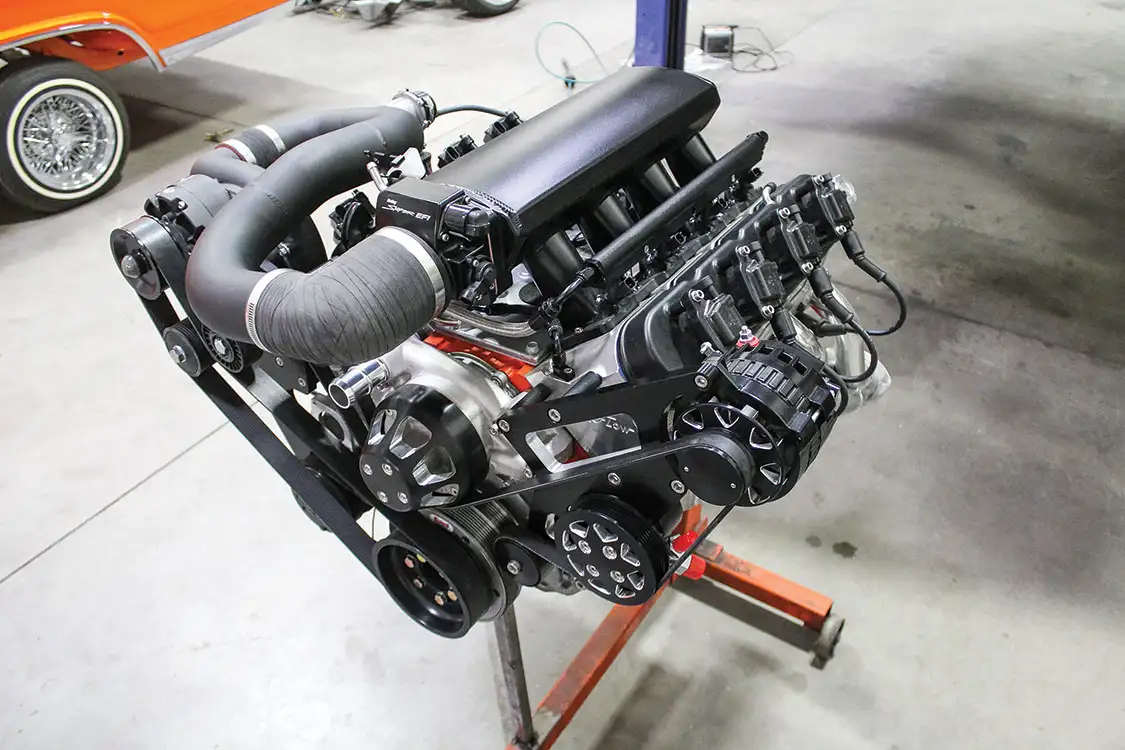
We also picked up a knock sensor harness (P/N NAL-12601822) to plug into the new sensors. The harness has rubber seals built into it that prevent water from gathering around the sensors.We turned our attention back to completing the installation of the heads. A new set of pushrods was included in the kit from Trick Flow. Obviously, Trick Flow did all of the work to ensure the pushrods were the correct length for the kit.The heat-treated and hardened chrome-moly pushrods were installed in the cylinder heads in preparation for the new roller rockers.Speaking of rockers, those were next on the list to install. The Trick Flow rockers are made from billet aluminum, which is stronger and lighter than a factory steel rocker. Plus, the roller creates less friction with the pushrod connection.Jason made sure to torque down the pedestal mounting bolt. We will revisit the bolt after a break-in period.A couple more sensors needed to be installed before we went any further. The new camshaft position sensor (P/N ADO-213-363) is located at the rear of the engine valley. This sensor simply drops in and is secured using a single bolt. The sensor reads the position of the camshaft while the engine is running via a machined groove on the camshaft.Another necessary sensor is a crankshaft position sensor. This particular part (P/N ADO-213-354) is meant for the 24X electronics system. The color of the sensor will indicate whether you have a 24X or 58X. That’s a whole other topic though; this is the one we needed for our application.Since the engine was on a stand, we were able to spin the entire thing upside down. This makes it much easier to clean the oil pan mating surface in preparation for installation.Summit sells these Chevrolet Performance muscle car oil pan kits (P/N NAL-19212593), which should work perfectly in most applications. The kit comes complete with the oil pickup tube and gasket. We installed the oil pump pickup tube first, followed by the oil pan. We also added a Royal Purple oil filter to keep our oil nice and clean.Summit recently released its own intake manifold (P/N SUM-226122B), so we ordered one for our engine. This manifold is fabricated from aluminum and features a 92mm throttle bore. We ordered ours with a black powder-coated finish.Before securing it in place, we realized that there were some ports in the bottom of the manifold that needed our attention. Since there wasn’t a provision for the MAP sensor, we used one of the ports. Then we plugged two of the other ports and threaded a hose barb fitting into the last remaining hole, but you’ll have to wait until later to see what that’s for.With the intake manifold prepped with the provided O-ring seals, we bolted it in place using the provided hardwareA Holley throttle body controls the air entering the intake manifold. Holley’s Sniper throttle body (P/N SNE-860004) works perfectly with the intake manifold because it has a matching 92mm bore, four-bolt pattern, and it’s available with black anodizing.We also ordered a set of Holley aluminum valve covers (P/N HLY-241-112). These valve covers are the tall version. Although the Trick Flow rockers should fit under the stock height valve covers, we had nothing to lose by ordering the taller versions. The black powder coat on these is nearly identical to the Summit intake manifold, so they match perfectly.The intake manifold comes with mounting locations for the fuel rails as well. We ordered the Summit fuel rail kit (P/N SUM-227150), which came with everything we needed to get the fuel rails in place, including these mounts. After the mounting tabs were loosely in place, we inserted a set of fuel injectors into the fuel rails and aligned them with the machined ports in the intake manifold.Using a bit of lube on the O-ring seals of the injectors, we put the assembly in place and used the provided hardware to secure the rail.These Hedman Hustler headers (P/N HED-45666) are a mid-length design, featuring 1 ¾-inch primaries and a 3-inch collector. We opted for the silver ceramic coating, which should help keep engine compartment temperatures lower.Installing the headers while the engine was on the stand was about as easy as it gets. We used the supplied gaskets and hardware and installed them loosely. Most likely we will have to install the engine into our project with the headers removed.Once the headers were installed, we added the new coil packs (P/N SUM-850504-8) and spark plug wires (P/N SUM-867828). We did have to pick up our own hardware for the coils, but some stainless Allen-head bolts and washers were readily available at our local hardware store.There are a few things going on in this photo. First, remember the barbed fittings we installed under the intake manifold? One was for the MAP sensor and we simply slid a short piece of vacuum hose onto that and the MAP sensor (P/N NAL-12592525). The second pertinent item is the steam vent line kit from Trick Flow (P/N TFS-306SB601). This kit comes with the fittings and lines needed to plumb the steam vent lines. The last thing you’ll notice is that we still need to put some hardware in the cam position sensor.To finish this portion of the build we installed the final two sensors, which go on the side of the Holley throttle body. The first is for the top; it’s the IAC or Idle Air Control Motor (P/N HLY-543-105). The bottom one is the TPS or Throttle Position Sensor (P/N SNE-870001). Both are Holley parts, so they fit perfectly into the throttle body. Again, we had to provide our own hardware, but it was easy to get from our local hardware store.This is the completed engine. You are seeing some extra parts on the front, and that was intentional. Stay tuned for our next tech article where we’ll explain all about that supercharger setup.
FREQUENTLY ASKED QUESTIONS
What are the parts required for a 1,000 HP 6.0 LS build?
Parts Required for a 1,000 HP 6.0 LS Build
Building a 1,000 horsepower 6.0 LS engine requires a carefully selected list of high-performance components. Here’s a breakdown of the essential parts:
Turbocharging Components
80mm Turbocharger: Provides the significant boost needed to achieve high horsepower.
Forward Facing Turbo Header Kit: Ensures optimal exhaust flow for the turbo setup.
Turbo Wastegates (44mm, two required): Critical for regulating exhaust gases and turbo pressure.
Cylinder Heads and Valvetrain
High-Performance Cylinder Heads: For example, CNC-machined heads with an 11-degree angle for improved airflow, ensuring better performance.
Dual Valve Spring Kit: Enhances engine reliability at high RPMs by managing the increased valve lift.
Stage 2 Camshaft: Designed to maximize power output with a balance of duration and lift.
Intake and Fuel System
High-Flow Intake Manifold: Ensures adequate air delivery to the cylinders.
85 lb/hr Fuel Injectors (Set of 8): Required to provide sufficient fuel under high load and boost conditions.
102mm Throttle Body: Offers increased airflow capacity to match the larger intake manifold.
Engine Fasteners and Gaskets
Head Stud Kit: Ensures a secure and stable cylinder head attachment to cope with high boost pressures.
Complete LS Engine Gasket Set: Necessary for sealing all engine components and maintaining reliability.
Balancer Bolt: A critical piece for securing the harmonic balancer, which is important to engine balance and function.
Additional Recommended Parts
Performance Crankshaft and Rods: To handle the increased stress and avoid failure under high power conditions.
High-Flow Fuel Pump: Ensures that the engine always has enough fuel at higher horsepower levels.
Aftermarket Engine Management System: For precise control over fuel and ignition timing, which is crucial in high-performance builds.
Summary
Each of these components plays a vital role in achieving the 1,000 horsepower goal for a 6.0 LS engine build. Proper selection and installation of these parts will lead to a reliable, high-performance setup.
What additional parts are recommended for a 700 HP 6.0 LS build if budget allows?
Recommended Additional Parts for a 700 HP 6.0 LS Build
If your budget allows, investing in these additional components can significantly enhance your 700 HP 6.0 LS build:
Roller Lifters:Opt for high-performance roller lifters (such as LS7 types) and make sure to order two sets.
Lifter Trays:Secure lifters in place with four high-quality lifter trays, ensuring optimal performance and longevity.
High-Performance Pushrods:Consider Comp Cams Hi-Tech pushrods for superior strength and durability.
Replacement Timing Chain:A durable, OEM-grade timing chain from GM will help maintain precise timing and improve engine reliability.
Supercharger Pulley:An Edelbrock E-Force 2.75-inch supercharger pulley can significantly boost your power output, taking your build to the next level.
These additional parts not only complement your existing setup but also ensure that your engine runs smoothly at higher performance levels.
What are the parts required for a 700 HP 6.0 LS build?
Essential Parts for a 700 HP 6.0 LS Build
Achieving a 700 HP build with a 6.0 LS engine requires a well-thought-out selection of components. Below are the essential parts you will need:
Core Components
Supercharger: A high-performance supercharger, ideally paired with a modestly-sized pulley to optimize boost.
Camshaft: A turbo or performance camshaft suitable for high horsepower.
Valve Springs: Performance-grade valve springs to handle increased lift and duration.
Timing Cover Gasket Set: Ensure a proper seal to maintain engine integrity.
Additional Recommended Components
To further enhance your build, consider adding the following items:
Roller Lifters: High-performance lifters for better valve operation; ensure you get the correct quantity.
Lifter Trays: Keeps the lifters aligned and functioning smoothly; often sold in packs.
Pushrods: High-tech pushrods to manage the increased stress from the high-performance camshaft.
Replacement Timing Chain: A robust timing chain to withstand the higher RPMs.
Supercharger Pulley Upgrade: Consider a smaller pulley for additional boost.
Notes
Be mindful of your budget when planning your build. If you can allocate additional funds, the extra recommendations will significantly enhance performance and reliability.
This list provides a comprehensive overview of the necessary parts to transform a 6.0 LS engine into a 700 HP powerhouse. Selecting the right components is critical to achieving your horsepower goals while maintaining engine reliability and performance.
What additional parts are recommended for a 600 HP 6.0 LS build if budget allows?
Recommended Parts for a 600 HP 6.0 LS Build (Budget Permitting)
When planning a 600 HP 6.0 LS build, consider adding these high-performance components to maximize your engine’s potential:
Shaft Mount Rocker System: Ensures stability and precise valve operation at high RPMs.
Hi-Tech Pushrods: Enhances durability and strength, reducing flex under load.
Roller Lifters (order two sets): Lowers friction for better efficiency and performance.
Lifter Trays (order four sets): Provides secure housing for lifters, preventing rotation and misalignment.
Replacement Timing Chain: A robust timing chain is crucial for maintaining proper engine timing under extreme conditions.
If you need a throttle body that integrates IAC and TPS sensors, consider the FiTech 102mm throttle body as an alternative. This option includes all necessary sensors, offering a seamless replacement for the Holley variant typically recommended.
What are the parts required for a 600 HP 6.0 LS build?
To achieve a 600 HP build for your 6.0 LS engine, you’ll need a combination of high-performance components. Here’s a comprehensive list:
Cylinder Heads
276cc Aluminum Heads(Order two)
Intake System
High-Flow Intake Manifold
65 lb/hr Fuel Injectors(Set of 8)
102mm Throttle Body
Camshaft
Stage 2 Camshaft
Valve Train
Dual Valve Spring Kit
Fasteners
Head Stud Kit
Gaskets and Hardware
Engine Gasket Set
Balancer Bolt
With these components, your 6.0 LS engine will be well on its way to delivering 600 HP. By opting for high-quality parts, you ensure durability and peak performance.
What additional parts are recommended for a 550 HP 6.0 LS build if budget allows?
Recommended Additional Parts for a 550 HP 6.0 LS Build
If you’re looking to elevate your 550 HP 6.0 LS build and your budget allows, consider adding these high-performance parts to your shopping list:
Essential Upgrades:
Trunnion Upgrade Kit
High-Performance Roller Lifters(buy two sets)
Lifter Trays(purchase four sets)
Replacement Timing Chain
Throttle Body (92mm)
Fuel System Considerations
The intake system doesn’t come with fuel rails. You’ll need to either find an OEM fuel rail or opt for high-quality aftermarket options.
Throttle Body Sensor Compatibility
If your existing throttle body lacks IAC and TPS sensors, you can replace it with a comprehensive 92mm throttle body, which includes these essential components.
These additions will not only boost your engine’s performance but also enhance its reliability and longevity.
What additional parts are recommended for a 500 HP 6.0 LS build if budget allows?
Recommended Parts for a 500 HP 6.0 LS Build (If Budget Allows)
When aiming for a powerful 500 HP 6.0 LS build, investing in additional high-quality parts can significantly enhance performance. If budget constraints aren’t an issue, consider incorporating the following components into your build:
Trunnion Upgrade Kit: Strengthening the rocker arms can prevent valve train issues under high performance.
Roller Lifters (Order Two Sets): These provide better stability and increased RPM potential, crucial for high-horsepower applications.
Lifter Trays (Order Four Sets): Ensuring that the lifters stay in place is vital, especially under intense engine stress.
Replacement Timing Chain: A robust timing chain maintains precise timing, reducing the risk of engine damage at high performance levels.
High-Flow Throttle Body: Opt for a 92mm throttle body to improve air intake, essential for achieving higher horsepower.
Additionally, the Trailblazer SS intake doesn’t come with fuel rails. You’ll need to either source OEM fuel rails or utilize aftermarket options. Aftermarket fuel rail kits designed for LS truck intakes are a practical choice.
If you lack a throttle body to transfer IAC (Idle Air Control) and TPS (Throttle Position Sensor) sensors, consider choosing a throttle body that includes these sensors, ensuring compatibility and ease of installation.
These upgrades not only boost your engine’s performance but also contribute to its overall reliability and longevity, allowing you to enjoy the full potential of your 6.0 LS build.
What fuel system modifications are needed to support different horsepower levels in a 6.0 LS build?
Fuel System Modifications for Different Horsepower Levels in a 6.0 LS Build
When building a high-performance 6.0 LS engine, various fuel system modifications are necessary to support different horsepower levels.
Basics for 400 Horsepower
To achieve around 400 horsepower, a simple cam swap can often suffice. However, at this power level, the stock injectors and fuel delivery system will be near their limits. You might need to upgrade these components for optimal performance:
Camshaft: Upgrade for additional airflow.
Stock Injectors: Ensure they are in good working condition; consider higher-flow options if necessary.
Fuel Delivery System: Likely to need replacement—consider converting to an electronic fuel injection (EFI) setup with in-tank fuel pumps, regulators, and fuel lines.
For Higher Horsepower Levels (E85 Considerations)
For builds aiming at significantly higher horsepower, moving to E85 fuel becomes advantageous:
E85-Compatible Components: You will need E85-compatible fuel pumps, lines, and injectors to handle the increased fuel volume and different chemical properties.
Injector Variations
LS fuel injectors come in various flow rates, heights, and connector styles, which can complicate your selection:
Flow Rates & Heights: Match injectors to your intended horsepower. Different heights might require spacers or adjustments.
Connector Styles: Injectors come with various connectors depending on their application year and model. Verify the compatibility with your wiring harness or use adapter connectors.
Historical Context: Injector Types
The 6.0 LS engines have used different injectors over the years, resulting in varied wiring connector styles and heights:
Wiring Connectors: Ensure compatibility with your existing harness or get adapters if necessary.
Aftermarket Solutions: Opt for new injectors rather than mixing used ones with potentially different flow rates and styles.
Recommendations
To avoid potential issues:
Purchase Compatible Injectors: Ensure they match your specific wiring harness and engine intake setup.
Injector Spacers: Use these if there are height discrepancies, especially when mixing truck injectors with car intakes.
Consistency: Avoid mixing old and new injectors to maintain consistent flow rates and performance.
By paying careful attention to these fuel system components and their compatibility, you’ll streamline the process of building a reliable, high-performance 6.0 LS engine that meets your horsepower goals.
What is the Maximum Reliable Horsepower for a 6.0 LS Engine Without Major Internal Upgrades?
If you’ve been diving into 6.0 LS builds, you might have seen impressive feats of horsepower in various YouTube videos. While these examples often achieve sky-high numbers using stock bottom ends (SBEs) under extreme conditions, what’s realistic for a reliable, street-worthy build?
Realistic Expectations
The key to a long-lasting 6.0 LS build is managing expectations. Stock bottom end 6.0 LS engines have been shown to handle substantial horsepower, but pushing them to their limits on the street can lead to reliability issues. Here are the considerations:
Stock Foundations: Factory 6.0 LS engines are designed with a baseline horsepower in the 300s.
Boost Potential: Many enthusiasts push these engines well beyond 500 with the help of increased ring gaps, boost-friendly camshafts, and aftermarket heads and intakes.
Case Study: Conservative Yet Powerful Build
For example, a 6.0L LS with refreshed pistons, rings, and bearings, paired with a performance cam, can easily reach around 496 horsepower and 460 lb/ft of torque without overhauling major internals.
Achievable and Reliable Power
So, what’s the maximum reliable horsepower? A safe bet is aiming for around 500 horsepower naturally aspirated, or just over, when fitted with better heads, cam, and intake. This level of power doesn’t necessitate major internal upgrades and maintains a better balance between performance and durability.
Components to Upgrade:
Heads: Aftermarket heads can significantly improve airflow.
Camshaft: Boost-friendly camshafts enhance power without overly stressing the engine.
Intake: An aftermarket intake manifold can complement the other upgrades and help achieve higher power levels.
Understanding Limitations and Weaknesses
Weak Links: The Gen III engines, in particular, have been noted for their weaker powdered metal rods which become a vulnerability at higher boost levels.
Boost Considerations: Adding boost can quickly escalate the need for stronger internal components. For major boosts, rods and pistons will likely need upgrading to ensure the engine’s longevity.
Conclusion
For a reliable street setup using a 6.0 LS engine without extensive internal modifications, aim for 500-600 horsepower. Beyond this range, the necessity for significant upgrades grows, making the engine less suited for long-term everyday use. Keeping the build within these parameters ensures a balance of power, performance, and durability.
How Much Horsepower Can a 6.0 LS Make?
If you’re diving into the world of 6.0 LS engine builds, you’re likely curious about its horsepower potential. The 6.0 LS, known for its robust design and performance, offers impressive capabilities, especially when modified.
Stock Capabilities and Beyond
From the factory, a stock 6.0 LS engine typically delivers just over 300 horsepower. However, many enthusiasts push these engines far beyond their original specs. With stock bottom end (SBE) setups, some have achieved over 25 pounds of boost, hitting remarkable power levels. But the real question is, how much horsepower can you realistically expect?
Modified Power Potential
With the right modifications, the 6.0 LS can produce incredible horsepower numbers. Here’s a general outline of common modifications and their impacts:
Increased Ring Gap: Helps with boost pressure and longevity.
Boost-Friendly Camshaft: Optimizes airflow for higher performance.
Aftermarket Heads and Intake: Improve breathing and efficiency.
When these modifications are combined, high-mileage 6.0 LS engines have been known to produce over 1,400 horsepower.
Factors Affecting Real-World Performance
While achieving over 1,400 horsepower is possible on a test bench, it’s critical to consider your specific setup and goals. Real-world performance on the street can vary due to:
Engine Health: Older engines may require more attention and rebuilding.
Boost Levels: Higher boost leads to more stress on engine components.
Tuning: Precise engine tuning is crucial for reliability and performance.
Supporting Mods: Components like fuel systems and intercoolers play significant roles.
Conclusion
The 6.0 LS engine, with the right modifications, can easily push well past its stock limits, reaching north of 1,400 horsepower. However, remember that street performance may differ, and achieving high horsepower involves careful planning and execution. Be sure to assess your goals and invest in quality components to make the most of your 6.0 LS build.
What are the differences between the LQ9 and LQ4 6.0 LS engines?
Differences Between the LQ9 and LQ4 6.0 LS Engines
When diving into the world of 6.0 LS engines, you’ll commonly encounter the LQ9 and LQ4. Both are robust choices for junkyard builds but have key differences that set them apart.
LQ9 Engine
Iron Block Construction: The LQ9 features a strong iron block, making it ideal for boosted applications.
Flat Top Pistons: These pistons offer higher compression, resulting in a boost in horsepower and torque compared to other 6.0 LS engines.
Performance Specs: Typically, an LQ9 produces around 345 horsepower and 380 lb-ft of torque.
Years and Vehicles: This engine was commonly found in 2002-2007 Chevy, GMC, and Cadillac trucks, vans, and SUVs. Look for the 8th digit of the VIN to be an “N” to identify an LQ9.
LQ4 Engine
Iron Block Construction: The LQ4 also features an iron block similar to the LQ9, which provides a strong foundation for various builds.
Dished Pistons: Unlike the LQ9’s flat tops, the LQ4 employs dished pistons that result in a lower compression ratio.
Performance Specs: The LQ4 produces anywhere from 15 to 45 horsepower less than the LQ9, depending on the model year.
Years and Vehicles: This engine was available in 1999-2007 GM trucks, vans, and SUVs. Check for the 8th digit of the VIN to be a “U” to identify an LQ4.
Summary
The LQ9 excels in higher compression and power output due to its flat top pistons, making it a popular choice for performance builds. In contrast, the LQ4, with its dished pistons, offers lower compression and slightly less horsepower but remains a solid option due to its similar iron block construction.
Whether you prioritize higher power potential or are open to a slightly lower power threshold, both engines offer great foundations for a budget-friendly, high-performance build.
How can I find a cheap 6.0 LS engine for a budget build?
How to Find a Cheap 6.0 LS Engine for a Budget Build
Start at Your Local Salvage Yard
One of the easiest and most effective ways to find a cheap 6.0 LS engine is by visiting your local salvage yard. Salvage yards are treasure troves filled with tens of thousands of vehicles, many of which house the coveted 6.0 LS engine.
Look for Popular Models
For a budget-friendly build, focus on popular models known for their availability and performance potential. A standout option is the LQ9 engine.
What is the LQ9?
The LQ9 is an iron block Gen 3 6.0 LS engine.
Found in 2002-2007 trucks, vans, and SUVs such as Chevy, GMC, and Cadillac.
Recognizable by the 8th digit of the VIN being an ‘N’.
Marketed as Vortec HO 6000 or Vortec MAX, making it easy to identify.
Why Choose the LQ9?
Plentiful and Affordable: Its widespread use in various GM vehicles makes it abundant and cost-effective.
Strong Iron Block: Ideal for boosting performance, the robust iron block can handle more power upgrades.
Flat Top Pistons: These factory pistons provide higher compression, translating to increased horsepower and torque. Expect around 345HP and 380 lb-ft of torque.
Tips for Salvage Yard Hunting
Do Some Research: Identify which vehicles commonly come with the engine you want.
Check the VIN: Use the VIN to ensure you’re picking the right engine model.
Inspect the Engine: Look for obvious signs of damage or excessive wear that could affect its performance.
Negotiate: Don’t be afraid to haggle to get the best deal possible.
Plan Your Budget Build
Starting your budget 6.0 LS build with a salvage yard find means you’ll save a significant amount of money upfront. Use these savings to invest in performance parts that will help you achieve the horsepower goals for your project. Whether you’re working on a muscle car or a classic truck, a well-chosen 6.0 LS engine from a salvage yard can be the heart of a powerful, budget-friendly build.
What is the Best 6.0 LS Engine for a Performance Build?
When it comes to building a high-performance 6.0 LS engine, the LQ9 stands out as a top contender. Here’s why this engine is a popular choice among enthusiasts:
Characteristics of the LQ9
Iron Block Durability: The LQ9 features a robust iron block, which handles high stress and boost more effectively than its aluminum counterparts. This makes it ideal for turbocharging or supercharging applications.
Factory Compression Advantage: Equipped with factory flat-top pistons, the LQ9 has a slight compression edge over other 6.0L LS engines. This results in a notable increase in horsepower and torque. To put it in perspective, the LQ9 typically delivers around 345 horsepower and 380 lb-ft of torque.
Affordability and Availability: Originally found in various 2002-2007 trucks, vans, and SUVs, the LQ9 is abundant in junkyards, making it an affordable option for builders. Additionally, its widespread use means that finding replacement parts is usually straightforward and inexpensive.
Versatile Application: Whether you’re working on a muscle car, a classic truck, or another high-performance project, the LQ9 adapts well to various builds. Its strong performance and reliability ensure that it meets the demands of a wide range of automotive projects.
Identifying an LQ9
Look for the 8th digit ‘N’ in the VIN when searching for an LQ9 in donor vehicles. These engines are often branded as Vortec HO 6000 or Vortec MAX. An easy visual cue is the distinctive plastic engine cover.
Conclusion
For a budget-friendly, robust, and versatile 6.0 LS engine, the LQ9 is the optimal choice. Its combination of durability, performance, and availability makes it highly suitable for enthusiasts aiming to create a powerhouse on a reasonable budget.
What tools are helpful for building a 6.0 LS engine?
To finish this portion of the build we installed the final two sensors, which go on the side of the Holley throttle body. The first is for the top; it’s the IAC or Idle Air Control Motor (P/N HLY-543-105). The bottom one is the TPS or Throttle Position Sensor (P/N SNE-870001). Both are Holley parts, so they fit perfectly into the throttle body. Again, we had to provide our own hardware, but it was easy to get from our local hardware store.
When building a 6.0 LS engine, there are several specialized tools that can make the process much smoother. Here are some essentials:
LS Crank Holding Tool: This tool is crucial for holding the crank in place when torquing the balancer bolt.
LS Balancer Installer: Ensures that the balancer is installed without damaging the crankshaft.
LS Valve Spring Compressor: Makes it easier to remove and install valve springs without damaging them.
LS Trunnion Upgrade Tool: This is particularly useful for upgrading the stock rockers to a more robust trunnion system.
LS Engine Mock Up Block: A lightweight alternative for trial-fitting components without the weight of a complete engine.
T4 Flange Turbo Mock Up Tool: Helps in aligning and fitting the turbo system accurately.
These tools, combined with the correct sensors and hardware, ensure a smoother build process and optimal engine performance.
What is the discussion around the intake manifold choice for the build?
Understanding the Intake Manifold Decision for the Build
Choosing the right intake manifold for this build involves weighing performance benefits with aesthetic preferences. While there are options available that boost low to mid-range power and torque, the High-Ram model stands out for its high RPM capabilities.
Performance Highlights
RPM Range: This manifold competes closely with others up to about 5,000 RPM. However, its true advantage becomes evident from 5,000 to over 7,000 RPM, where it significantly enhances horsepower and torque.
Engine Bay Compatibility: With a generously sized engine bay in the ’78 F-100, the High-Ram fits seamlessly, allowing for optimal performance without compromising on space.
Aesthetic Appeal
The ability to powder-coat the manifold adds a level of customization that aligns with the truck’s overall color scheme. This not only enhances the engine’s appearance but also caters to enthusiasts keen on both function and form.
In summary, while other models may better serve certain power ranges, the High-Ram is chosen not only for its high-range performance but also for its compatibility and visual appeal in this specific truck build.
What vehicle is the engine from the budget build being installed in?
The engine from the budget build is being installed in a vintage 1978 Ford F-100. Isn’t that an exciting choice?
How does the Holley Hi-Ram Intake Manifold perform compared to other intakes?
Exploring the Performance of the Holley Hi-Ram Intake Manifold
When considering the performance of the Holley Hi-Ram Intake Manifold in comparison to other intake options, it’s important to analyze its capabilities across various power ranges. For vehicles that favor low to mid-range power and torque, there are indeed alternative intakes designed specifically for such needs. However, the Holley Hi-Ram shines in scenarios where upper-range power is prioritized.
Performance Metrics:
Comparable Power: Up to 5,000 RPM, this manifold performs on par with some of the well-regarded standard intakes available.
Enhanced Upper-Range Output: Beyond the 5,000 RPM mark, the Hi-Ram begins to distinguish itself, delivering steadily increasing horsepower and torque up to and beyond 7,000 RPM. This makes it an excellent choice for high-performance enthusiasts looking to push their engines further.
Design and Fit:
Engine Compatibility: Its design accommodates large engine bays, such as in the ’78 F-100, ensuring a seamless fit and integration.
Aesthetic Appeal: Available in customizable finishes, the Hi-Ram can be powder-coated to match your vehicle’s unique color scheme, adding a visually appealing touch to its robust performance capabilities.
In summary, while the Holley Hi-Ram Intake Manifold may not be the optimal solution for all low-end power needs, it excels in delivering significant gains in upper RPM ranges, making it a compelling choice for high-performance builds.
What components are being used in the Summit Racing’s Budget 6.0L LS Build?
Here’s how the new BluePrint Engines 6.0L, 364-ci short-block engine (P/N MLL-BPLS3640) showed up after we ordered it from Summit Racing. Our first order of business was to get the engine unpacked and on an engine stand so we could inspect it and make sure all was well.
Once we received the Trick Flow top-end kit (P/N TFS-K306-550-470), we laid it out on a table and took a quick inventory. The kit comes complete with new, assembled heads. The heads boast a ton of changes from the stock versions to provide extra strength and power. The kit also comes with a new camshaft featuring an advertised 291/295 duration, .595/.595 lift, and 112 degrees of lobe separation. The camshaft is designed for use with the pushrods and roller rockers, which are also included with the kit. New head gaskets and head bolts round out the list of included parts.
To further enhance the build, we selected a range of high-performance components. Here’s a breakdown of the key parts:
Pro LS Vortec Truck Swap Camshaft – “Big Torkinator” (P/N SUM-8728R1): Known for its torque-producing capabilities, this camshaft is a crucial addition.
LS7 Lifters with Lifter Guides (P/N SUM-HTLSKIT2): These lifters ensure smooth operation and reliability.
.600″ Lift Beehive Springs (P/N SUM-174004): Designed to handle high lift demands, these springs add durability.
True Roller Timing Set (P/N SUM-G6640): Provides precise timing for optimal engine performance.
Holley Hi-Ram Intake Manifold (P/N HLY-300-122): This manifold tops off the build, enhancing airflow and power.
Once everything arrived, we laid it out and took inventory. We picked up everything from new ignition coils to front and rear covers, matching valve covers, and an intake manifold. With this comprehensive list of components, we’re set for a powerful build that promises both strength and performance.
Are there any upcoming parts to the series?
This is the first part of a planned four-part series, with future episodes promised to continue the project.
What are some of the key parts used in the Summit Racing build series?
Here’s how the new BluePrint Engines 6.0L, 364-ci short-block engine (P/N MLL-BPLS3640) showed up after we ordered it from Summit Racing. Our first order of business was to get the engine unpacked and on an engine stand so we could inspect it and make sure all was well. Once we received the Trick Flow top-end kit (P/N TFS-K306-550-470), we laid it out on a table and took a quick inventory.
The kit comes complete with new, assembled heads. The heads boast a ton of changes from the stock versions to provide extra strength and power. The kit also comes with a new camshaft featuring an advertised 291/295 duration, .595/.595 lift, and 112 degrees of lobe separation. The camshaft is designed for use with the pushrods and roller rockers, which are also included with the kit. New head gaskets and head bolts round out the list of included parts.
In addition to these components, the build incorporates several other key parts to ensure optimal performance:
Pro LS Vortec Truck Swap Camshaft – SUM-8728R1 “Big Torkinator”
LS7 Lifters with Lifter Guides – SUM-HTLSKIT2
.600″ Lift Beehive Springs – SUM-174004
True Roller Timing Set – SUM-G6640
Holley Hi-Ram Intake Manifold – HLY-300-122
Holley Sniper Throttle Body – SNE-860004-1
Holley Terminator X Max Engine Management System – HLY-550-917
Summit Racing Pro LS Aluminum Oil Pan – SUM-121200B
Melling Oil Pump – MEL-M295
ICT Billet LS Lifter Valley Cover – ICB-551629G
Trick Flow Timing Chain Dampener – TFS-K30675600
Summit Racing LS Oil Galley Barbell – SUM-120116
Dura-Bond Bearings – DUR-CH-25
These parts were meticulously chosen to complement the core components from the Trick Flow kit and significantly enhance the build’s overall performance. There are a lot of parts necessary to complete the engine build, and Summithelped us put together a list of everything we needed. Once everything arrived, we laid it out and took inventory. We picked up everything from new ignition coils to front and rear covers, matching valve covers, and an intake manifold.
We use cookies to enhance your browsing experience, serve personalized ads or content, and analyze our traffic. By clicking "Accept All", you consent to our use of cookies. Visit our Cookie Policy for more info.
 JEREMY RICE
.
May 23, 2019
.
C10 Builders Guide
.
JEREMY RICE
.
May 23, 2019
.
C10 Builders Guide
.


")


 and new bolts (P/N NAL-11561455)")


")
")


")

 installed")

")


")


")
")


")

")


")
")


Share Link